1. Introduktion
The SONICAKE EQ Equalizer is a professional 10-band graphic equalizer pedal designed with an analog circuit. It features ten carefully selected frequency bands, allowing musicians to precisely and quickly shape their instrument's tone. This pedal is suitable for a variety of instruments and is built with a true bypass circuit to maintain signal integrity.
This manual provides detailed instructions for the setup, operation, and maintenance of your EQ Equalizer pedal to ensure you achieve the best possible sound.
2. Produktfunktioner
- 100% Analog 10-Band Equalizer: Based on classic EQ effect pedal frequency bands.
- Adjustable Gain Range: ±15dB adjustable gain range for each band, suitable for various instruments.
- Precise Tone Shaping: 11 high-quality sliders for quick and accurate parameter control.
- True Bypass Circuit: Ensures a clean signal path when the effect is disengaged.
- Holdbar konstruktion: Aluminium-alloy casing for lightweight yet robust performance.
3. Betjeningselementer og funktioner
Familiarize yourself with the controls of your SONICAKE EQ Equalizer pedal:

Billede: Forside view of the SONICAKE EQ Equalizer pedal with numbered control labels.
- Input Jack (1/4 inch): Connect your instrument or the output of a preceding effect pedal here.
- DC 9V strømindgang: Connect a standard 9V DC center-negative power supply (not included).
- Output Jack (1/4 inch): Forbind dette med din amplifier eller indgangen på den næste effektpedal i din kæde.
- Frequency Band Sliders (31.25Hz to 16kHz): Ten individual sliders to boost or cut specific frequency ranges by ±15dB. Adjust these to shape your tone.
- Level Slider: Controls the overall output volume of the pedal. Use this to match the volume when the effect is engaged or disengaged.
- Fodkontakt: Engages or disengages the equalizer effect. This pedal features true bypass, ensuring your signal remains unaffected when the pedal is off. The LED indicator above the footswitch illuminates when the effect is active.

Billede: Top-down view of the SONICAKE EQ Equalizer pedal, showing all sliders and the footswitch.

Image: A hand demonstrating the adjustment of the frequency sliders on the EQ Equalizer pedal.
4. Opsætning
Follow these steps to set up your EQ Equalizer pedal:
- Strømtilslutning: Connect a standard 9V DC center-negative power supply (not included) to the DC 9V input jack (2). Ensure the power supply meets the specified voltage og polaritetskrav.
- Instrumentindgang: Connect your instrument (e.g., guitar) or the output of a previous effect pedal to the Input Jack (1) on the right side of the pedal.
- Udgangsforbindelse: Connect the Output Jack (3) on the left side of the pedal to your amplifier's input or the input of the next effect pedal in your signal chain.
- Tænd: Når alle forbindelser er sikre, skal du tænde for din amplifter og andet udstyr.

Billede: En vinklet view of the EQ Equalizer pedal, highlighting the DC 9V power input and its central negative polarity requirement.
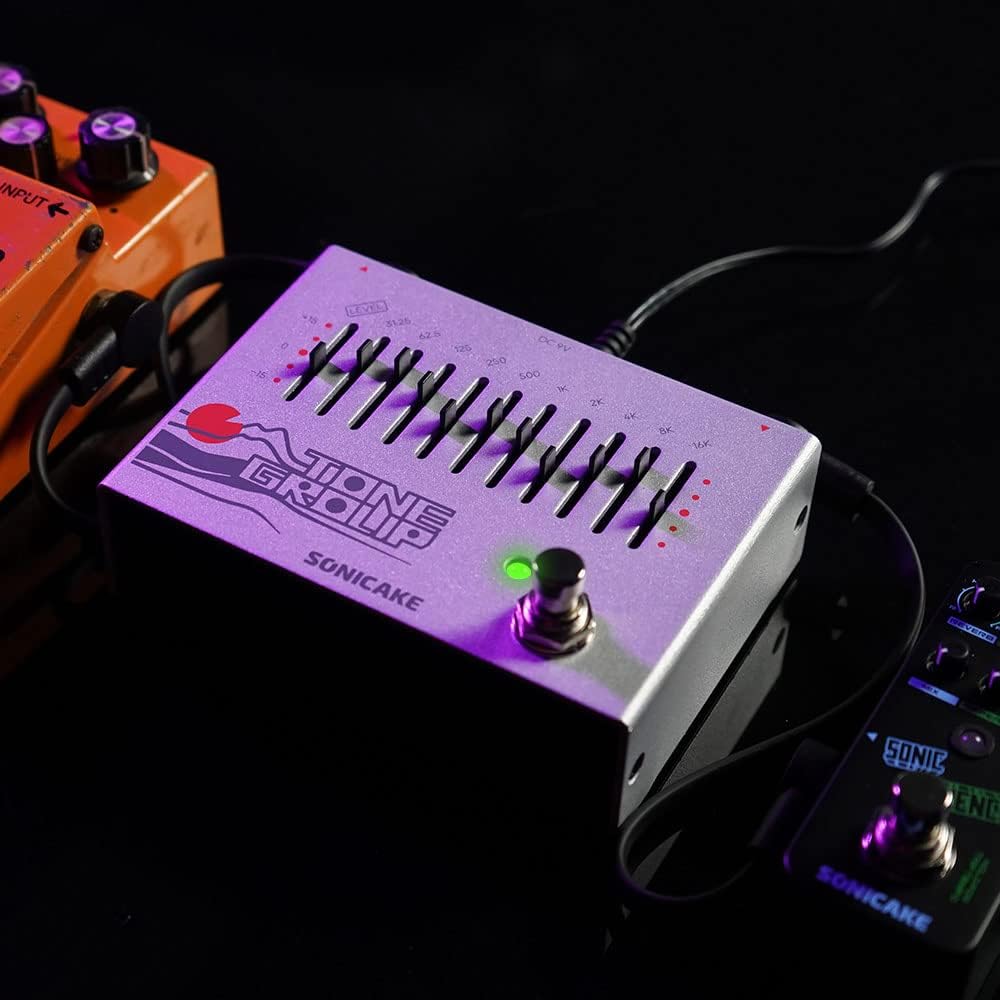
Image: The EQ Equalizer pedal integrated into a pedalboard setup, demonstrating typical connections.
5. Betjeningsvejledning
To operate your SONICAKE EQ Equalizer pedal:
- Engage/Disengage Effect: Press the footswitch (6) to toggle the equalizer effect on or off. The LED indicator will light up when the effect is active.
- Adjusting Frequency Bands: Use the ten frequency band sliders (4) to boost or cut specific frequencies. Moving a slider up boosts that frequency, while moving it down cuts it. Experiment with different settings to find your desired tone.
- Adjusting Overall Level: Use the Level slider (5) to control the overall output volume of the pedal. This is useful for compensating for volume changes introduced by EQ adjustments or for matching the volume with other pedals in your chain.
- Tone Shaping Tips:
- Low Frequencies (31.25Hz - 125Hz): Affect bass and sub-bass. Boosting can add warmth and fullness; cutting can reduce muddiness.
- Mid Frequencies (250Hz - 2kHz): Crucial for presence and clarity. Boosting around 500Hz-1kHz can add body; cutting can reduce harshness. Boosting 2kHz can add bite.
- High Frequencies (4kHz - 16kHz): Control treble and brilliance. Boosting can add sparkle and air; cutting can reduce hiss or harshness.

Billede: Nærbillede view of the footswitch on the EQ Equalizer pedal, illustrating its true bypass functionality.
6. Vedligeholdelse
For at sikre din pedals levetid og optimale ydeevne:
- Rensning: Brug en blød, tør klud til at rengøre pedalens yderside. Undgå slibende rengøringsmidler eller opløsningsmidler.
- Opbevaring: Opbevar pedalen et tørt sted, væk fra ekstreme temperaturer, fugtighed og direkte sollys.
- Strømforsyning: Always use a regulated 9V DC center-negative power supply. Incorrect power can damage the unit.
- Forbindelser: Periodically check all cable connections for wear and tear.
7. Fejlfinding
If you encounter issues with your EQ Equalizer pedal, consider the following:
- Ingen lyd:
- Sørg for, at strømforsyningen er korrekt tilsluttet og fungerer.
- Kontrollér alle instrumentkabler for korrekt forbindelse og funktionalitet.
- Bekræft, at ampLyfteren er tændt, og dens lydstyrke er op.
- Ensure the pedal's Level slider is not set to minimum.
- Svag eller forvrænget lyd:
- Check the power supply; insufficient power can cause distortion.
- Ensure instrument cables are not faulty.
- Adjust the Level slider to prevent signal clipping.
- Uønsket støj/brummen:
- Use a high-quality, regulated power supply.
- Sørg for, at alle kabler er korrekt afskærmet og tilsluttet.
- Try isolating the pedal from other power sources or noisy equipment.
8. Specifikationer
| Modelnummer | QDS |
| Varens vægt | 12.7 ounce (0.36 kilo) |
| Produktdimensioner | 9 x 5.5 x 12.4 cm (L x B x H) |
| Strømkilde | DC Power Supply (9V Center Negative, not included) |
| Voltage | 9 volt |
| Signalformat | Analog |
| Connector Type | 1/4 tommer lydstik |
| Hardware-interface | 1/4-tommer lyd |
9. Garanti og support
For warranty information, technical support, or service inquiries regarding your SONICAKE EQ Equalizer pedal, please refer to the documentation included with your purchase or visit the official SONICAKE webwebsted. Gem din købsbevis i tilfælde af garantikrav.


