Indledning
Welcome to the user manual for your new Pro-Ject Debut III Phono SB Audiophile Turntable. This manual provides essential information for setting up, operating, and maintaining your turntable to ensure optimal performance and longevity. Please read these instructions carefully before first use.

Figure 1: Pro-Ject Debut III Phono SB Turntable (Walnut)
The Pro-Ject Debut III Phono SB is an audiophile-grade turntable featuring an 8.6" aluminum tonearm, electronic speed selection, and a pre-mounted Ortofon OM5e phono cartridge. It includes a built-in phono preamp for alsidig tilslutning.
Pakkens indhold
Before beginning setup, please ensure all components listed below are present in your package:
- Pro-Ject Debut III Phono SB Turntable
- Støvbetræk
- Filtmåtte
- Strømforsyning
- RCA Cable (semi-balanced shielded audio cable, 1.23m)
- Standard Flat Belt (for 33/45 RPM)
- Vinkelmåler til patronjustering
- Round Belt (for 78 RPM)
- Anti-skøjteløbsvægt
- Adapter for 7" Singles
- Ortofon OM5e Phono Cartridge (pre-mounted)
Opsætningsinstruktioner
Follow these steps carefully to set up your turntable.
1. Placering
Placer pladespilleren på en stabil, plan overflade væk fra direkte sollys, varmekilder og stærke vibrationer. Sørg for tilstrækkelig ventilation omkring enheden.
2. Montering af tallerken og bælte
- Carefully place the heavy steel platter onto the turntable spindle.
- Locate the drive motor pulley. Gently stretch the standard flat belt (for 33/45 RPM) around the motor pulley and the inner rim of the platter. For 78 RPM playback, use the round belt.

Figure 2: Turntable Platter
Ensure the drive belt is correctly seated around the motor pulley and the platter's inner rim for stable rotation.
3. Opsætning af tonearm og patron
Your Ortofon OM5e cartridge is pre-mounted and pre-adjusted. However, you will need to set the tracking force and anti-skating.
- Indstil sporingskraft: Rotate the counterweight at the rear of the tonearm until the tonearm floats freely and is balanced horizontally. Lock the tonearm in its rest. Rotate the tracking force dial (the numbered ring on the counterweight) to '0'. Then, rotate the entire counterweight (including the dial) counter-clockwise until the desired tracking force is set. For the Ortofon OM5e, the recommended tracking force is typically 1.75g.
- Indstil anti-skating: Attach the anti-skating weight to the small thread loop on the tonearm support. The thread should pass through the second groove for the Ortofon OM5e cartridge.

Figure 3: Tonearm with Anti-Skating Weight
Proper adjustment of tracking force and anti-skating is crucial for optimal sound quality and record preservation.
4. Forbindelse til en Amplivligere
The Debut III Phono SB features a built-in phono preamp, offering two output options:
- Line Out: Use this if your amplifier gør ikke have a dedicated phono input. Connect the supplied RCA cable from the turntable's "Line Out" jacks to any standard line-level input on your amplifier (f.eks. AUX, CD, Tuner).
- Phono Out: Use this if your amplivligere gør have a dedicated phono input. Connect the supplied RCA cable from the turntable's "Phono Out" jacks to your amplifier's "Phono" input.
Always connect the ground wire from the turntable to the ground terminal on your amplifier for at minimere brummen.

Figure 4: RCA Outputs and Ground Terminal
Choose the appropriate output based on your amplifiers muligheder.
5. Strømtilslutning
Connect the power supply to the DC input jack on the turntable and then plug it into a suitable wall outlet.
Betjeningsvejledning
1. Tænd/sluk
The power switch is located on the underside of the turntable plinth. Flip the switch to the 'ON' position to power on the unit.

Figure 5: Power Switch Location
The discreetly placed power switch maintains the clean aesthetic of the turntable.
2. Hastighedsvalg
The Debut III Phono SB features electronic speed selection for 33, 45, and 78 RPM.
- To switch between 33 and 45 RPM, press the speed control button located on the underside of the plinth. The platter will adjust to the selected speed.
- For 78 RPM playback, you must manually change the drive belt to the larger diameter step on the motor pulley and use the round belt provided. Then, select 45 RPM using the electronic speed control.
3. Afspilning af en plade
- Place a record on the platter. If playing a 7" single, use the provided adapter.
- Select the correct playback speed (33, 45, or 78 RPM).
- Løft forsigtigt tonearmen ved hjælp af cue-håndtaget.
- Placer tonearmen over den ønskede startrille på pladen.
- Sænk langsomt cue-håndtaget for forsigtigt at lade pennen falde ned på pladen.
- At the end of the record, lift the tonearm using the cueing lever and return it to the tonearm rest. Secure it with the tonearm clip.
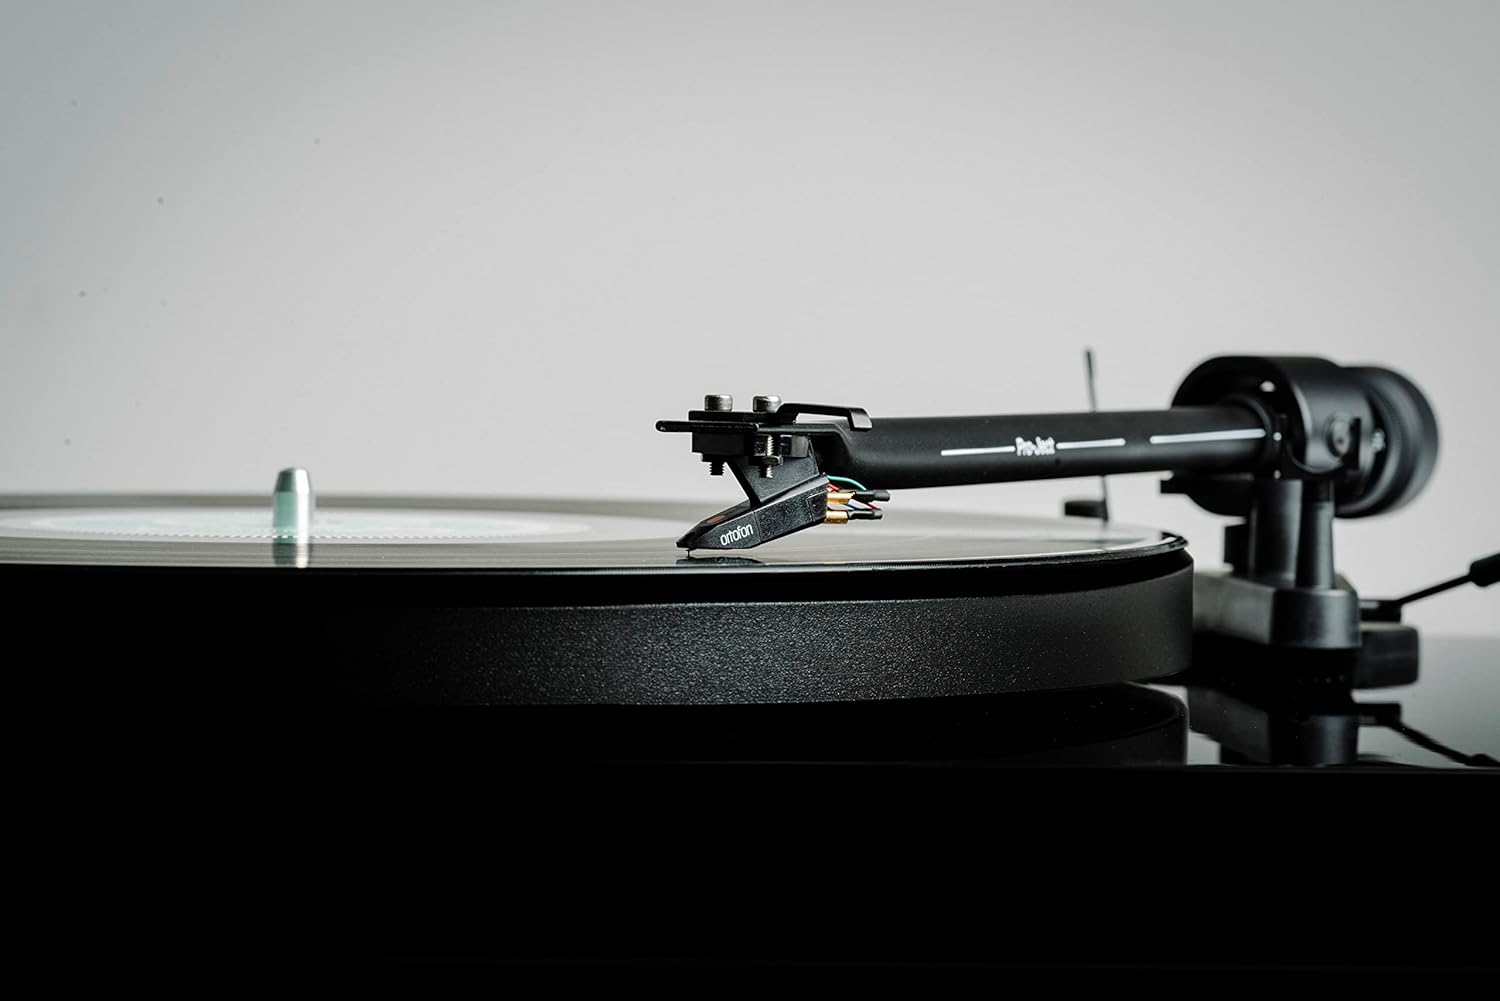
Figure 6: Cartridge on Record
Handle the tonearm and cartridge with care to prevent damage to the stylus or records.
Opretholdelse
Regular maintenance will help preserve the performance and appearance of your turntable.
- Cleaning the Plinth and Dustcover: Use a soft, lint-free cloth to wipe down the plinth and dustcover. For stubborn marks, a slightly damp en klud kan bruges, efterfulgt af en tør klud. Undgå slibende rengøringsmidler eller opløsningsmidler.
- Rengøring af pennen: Use a dedicated stylus cleaning brush or fluid. Always brush from back to front (away from the cantilever). Clean the stylus regularly to prevent debris buildup, which can degrade sound quality and damage records.
- Udskiftning af bælte: The drive belt may stretch over time. If you notice inconsistent speed or reduced torque, consider replacing the belt.
- Patronpleje: Avoid touching the stylus with your fingers. If the cartridge needs replacement, consult a qualified technician or refer to the cartridge manufacturer's instructions.

Figure 7: Turntable with Dustcover
Keep the dustcover closed when not in use to protect the turntable from dust and debris.
Fejlfinding
If you encounter issues with your turntable, refer to the following common problems and solutions.
| Problem | Mulig årsag | Løsning |
|---|---|---|
| No power / No rotation | Power cable not connected; Power switch off; Faulty power supply. | Check power connections; Ensure power switch is ON; Test with another power outlet. |
| Ingen lyd eller lav lydstyrke | Forkert input valgt på amplifier; RCA cables not connected properly; Phono/Line Out switch incorrect; Stylus dirty or damaged. | Select correct input (e.g., AUX, CD, Phono); Reconnect RCA cables firmly; Ensure Phono/Line Out switch matches amplifier input; Clean or replace stylus. |
| Brummende lyd | Ground wire not connected; Nearby electrical interference; Loose connections. | Tilslut jordledningen til amplifier; Move turntable away from other electronics; Check all cable connections. |
| Forvrænget lyd | Incorrect tracking force; Dirty stylus; Damaged stylus; Worn record. | Adjust tracking force; Clean stylus; Replace stylus; Try a different record. |
| Inkonsekvent hastighed | Drive belt stretched or dirty; Platter not seated correctly; Motor issue. | Clean or replace drive belt; Re-seat platter; Contact support if issue persists. |
Specifikationer
Key technical specifications for the Pro-Ject Debut III Phono SB Turntable:
- Model: Debut III Phono HG OM5e
- Drive Principle: Bælt Drive
- Hastigheder: 33, 45, 78 RPM (electronic speed selection for 33/45)
- Fad: 1.7kg heavy steel platter
- Tonearm: 8.6" Aluminum Tonearm
- Patron: Ortofon OM5e (pre-mounted)
- Phono Preamp: Built-in (switchable Phono/Line Out)
- Motortype: DC motor
- Produktmål (L x B x H): 16.34 x 12.6 x 4.65 tommer (41.5 x 32 x 11.8 cm)
- Varens vægt: 12.1 pund (5.5 kg)
- Materiale: Engineered Wood (Plinth)
- Farve: Valnød
Garanti og support
For warranty information and technical support, please refer to the official Pro-Ject Audio Systems webwebstedet eller kontakt din autoriserede forhandler. Gem din købsbevis til garantikrav.
Fabrikant: Pro-Ject lydsystemer


