1. Introduktion
Tak for købetasing the BRUNO Compact Mill Coffee Maker. This manual provides essential information for the safe and efficient use of your new coffee maker. Please read it thoroughly before first use and keep it for future reference.

Image: The BRUNO Compact Mill Coffee Maker in Greige, showcasing dens elegante design.
2. Vigtige sikkerhedsoplysninger
For at forhindre skade eller beskadigelse skal du altid overholde følgende sikkerhedsforanstaltninger:
- Nedsænk ikke apparatet, ledningen eller stikket i vand eller andre væsker.
- Ensure the power supply matches the rating label on the appliance (AC100V).
- Opbevares utilgængeligt for børn.
- Tag stikket ud af stikkontakten, når den ikke er i brug, og før rengøring.
- Betjen ikke noget apparat med en beskadiget ledning eller stik, eller efter at apparatet ikke fungerer korrekt eller er blevet beskadiget på nogen måde.
- Brug kun tilbehør anbefalet af producenten.
- Undgå kontakt med bevægelige dele.
- Må ikke placeres på eller i nærheden af en varm gas- eller elektrisk brænder eller i en opvarmet ovn.
- Always ensure the dripper cover is securely locked before operation.
3. Produktet er slutview og komponenter
The BRUNO Compact Mill Coffee Maker is designed for convenience and quality, allowing you to brew fresh coffee from whole beans or ground coffee. Key features include:
- Steaming Extraction: Ensures even saturation of coffee grounds for rich flavor.
- Simple 3-Step Operation: Easy to use for daily brewing.
- Kompakt design: Fits neatly on tables or desks.
- Bean and Powder Compatibility: Integrated mill handles both whole beans and pre-ground coffee.
- Reusable Mesh Filter: Eliminates the need for disposable paper filters, making it eco-friendly and economical.

Image: An infographic highlighting the five main features of the BRUNO coffee maker, including steaming extraction, easy operation, compact size, bean/powder compatibility, and no paper filter requirement.
Komponenter:
- Hovedenhed
- Vandtank (aftagelig)
- Drypperdæksel
- Drypper
- Netfilter (genanvendeligt)
- Glaskaraffel
- Måleske
4. Opsætning
Before first use, ensure all packaging materials are removed and clean all removable parts as described in the 'Maintenance and Cleaning' section.
Indledende opsætningstrin:
- Placer apparatet: Position the coffee maker on a stable, flat, heat-resistant surface, away from water sources and heat.
- Insert the Mesh Filter: Place the mesh filter into the dripper, ensuring it is seated correctly.
- Assemble the Dripper: Insert the dripper assembly (with mesh filter) into the main unit. Ensure it is pushed down firmly until it clicks into place.
- Place the Glass Carafe: Position the empty glass carafe on the warming plate beneath the dripper.
5. Betjeningsvejledning
Follow these steps to brew coffee using your BRUNO Compact Mill Coffee Maker:
- Tilsæt kaffe:
- For Whole Beans: Open the dripper cover and add the desired amount of whole coffee beans into the mesh filter. Refer to the quantity guide below.
- Til malet kaffe: Open the dripper cover and add the desired amount of pre-ground coffee into the mesh filter.

Image: A hand adding whole coffee beans into the mesh filter of the coffee maker.

Image: A side-by-side comparison showing whole coffee beans and finely ground coffee, illustrating the machine's compatibility with both.
- Tilsæt vand: Fill the water tank with fresh, cold water up to the desired level, corresponding to the number of cups you wish to brew. Do not exceed the 'MAX' line.

Image: A hand pouring water into the transparent water tank of the coffee maker.
- Luk låget: Securely close the dripper cover. Ensure it is locked into place.
- Begynd at brygge: Press the power button to begin the brewing process. The indicator light will illuminate. For whole beans, the machine will first grind the beans, then proceed with brewing.

Image: A finger pressing the power button on the control panel of the coffee maker.
- Nyd din kaffe: Once brewing is complete, the machine will automatically switch to a warming function for 40 minutes before auto-shutoff. Carefully remove the carafe and pour your freshly brewed coffee.

Image: A hand pouring hot, freshly brewed coffee from the glass carafe into a white coffee cup.
Coffee Quantity Guide (Approximate):

Image: A table illustrating the recommended number of measuring spoons of coffee powder for 2 to 5 cups, with 1 cup approximately 120ml.
| Kopper | Measuring Spoons (Approx. Weight) |
|---|---|
| 2 kopper | 3 spoons (approx. 15g) |
| 3 kopper | 4 spoons (approx. 20g) |
| 4 kopper | 5 spoons (approx. 25g) |
| 5 kopper | 6 spoons (approx. 30g) |
6. Vedligeholdelse og rengøring
Regular cleaning ensures optimal performance and extends the life of your coffee maker. Always unplug the appliance before cleaning.
Rengøringstrin:
- Disassemble Removable Parts: The dripper cover, dripper, mesh filter, water tank, and glass carafe are all removable for easy cleaning.

Image: Hands demonstrating the removal of the water tank and the dripper assembly from the main unit for cleaning.

Image: A close-up of hands carefully detaching the transparent water tank from the side of the coffee maker.

Image: A hand lifting the black dripper assembly, including the mesh filter, out of the coffee maker's main unit.
- Vask dele: Wash these removable parts with warm, soapy water and a soft sponge. Rinse thoroughly and allow them to air dry completely before reassembling.
- Rengør hovedenhed: Tør ydersiden af hovedenheden af med enamp klud. Brug ikke slibende rengøringsmidler, og nedsænk ikke hovedenheden i vand.
- Clean Grinding Blades (if applicable): For whole bean users, periodically clean any coffee residue from the grinding blades using a small brush.
- Afkalkning: Depending on water hardness, descaling may be necessary every few months. Refer to descaling instructions for coffee makers, typically involving a descaling solution or vinegar solution.
7. Fejlfinding
If you encounter issues with your coffee maker, please refer to the following common problems and solutions:
- Dripper cover does not close: Ensure the dripper and mesh filter are correctly set. Push the dripper all the way in, and align the mesh filter with the dripper's concave position.
- Dripper cover opens during use, and indicator flashes/stops: Ensure the dripper cover is locked correctly. Push the dripper cover until it locks securely, with the entire button on the left side protruding outwards.
- Dripper parts detach when pulled out: The dripper valve may have come off when pulling out the dripper. Please contact customer support for assistance.
- Some coffee beans remain unground: Adjust grinding time according to the amount of beans. This product uses a propeller-type mill, so some beans may naturally remain unground in the dripper.
- Lid part gets stuck after washing: The lock button on the dripper cover only moves on one side. Ensure it is not forced.
- Coffee overflows from dripper, leaks onto table: The dripper may not be set correctly (not pushed into the proper position), or the valve may be clogged with coffee grounds. Check placement and clean the valve if necessary.
8. Specifikationer
| Feature | Detalje |
|---|---|
| Mærke | BRUNO |
| Modelnummer | BOE104-GRG |
| Farve | Greige |
| Dimensioner (B x H x D) | 175 mm x 270 mm x 285 mm |
| Vægt | 2100 g (2.1 kg) |
| Nominelt strømforbrug | 550W |
| Strømforsyning | AC100V |
| Auto-sluk funktion | 40 minutter |
| Sikkerhedsfunktion | Temperature fuse (240℃) |
| Oprindelsesland | Kina |
| Inkluderede komponenter | Måleske |
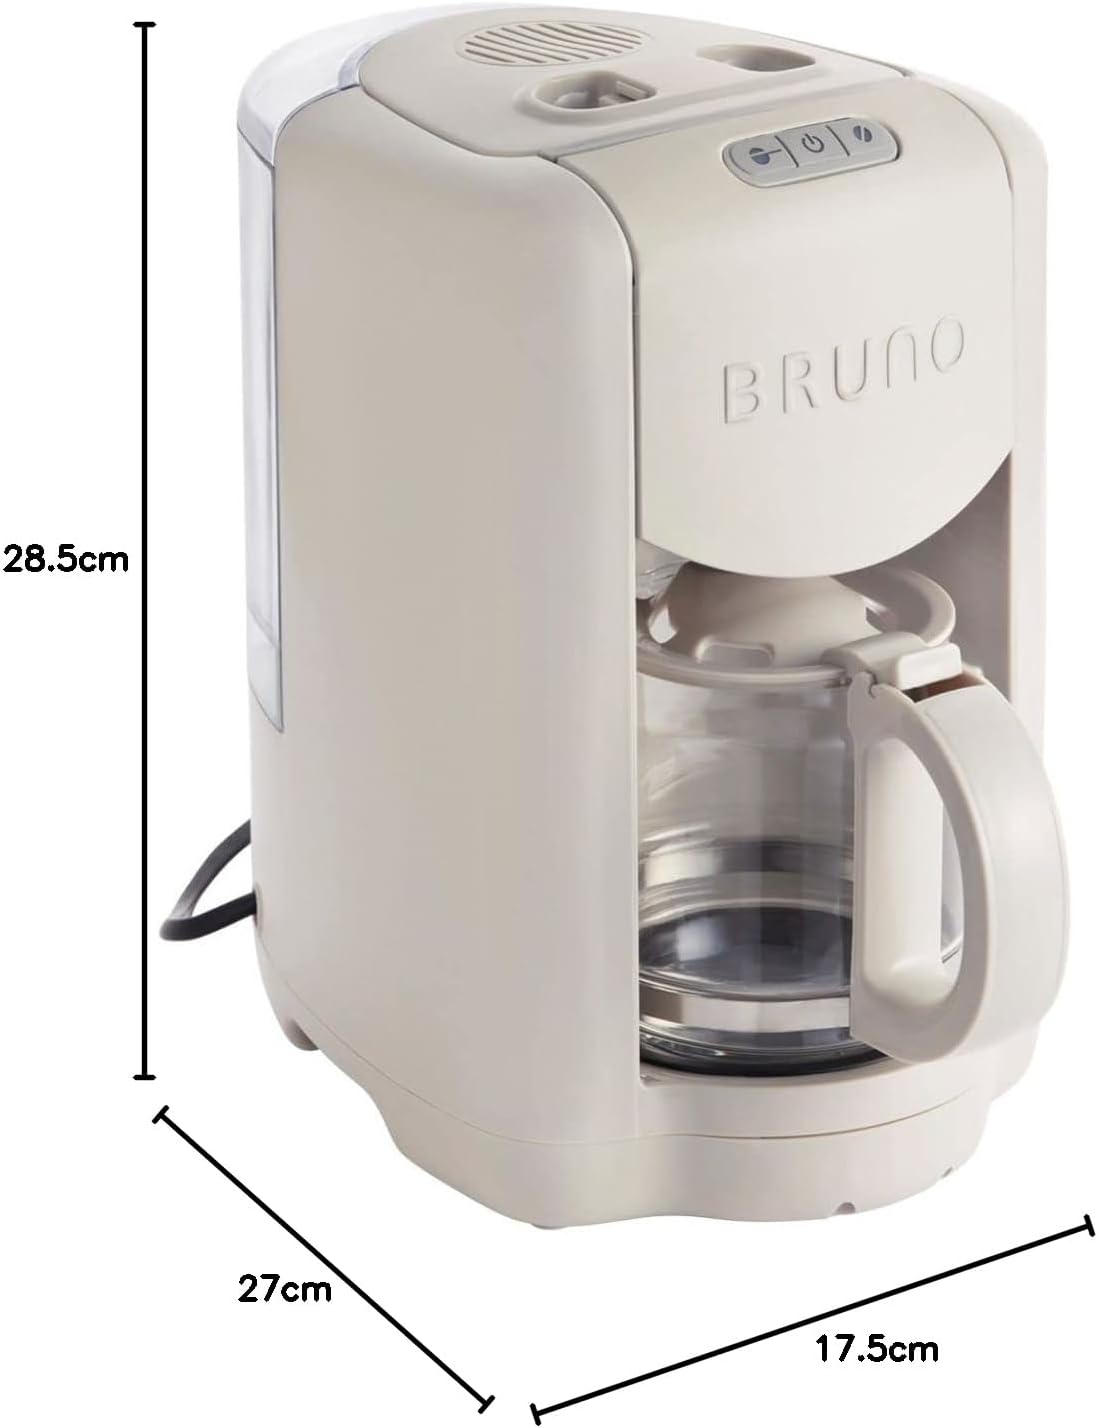
Image: A diagram illustrating the width (17.5cm), depth (28.5cm), and height (27cm) of the coffee maker.
9. Garanti og support
For warranty information and customer support, please refer to the documentation included with your purchase or visit the official BRUNO webwebsted. Gem din købsbevis til garantikrav.
For further assistance, you may contact BRUNO customer service through their official channels. The brand store can be found at BRUNO Official Store.


