Indledning
This manual provides detailed instructions for the setup, operation, maintenance, and troubleshooting of your BEITONG Zeus 2 Elite Wireless Controller. Please read this manual thoroughly to ensure proper use and to maximize your gaming experience. This controller is designed for multi-platform compatibility, including PC, Nintendo Switch, iOS, and Android devices.

Image: The BEITONG Zeus 2 Elite Wireless Controller in Galaxy Black, showcasing dens ergonomiske design og knaplayout.
Pakkens indhold
- BEITONG Zeus 2 Elite Wireless Controller
- Trådløs modtager (USB-dongle)
- 2 Extra Key Modulars (different pressing feels)
- 2 Extra Joysticks (different heights)
- 3 Extra D-Pads (different styles)
- USB-C to USB-A Cable (6.5ft)
Opsætning
1. Opladning af controlleren
Before initial use, fully charge the controller using the provided USB-C cable. Connect the USB-C end to the controller and the USB-A end to a power source (e.g., PC USB port, USB wall adapter). The LED indicator will show charging status and turn off when fully charged. A full charge provides up to 40 hours of gameplay.
2. Tilslutningsmuligheder
The BEITONG Zeus 2 Elite supports multiple connection methods:
- 2.4GHz Wireless (PC, Nintendo Switch, Steam Deck): Insert the USB wireless receiver into an available USB port on your device. The controller will automatically pair.
- Bluetooth 5.0 (PC, iOS, Android, Nintendo Switch): On your device, enable Bluetooth and search for available devices. Select "BEITONG Zeus 2 Elite" to pair. For iOS and Android, only native games are supported.
- Wired (PC, Nintendo Switch): Connect the controller directly to your device using the provided USB-C cable.

Billede: En overview of the controller's innovative features, modularity, compatibility, and uniqueness, including optical switches, multi-platform support, and customizable components.
3. Installing Modular Parts
The controller features detachable and interchangeable components:
- AXBY Buttons: The controller comes with three types of button modules offering different pressing feels. To change, gently pry off the existing button module and snap in the desired one.
- Joysticks: Three joystick heights (6mm, 8mm, 10mm) are available. Pull up the existing joystick and push down the desired height joystick until it clicks into place.
- D-Pad: Two types of D-pad outer shells are included. These can be replaced by gently removing the current D-pad and attaching the preferred style.
- Face Shell: The face shell is replaceable. Gently detach it to customize the controller's appearance.

Image: Illustration of the controller's modular design, showing interchangeable key modules with different strokes and joystick heights (6mm, 8mm, 10mm).
Betjeningsvejledning
1. Grundlæggende kontroller
Familiarize yourself with the standard button layout and functions:
- ABXY knapper: Standard handlingsknapper.
- D-Pad: Retningsbestemt input.
- Analoge joysticks: Precise movement and camera control.
- Skulderknapper (LB, RB) og aftrækkere (LT, RT): Additional action inputs. The triggers utilize Hall Effect technology for 0.01mm pressing accuracy.
- Function (FN) Button: Activates special functions, including fly mouse mode.
- Profile Knap: Switches between different key configurations.
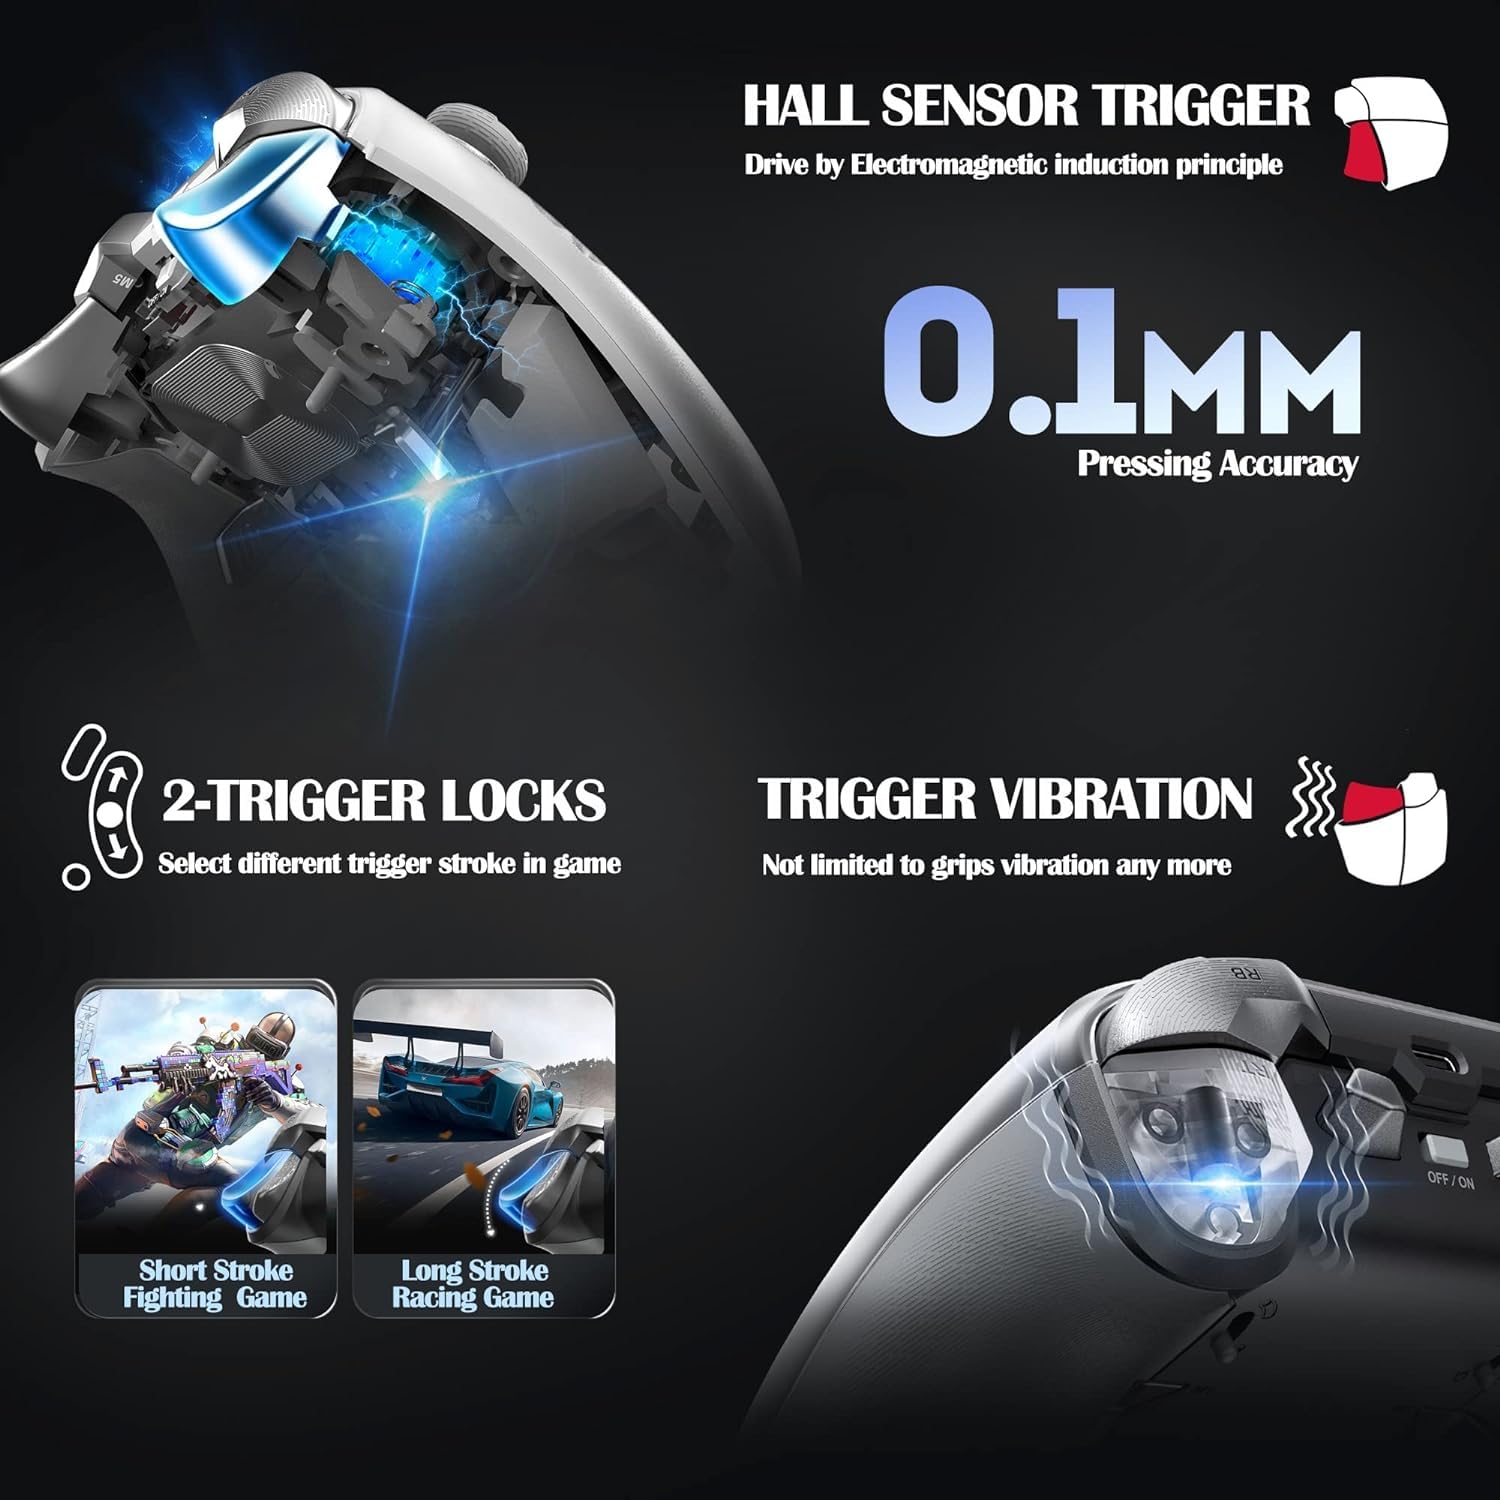
Billede: Detaljeret view of the Hall Sensor Triggers, highlighting 0.1mm pressing accuracy, trigger vibration, and the two-trigger lock system for short or long stroke selection.
2. Button Customization and Macro Programming
The controller features 6 additional keys on the backside that can be programmed. Up to 30 actions can be saved as macros. The Profile key allows switching between different key configurations for various game scenarios with a single click. Refer to the BEITONG Gamepad Assistant software for detailed customization options.
3. Six-Axis Somatosensory Control
Built-in 6-axis gyro sensor provides quick response for motion-sensing games. This feature offers enhanced control, particularly for games that utilize tilt or motion input. This is natively adapted for Nintendo Switch.
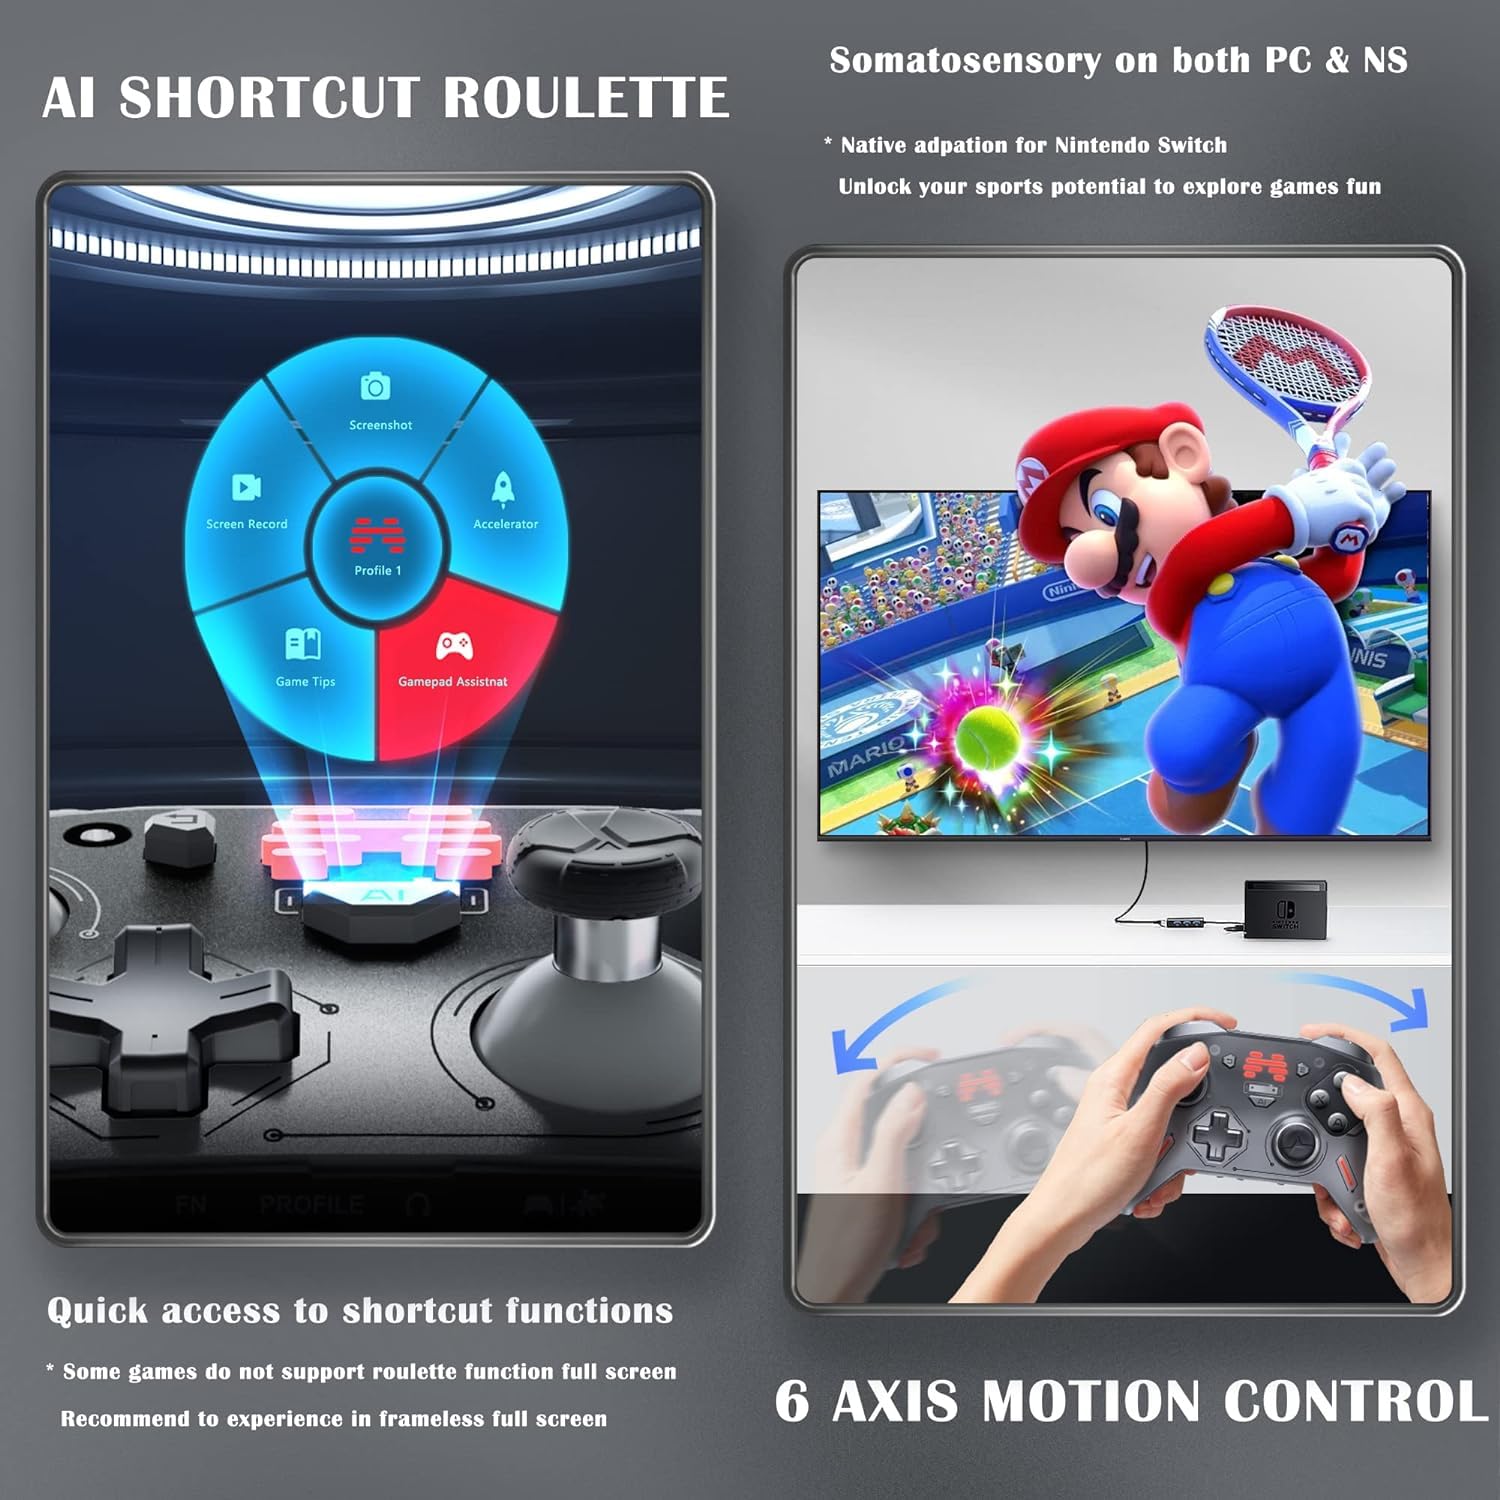
Image: Depiction of the AI Shortcut Roulette for quick access to functions and the 6-axis motion control feature, showing a user playing a motion-controlled game on Nintendo Switch.
4. 3.5mm Audio Jack & EQ Sound
The controller includes a 3.5mm audio jack with a built-in professional high-fidelity sound decoder. Customizable EQ settings, including frequency band, subwoofer, and channel balance, are available through the BEITONG Gamepad Assistant software.
5. FN Fly Mouse Function
The FN key can be used to switch the controller into a fly mouse mode, allowing for PC control without needing a separate mouse.
6. BEITONG Gamepad Assistant Software
Download and install the BEITONG Gamepad Assistant software on your PC or mobile device for advanced customization. This software allows you to:
- Configure button mappings and macros.
- Juster joystick- og triggerfølsomheden.
- Customize EQ settings for audio.
- Manage vibration feedback.
- Opdater controllerens firmware.

Image: Screenshot of the BEITONG Gamepad Assistant software interface on PC and mobile, demonstrating options for vibration settings, EQ customization, and button remapping.
Opretholdelse
- Rensning: Brug en blød, tør klud til at rengøre controlleren. Undgå at bruge skrappe kemikalier eller slibende materialer.
- Opbevaring: Opbevar controlleren et køligt, tørt sted væk fra direkte sollys og ekstreme temperaturer.
- Batteripleje: For at forlænge batteriets levetid bør du undgå at aflade controlleren helt ofte. Oplad den regelmæssigt, selvom den ikke er i brug i længere perioder.
Fejlfinding
1. Controller Not Connecting/Pairing
- Sørg for, at controlleren er opladet.
- Verify the correct connection method (2.4GHz, Bluetooth, Wired) is selected on both the controller and your device.
- For 2.4 GHz skal du sørge for, at USB-modtageren er tilsluttet korrekt.
- For Bluetooth, ensure your device's Bluetooth is enabled and the controller is in pairing mode.
- Try restarting both the controller and your device.
2. Firmware Upgrade Process
If you upgrade the controller/adapter's firmware using the BEITONG Gamepad Assistant software, you will need to re-pair them. Follow these steps:
- Sluk for controlleren.
- Press and hold the Function (FN) button (located at the bottom of the controller).
- While holding the FN button, turn on the controller. Keep the FN button pressed until the lights on the controller quickly flash.
- Vent på, at parringsprocessen er fuldført.
3. Input Lag or Unresponsive Buttons
- Ensure the controller is fully charged. Low battery can affect performance.
- Reduce interference by moving closer to the wireless receiver or Bluetooth device.
- Update the controller's firmware using the BEITONG Gamepad Assistant software.
- If using a wired connection, ensure the cable is securely connected and undamaged.
Specifikationer
| Feature | Detalje |
|---|---|
| Modelnummer | BTP-T9 |
| Forbindelse | Bluetooth 5.0, 2.4GHz Wireless, USB Wired |
| Kompatibilitet | PC, Nintendo Switch, Steam, iOS (native games only), Android (native games only) |
| Udløsere | Hall Effect Triggers with 0.01mm accuracy, Trigger Locks, Trigger Vibration |
| Knapper | Optical Microswitches (0.25mm stroke), Interchangeable AXBY Modules |
| Joysticks | Anti-Wear, 3 Adjustable Heights |
| D-Pad | 2 Interchangeable Styles |
| Bevægelseskontrol | Built-in 6-axis Gyro Sensor |
| Batterikapacitet | 1000mAh Lithium Polymer (up to 40 hours) |
| Lyd | 3.5mm Audio Jack, High-Fidelity Sound Decoder, Customizable EQ |
| Dimensioner | 6 x 4.3 x 2.4 tommer |
| Vægt | 11.2 ounce |
Garanti og support
For warranty information and technical support, please refer to the official BEITONG website or contact BEITONG customer service. The BEITONG technology team is available to provide support for any issues encountered with the controller.


