1. Produktet er slutview
The EPOMAKER RT100 is a 97-key gasket-mount mechanical gaming keyboard designed for versatility and customization. It features triple connectivity modes (Bluetooth 5.0, 2.4GHz wireless, and USB-C wired), a unique detachable TFT-LCD display, a multi-function knob, and hot-swappable switches. This manual provides detailed instructions for setup, operation, and maintenance.
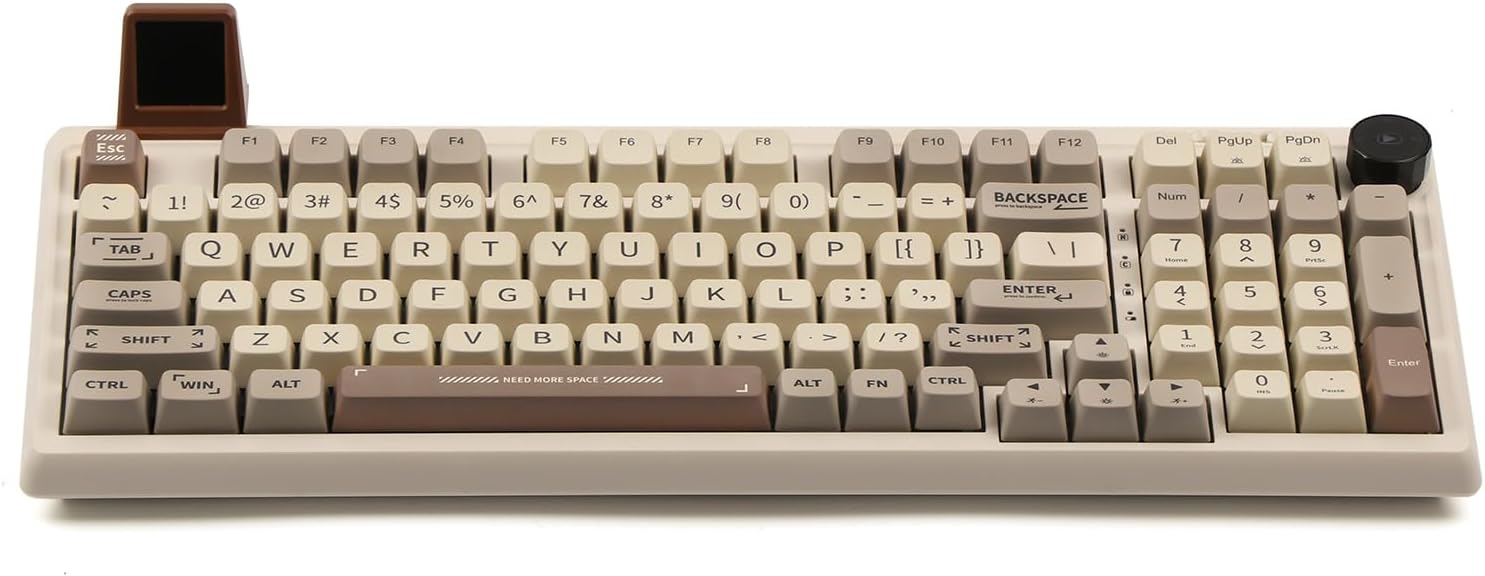
Image 1.1: The EPOMAKER RT100 mechanical keyboard, showcasing its 97-key layout, customizable display, and rotary knob.
Video 1.1: En overview of the EPOMAKER RT100 Gasket Keyboard, demonstrating its features and functionality.
2. Pakkens indhold
Kontroller venligst, at alle varer er til stede i pakken:
- EPOMAKER RT100 Mekanisk tastatur
- USB-C kabel
- Brugervejledning (dette dokument)
3. Specifikationer
| Feature | Detalje |
|---|---|
| Modelnummer | RT100 |
| Dimensioner | 12.99 x 4.57 x 0.98 tommer |
| Vægt | 3.29 pund |
| Forbindelse | Bluetooth 5.0, 2.4 GHz trådløs, USB-C kablet |
| Batterikapacitet | 5000mAh |
| Key Rollover | N-Key Rollover (NKRO) |
| Afbrydere | Hot-Swappable Kailh Socket (Gateron Pro Yellow included) |
| tasterne | 5-Side Dye-sub PBT, MDA Profile |
| Baggrundsbelysning | RGB, sydvendte LED'er |
| Kompatibilitet | Windows, macOS |

Image 3.1: The EPOMAKER RT100 keyboard highlighting its 5000mAh large capacity battery.
4. Opsætningsvejledning
4.1 Forbindelsestilstande
The RT100 keyboard supports three connection methods:
- USB-C-kablet: Connect the keyboard directly to your computer using the provided USB-C cable.
- 2.4 GHz trådløs: Insert the 2.4GHz USB receiver into an available USB port on your computer. The receiver is stored in a hidden compartment on the keyboard, accessible by detaching the mini display.
- Bluetooth 5.0: Enable Bluetooth on your device and search for the RT100 keyboard to pair.

Image 4.1: The EPOMAKER RT100 keyboard illustrating its triple connectivity options: Bluetooth, 2.4GHz wireless, and USB-C wired.
4.2 Detachable Smart TFT-LCD Display
The RT100 features a customizable mini TFT-LCD display. This display can show various information such as date, time, weather forecasts, and keyboard battery level. It also supports custom GIFs.
- To access the 2.4GHz wireless receiver, gently detach the mini display from its port.
- To customize the display, download and install the official EPOMAKER software from the manufacturer's webwebsted.
- Within the software, navigate to the 'Sketchpad mode' to upload custom GIFs or images.

Billede 4.2: Et nærbillede view of the EPOMAKER RT100's detachable mini display, showing its informational capabilities and GIF customization.

Image 4.3: The EPOMAKER software interface, demonstrating options for customizing the keyboard's display and functions.
4.3 Customizable Knob
The rotary knob on the RT100 serves as a multi-media control by default, allowing you to adjust volume, play/pause media, and skip tracks. Its functionality can be further customized using the EPOMAKER software to assign various functions.
4.4 Skift til operativsystemlayout
A physical switch is located on the keyboard to toggle between Mac and Windows layouts, providing optimized hotkeys and macros for each operating system.

Image 4.4: Detail of the power switch (OFF for wired, ON for wireless) and the mode switch (Mac/Win) on the EPOMAKER RT100 keyboard.
5. Betjeningsvejledning
5.1 N-nøgleoverførsel (NKRO)
The RT100 supports N-Key Rollover, meaning every key press is registered independently, even when multiple keys are pressed simultaneously. This feature is beneficial for fast typing and gaming, preventing missed inputs.
5.2 RGB-belysning
The keyboard features south-facing RGB LEDs, providing optimal visibility of the lighting patterns from the user's perspective. There are 16 default lighting patterns, and additional customization options are available through the EPOMAKER software.
5.3 Hot-swap-kontakter
The RT100 is equipped with Kailh hot-swappable sockets, allowing users to change mechanical switches without soldering. This enables customization of typing feel and sound.
- Use the provided switch puller tool to carefully remove a keycap.
- Using the switch puller, gently grip the switch and pull it straight up to remove it from the socket.
- Align the pins of the new switch with the holes in the PCB. Ensure the pins are straight to avoid bending.
- Press the new switch firmly into the socket until it clicks into place.
- Udskift tastaturdækslet.

Image 5.1: Demonstrating the hot-swappable nature of the EPOMAKER RT100, with loose keycaps and switches.

Image 5.2: A user removing a switch from the EPOMAKER RT100 keyboard, illustrating the hot-swappable feature.
5.4 PBT Keycaps with MDA Profile
The RT100 features durable, non-greasy PBT keycaps with an MDA profile. Denne profile is designed for ergonomic comfort during extended typing sessions, and the dye-sublimated legends ensure long-lasting durability.
6. Vedligeholdelse
- Rensning: Regularly clean the keyboard with a soft, dry cloth. For deeper cleaning, remove keycaps and use compressed air to clear debris.
- Taster: PBT keycaps are durable but can be cleaned with mild soap and water if necessary. Ensure they are completely dry before reattaching.
- Kontakter: Avoid spilling liquids on the keyboard. If a switch feels inconsistent, it may be replaced due to the hot-swappable design.
7. Fejlfinding
- Tastaturet reagerer ikke: Ensure the keyboard is charged or connected via USB-C. Check the power switch. For wireless modes, ensure the receiver is properly inserted or Bluetooth is paired.
- Skærmen virker ikke: Verify the display is securely attached. Ensure the EPOMAKER software is installed and updated.
- Nøgler registreres ikke: If specific keys are not working, the switch may be faulty. Utilize the hot-swappable feature to replace the switch.
- Forbindelsesproblemer: Try reconnecting the USB-C cable, re-pairing Bluetooth, or re-inserting the 2.4GHz receiver. Ensure no strong interference sources are nearby for wireless connections.
8. Garanti og support
For garantioplysninger, teknisk support eller yderligere assistance, besøg venligst den officielle EPOMAKER webwebstedet eller kontakt deres kundeservice direkte. Gem din købskvittering til garantikrav.


