1. Introduktion
The briidea Temporary Power Outlet Panel, Model HPOB-01S, is engineered to provide safe and reliable temporary electrical power in various outdoor settings, including construction sites and RV parks. This unit integrates 20, 30, and 50 Amp receptacles, each protected by a circuit breaker, within a durable stainless steel, NEMA 3R enclosure. Its pre-wired design simplifies installation, offering a convenient power solution.
2. Sikkerhedsoplysninger
ADVARSEL: Electrical shock hazard. Improper installation or use can result in serious injury or death. Always follow local electrical codes and safety guidelines.
- Ensure power is disconnected at the source before any installation or maintenance.
- Installation should be performed by a qualified electrician or a knowledgeable individual familiar with electrical wiring.
- Do not operate the panel if it is damaged or shows signs of wear.
- The unit is UL Listed, indicating compliance with safety standards.
- Brug altid passende personlige værnemidler (PPE) når du arbejder med elektriske systemer.
3. Produktet er slutview
The briidea HPOB-01S panel features a robust stainless steel construction for enhanced durability and resistance to rust and corrosion, making it suitable for outdoor use. It includes three distinct receptacles for versatile power access.

Figur 3.1: Front view of the briidea Temporary Power Outlet Panel. This image displays the open panel, revealing the integrated 20 Amp, 30 Amp, og 50 Amp receptacles, along with their corresponding circuit breakers. The stainless steel finish is visible, highlighting the product's durable design.
Nøglefunktioner:
- Multiple Receptacles: Equipped with one 50 Amp, one 30 Amp, and one 20 Amp beholder.
- Beskyttelse af maksimalafbryder: Each receptacle is individually protected by a UL-certified circuit breaker.
- Holdbar konstruktion: Made from stainless steel for superior anti-rust and anti-corrosion properties.
- NEMA 3R Enclosure: Provides weatherproof, dust-proof, and sun-proof protection for outdoor environments.
- Pre-wired Components: Internal wiring is factory-assembled for simplified and safer installation.
- 90-Degree Door Opening: The panel door can remain open at a 90-degree angle, facilitating easier wiring access.

Figur 3.2: UL Certification and Internal Wiring. This image highlights the UL certification logo, confirming the product's adherence to safety standards. Green lines illustrate the internal wiring connections from the circuit breakers to the receptacles.
4. Opsætning og installation
The briidea Temporary Power Outlet Panel is designed for straightforward installation due to its pre-wired components. However, professional installation is recommended to ensure compliance with all electrical codes and safety standards.
4.1 Montering af panelet
- Select a suitable outdoor location for mounting, such as a sturdy post or wall, ensuring it is easily accessible and protected from potential physical damage.
- Use appropriate mounting hardware (not included) to securely fasten the panel to the chosen surface. Ensure the panel is level and firmly attached.

Figur 4.1: Panel Mounted with Door Open. This image demonstrates the panel mounted on a post, with its lid held open at a 90-degree angle. This feature allows for unobstructed access during the wiring process, simplifying installation.
4.2 Elektriske forbindelser
The internal components are pre-wired. Connect the main power supply to the designated terminals within the panel. All terminals are compatible with both copper and aluminum wiring.
- Open the panel door. The door is designed to remain open at 90 degrees for convenience.
- Identify the main power input terminals (LINE, Neutral Bar, Ground Bar) as indicated in the wiring diagram.
- Connect the incoming power supply wires (Line, Neutral, Ground) to their respective terminals. Ensure all connections are tight and secure.
- Verify all internal wiring connections are secure before closing the panel door.
- Close and secure the panel door.

Figur 4.2: Internal Wiring Diagram. This diagram illustrates the pre-wired connections within the panel, showing the circuit breakers, connector bar, ground bar, neutral bar, and the wiring to the 50 Amp, 30 Amp, og 20 Amp receptacles. Labels for Line (L), Neutral (N), and Ground (GND) are provided.
5. Betjeningsvejledning
Once the panel is installed and connected to a power source, it is ready for use.
- Ensure the main power supply to the panel is active.
- Verify that the circuit breakers inside the panel are in the 'ON' position.
- Connect your RV, tools, or other electrical devices to the appropriate 20 Amp, 30 Ampeller 50 Amp beholder.
- Always ensure that the connected devices do not exceed the amperage rating of the respective receptacle or the overall panel capacity.
6. Vedligeholdelse
Regular maintenance helps ensure the longevity and safe operation of your briidea power outlet panel.
- Rensning: Periodically clean the exterior of the stainless steel enclosure with a soft, damp klud. Undgå slibende rengøringsmidler, der kan ridse overfladen.
- Inspektion: Regularly inspect the panel for any signs of physical damage, corrosion, or loose connections. Check the integrity of the door seal.
- Breaker Functionality: Test the circuit breakers annually by momentarily switching them to the 'OFF' position and then back to 'ON' to ensure they operate freely.
- Miljøbeskyttelse: While the NEMA 3R enclosure offers protection, avoid prolonged exposure to extreme weather conditions if possible.
7. Fejlfinding
Se følgende almindelige problemer og løsninger:
| Problem | Mulig årsag | Løsning |
|---|---|---|
| No power at any receptacle. | Main power supply is off or tripped. | Check the main breaker at the source. Ensure all internal breakers are 'ON'. |
| One receptacle has no power. | Corresponding circuit breaker is tripped. | Switch the tripped breaker to 'OFF' then back to 'ON'. If it trips again, reduce load or check for a short circuit. |
| Breaker rejser ofte. | Overload or short circuit in connected device/wiring. | Disconnect devices and test one by one. Ensure total load does not exceed breaker rating. Consult an electrician if problem persists. |
| Panel door does not close properly. | Obstruction or damaged hinge/latch. | Check for any obstructions. Inspect hinges and latch for damage. |
8. Specifikationer
- Mærke: briidea
- Modelnummer: HPOB-01S
- Beholdere: 1 x 50 Amp1 x 30 Amp1 x 20 Amp
- Indkapslingsmateriale: Rustfrit stål
- Bedømmelse af kabinet: NEMA 3R (Weatherproof, Dust-proof, Sun-proof)
- Certificeringer: UL-listet
- Varens vægt: 10.61 pund (ca. 4.81 kg)
- Produktdimensioner: 2 x 1 x 1 tommer (ca. 5.08 x 2.54 x 2.54 cm) - Note: This dimension appears to be a placeholder. Refer to Figure 8.1 for detailed dimensions.
- ASIN: B0BNVPCX15
- Dato først tilgængelig: 29. januar 2023
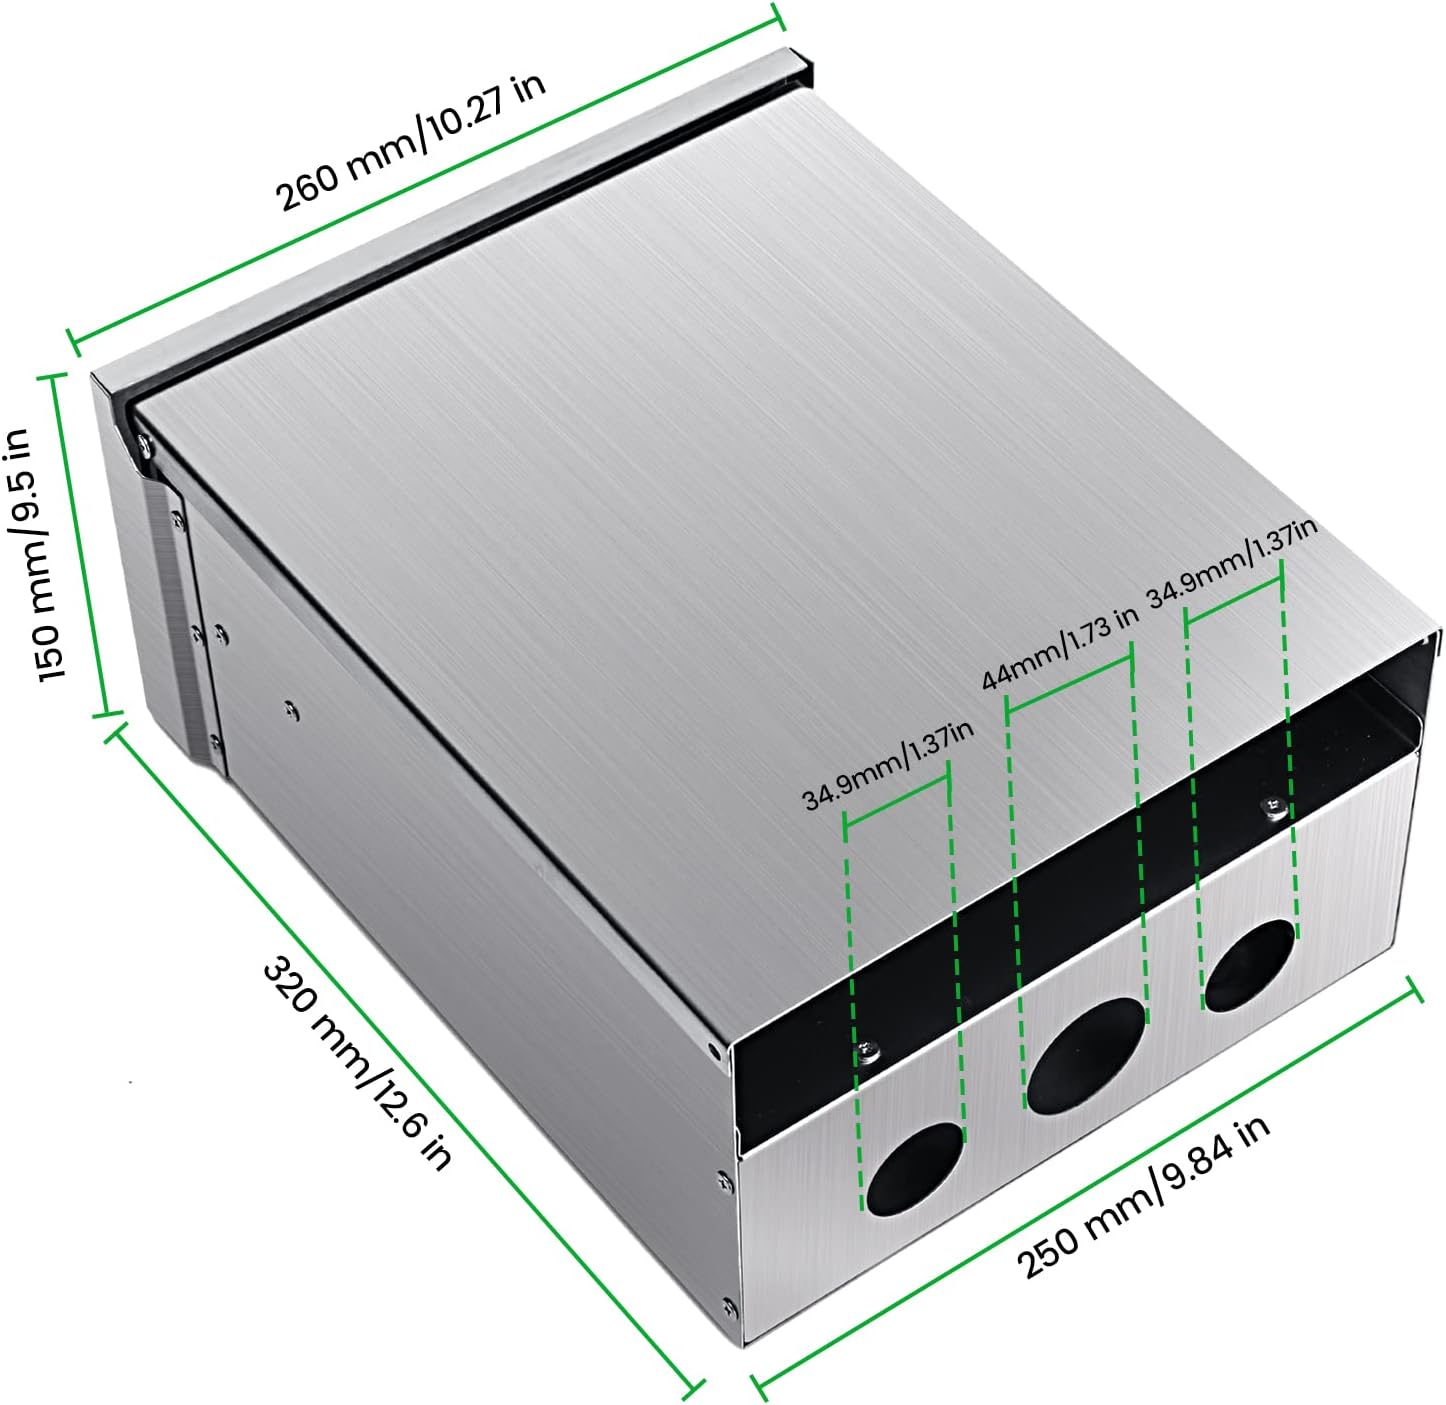
Figur 8.1: Product Dimensions. This diagram provides detailed measurements of the panel: 260 mm (10.27 in) width, 150 mm (5.9 in) height, and 320 mm (12.6 in) depth. It also shows the spacing for conduit knockouts.
9. Garanti og support
For warranty information or technical support regarding your briidea Temporary Power Outlet Panel, please contact briidea customer service. Details can typically be found on the product packaging or the official briidea webwebsted.


