1. Introduktion
This manual provides detailed instructions for the installation, operation, and maintenance of your Naifay X3 Double Din Car Stereo. This unit features a 7-inch HD touchscreen, Apple CarPlay, Android Auto, Bluetooth connectivity, FM radio, Mirror Link, and support for a backup camera. Please read this manual thoroughly before use to ensure proper functionality and safety.

Image 1.1: Naifay X3 Double Din Car Stereo with included backup camera.
2. Sikkerhedsoplysninger
Overhold altid følgende sikkerhedsforanstaltninger for at forhindre personskade eller beskadigelse:
- Professionel installation anbefales: På grund af kompleksiteten af bilens elektriske systemer anbefales professionel installation på det kraftigste.
- Strømforsyning: This unit operates on a 12V DC power supply. Do not connect to 24V systems (e.g., large trucks) as this will cause damage.
- Ledningsføring: Ensure all wiring is correctly connected according to the provided diagram. Incorrect wiring can lead to malfunction or electrical fire.
- Kørselssikkerhed: Betjen ikke enheden på en måde, der distraherer dig fra kørslen. Prioritér altid trafiksikkerhed.
- Temperatur: Undgå at udsætte enheden for ekstreme temperaturer eller direkte sollys i længere perioder.
- Fugtighed: Keep the unit dry. Exposure to moisture can cause damage.
3. Pakkens indhold
Bekræft at alle varer er til stede i pakken:
- Naifay X3 Double Din Car Stereo Unit
- Strømforsyning
- RCA kabler
- Backup Camera with 12 LEDs
- Video Cable for Backup Camera (6 meters)
- Monteringsbeslag og skruer
- Brugermanual
4. Produktet er slutview
The Naifay X3 features a responsive 7-inch HD touchscreen and various ports for connectivity. Familiarize yourself with the unit's front panel and rear connections.
Frontpanelets funktioner:
- Mikrofon (MIC): Til håndfri opkald.
- Lydstyrkekontrol: Op/Ned knapper.
- SD Card Slot (TF CARD): Til medieafspilning.
- AUX-indgang: 3.5 mm jackstik til eksterne lydenheder.
- Nulstillingsknap (RST): For at nulstille enheden.
- USB-port: For media playback, Apple CarPlay, and Android Auto connection.
Tilslutninger bagpå:
The rear panel includes various RCA outputs for external amplifiers/subwoofers, video inputs for cameras, and the main power/speaker harness connection.

Image 4.1: Unit dimensions and rear wiring connections.
5. Installationsvejledning
Careful installation is crucial for optimal performance. If you are unsure, consult a professional installer.
5.1 Kontrol før installation
- Dashboard Size: Confirm your vehicle's dashboard opening size. Common sizes are 173x96mm (6.81x3.78 inches), 178x100mm (7x4 inches), or 188x116mm (7.4x4.56 inches). You may need a specific dash kit for your vehicle model.
- Strømforsyning: Ensure your vehicle's electrical system is 12V DC. This unit is not compatible with 24V systems.
- Ledningsnettet: You may need a vehicle-specific wiring harness adapter and antenna adapter.
5.2 Ledningsforbindelser
Refer to the wiring diagram below and the labels on the unit's harness for correct connections.
| Tråd farve | Fungere |
|---|---|
| Rød | ACC (tændingskontakt +12V) |
| Gul | B+ (Battery Constant +12V) |
| Sort | GND (jord) |
| Blå | ANT (Antenna Control Line) |
| Brun | KEY (Steering Wheel Control) |
| Lyserød | REVERSE (Backup Camera Trigger) |
| Grøn/sort | Venstre baghøjttaler (-) |
| Grøn | venstre baghøjttaler (+) |
| Hvid/sort | Venstre forreste højttaler (-) |
| Hvid | Forreste venstre højttaler (+) |
| Grå/sort | Højre forreste højttaler (-) |
| Grå | Højre forreste højttaler (+) |
| Lilla/sort | Højre baghøjtaler (-) |
| Lilla | Højre baghøjtaler (+) |
Vigtig: Connect the Yellow (B+) wire to a constant 12V power source for memory retention. Connect the Red (ACC) wire to a switched 12V source that turns on/off with the ignition.
5.3 Backup Camera Wiring
Connect the backup camera as follows:
- Connect the camera's power cable (red wire) to the vehicle's reverse light positive (+).
- Connect the camera's ground cable (black wire) to the vehicle's reverse light negative (-) or chassis ground.
- Connect the yellow RCA video cable from the camera to the unit's "CAMIN" (or similar) video input.
- Connect the pink wire from the unit's harness to the vehicle's reverse light positive (+) to trigger the camera display when reversing.
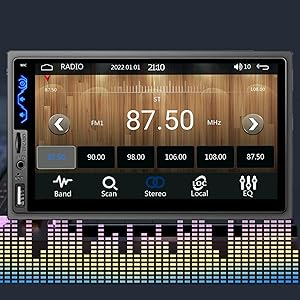
Image 5.1: Rear RCA output ports for external audio/video connections.
6. Betjeningsvejledning
6.1 Grundlæggende kontroller
- Tænd/sluk: Press the power button (usually a physical button or a soft button on the screen) to turn the unit on or off.
- Lydstyrkejustering: Use the physical volume buttons on the left side of the unit or the touchscreen controls.
- Touchscreen interface: Navigate through menus and select functions by touching the icons on the screen.
- Tidsindstilling: Access the system settings to adjust the time and date format (12-hour or 24-hour).
- Custom Boot Screen: You can upload a custom image via USB to be displayed during startup. Refer to the settings menu for this option.
6.2 Apple CarPlay og Android Auto
Connect your compatible iPhone or Android smartphone via the USB cable to access CarPlay or Android Auto features.
- Connect your smartphone to the unit's USB port using its original data cable.
- The unit will automatically detect and launch Apple CarPlay or Android Auto.
- Use voice commands (Siri or Google Assistant) for navigation, calls, messages, and music playback.

Image 6.1: Apple CarPlay and Android Auto functionality.
6.3 Bluetooth-forbindelse
Par din smartphone for håndfri opkald og lydstreaming.
- Gå til Bluetooth-menuen på bilstereoen.
- Aktiver Bluetooth på din smartphone, og søg efter tilgængelige enheder.
- Select the car stereo (e.g., "CarBT" or similar) from your phone's list and confirm pairing.
- Når den er parret, kan du foretage/modtage opkald og streame musik trådløst.

Image 6.2: Bluetooth music and FM radio interface.
6.4 Spejllinkfunktion
Display your smartphone screen directly on the car stereo's display.
- Connect your smartphone to the unit's USB port using its original data cable.
- Select the "Mirror Link" option on the car stereo.
- Follow any on-screen prompts on your phone to allow screen mirroring.
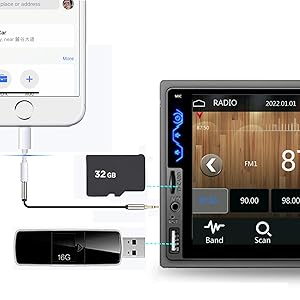
Image 6.3: Phone Mirror Link displaying navigation from a smartphone.
6.5 FM radio
Access and save your favorite radio stations.
- Select the "FM Radio" icon from the main menu.
- Use the "Scan" function for automatic station search or manually tune frequencies.
- Save up to 18 preset stations by long-pressing a preset number.
6.6 Media Playback (USB/TF/AUX)
The unit supports media playback from USB drives, TF (microSD) cards, and external devices via the AUX input.
- Insert a USB drive or TF card into the respective slot. The unit will automatically detect and display media files.
- Connect an external audio device to the 3.5mm AUX input. Select the AUX source from the main menu.
7. Avancerede funktioner
7.1 Bakkameravisning
When correctly installed, the unit will automatically display the rear view når køretøjet sættes i bakgear.
- The included camera features 12 LEDs for improved night vision and a 170° viewvinkel.
- Parking guidelines will appear on the screen to assist with parking maneuvers.

Image 7.1: Backup camera view med parkeringsregler.
7.2 Ratbetjening (SWC)
If your vehicle supports analog steering wheel controls, you can configure them to operate the stereo.
- Ensure the "KEY" wire (Brown) from the unit's harness is connected to your vehicle's steering wheel control wire.
- Access the "Steering Wheel Control" settings menu on the unit.
- Follow the on-screen instructions to program each button (e.g., volume up, volume down, next track, answer call).
Billede 7.2: Konfigurationsskærm for ratbetjening.
7.3 Sound Settings (DSP/EQ)
Customize your audio experience with the built-in Digital Sound Processor (DSP) and 10-band Equalizer (EQ).
- Access the "Sound Setup" or "EQ" menu from the main interface.
- Adjust frequency bands (e.g., 30Hz, 125Hz, 1kHz, 10kHz) to fine-tune bass, mid-range, and treble.
- Select from preset EQ modes (Jazz, Classic, Rock, Pop, Flat) or create a custom user profile.
- Adjust Loudness and Balance settings as desired.
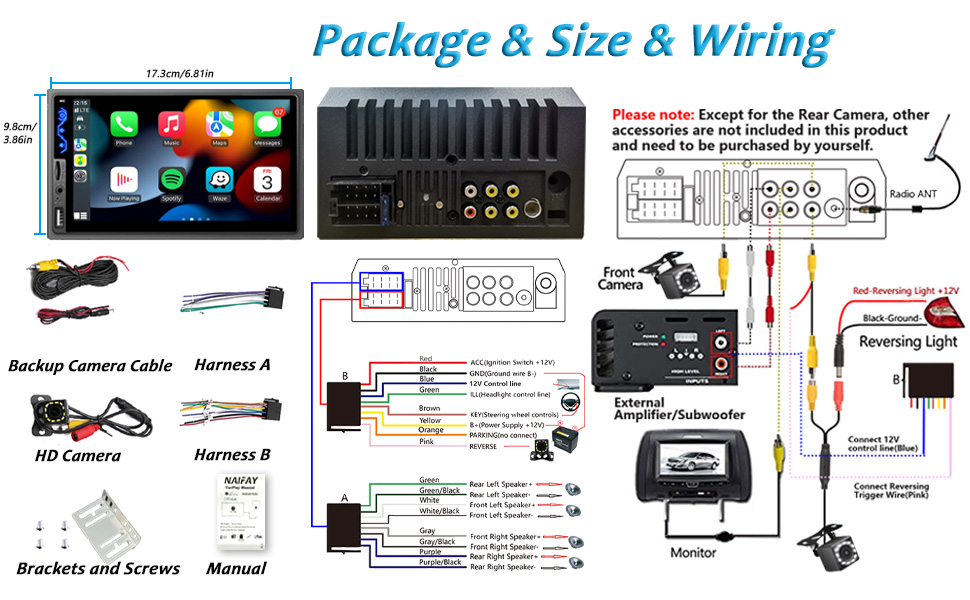
Image 7.3: Equalizer (EQ) settings for audio customization.
8. Vedligeholdelse
- Rengøring af skærmen: Brug en blød, fnugfri klud til forsigtigt at tørre berøringsskærmen af. Brug ikke slibende rengøringsmidler eller opløsningsmidler.
- Generel rengøring: Keep the unit free from dust and debris. Use a dry cloth for cleaning.
- Firmwareopdateringer: Tjek producentens website periodically for any available firmware updates to improve performance or add features.
9. Fejlfinding
Hvis du støder på problemer, kan du se følgende almindelige problemer og løsninger:
| Problem | Mulig årsag | Løsning |
|---|---|---|
| Ingen strøm | Incorrect wiring (B+/ACC), blown fuse, faulty power source. | Check Red (ACC) and Yellow (B+) wire connections. Verify fuses. Test power with a multimeter. |
| Ingen lyd | Speaker wires incorrectly connected, volume too low, mute activated, ampproblem med lifter. | Check speaker wiring. Increase volume. Ensure unit is not muted. Verify external ampforsyningsforbindelser, hvis de anvendes. |
| Unit has no memory (settings reset) | Yellow (B+) and Red (ACC) wires are reversed or B+ has no constant power. | Ensure Yellow (B+) wire is connected to a constant 12V source and Red (ACC) to a switched 12V source. |
| CarPlay/Android Auto opretter ikke forbindelse | Non-original USB cable, phone settings, faulty USB port. | Use the phone's original USB data cable. Check phone settings for CarPlay/Android Auto permissions. Try a different USB port if available. |
| Bakkameraet viser ikke | Problem med kameraets strømforsyning, videokabel frakoblet, ledning til omvendt trigger ikke tilsluttet. | Check camera power supply. Ensure video RCA cable is securely connected to "CAMIN". Verify the pink reverse trigger wire is connected to the reverse light. |
| Ratbetjeningen virker ikke | KEY wire not connected, incorrect programming. | Ensure the Brown (KEY) wire is connected. Re-program the SWC buttons in the settings menu. |
Hvis problemet fortsætter, skal du kontakte kundesupport for at få hjælp.
10. Specifikationer
- Mærke: Naifay
- Model: X3
- Skærmstørrelse: 7 tommer HD-touchskærm
- Skærmopløsning: 800x480 pixels
- Strømudgang: 180 Watt (Max)
- Operation Voltage: 12V DC
- Forbindelse: Bluetooth 5.1, USB, AUX, TF-kort
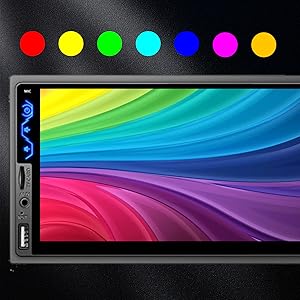
- Særlige funktioner: Apple CarPlay, Android Auto, Mirror Link, FM Radio, Backup Camera Input, Steering Wheel Control (SWC), Built-in DSP, 10-band EQ, 7-color LED buttons
- Lydudgangstilstand: Stereoanlæg
- Surround Sound Kanalkonfiguration: 4.0
- Produktdimensioner: 2.6 x 6.8 x 3.8 tommer
- Varens vægt: 1.76 pund
11. Garanti og support
Naifay provides a 12-month replacement warranty for this product. For any questions, technical support, or warranty claims, please contact Naifay customer service. You can typically find contact information by clicking on "Sold by Naifay" and then "Ask a question" on the product's purchase page.
The Naifay brand has been dedicated to the research and development of electronic imaging products for nearly 5 years, accumulating extensive experience in industrial products. We are committed to providing high-quality in-vehicle electronic products.


