1. Introduktion
The DarwinFPV Darwin79 is a high-performance 3-inch FPV quadcopter designed for agile flight and immersive FPV experiences. Featuring a durable 3K carbon fiber frame with a 140mm wheelbase, it integrates an F4 OSD flight controller, 30A BLHeli_S Electronic Speed Controllers (ESCs), a 40-channel 200mW Video Transmitter (VTX), and a 1200TVL FPV camera. This manual provides essential information for the setup, operation, and maintenance of your DarwinFPV Darwin79 quadcopter.

Figure 1.1: The DarwinFPV Darwin79 FPV Quadcopter, showcasing its compact design and blue propellers.
2. Sikkerhedsoplysninger
Operating FPV quadcopters requires adherence to strict safety guidelines to prevent injury and damage.
- Propelsikkerhed: Always remove propellers before performing any maintenance or configuration. Keep hands and face clear of spinning propellers. They can cause severe injury.
- Batterisikkerhed: Use only compatible LiPo batteries. Never overcharge or over-discharge batteries. Store them in a fire-safe bag and away from flammable materials. Disconnect the battery immediately after flight.
- Flyvemiljø: Fly in open areas, away from people, animals, buildings, and power lines. Avoid flying near airports or restricted airspace. Always maintain visual line of sight with your quadcopter.
- Lovlig overholdelse: Be aware of and comply with all local laws and regulations regarding drone operation in your region.
- Tjek før flyvning: Before each flight, inspect the quadcopter for any damage, loose connections, or worn components. Ensure all propellers are securely attached and oriented correctly.
- Advarsel om varme: Motors, ESCs, and the VTX can become hot during operation. Allow components to cool before handling.
3. Pakkens indhold
Upon unboxing, verify that all components are present and undamaged. The standard package for the DarwinFPV Darwin79 typically includes:
- DarwinFPV Darwin79 FPV Quadcopter (pre-assembled frame, motors, ESCs, Flight Controller, VTX, Camera)
- Propellers (set of 4 or more)
- Battery Strap(s)
- Hardware (screws, standoffs, etc.)
- Note: A radio receiver and battery are typically not included and must be purchased separately.
4. Opsætning og montering
While the Darwin79 comes largely pre-assembled, some initial setup and configuration are required before its first flight.
4.1. Frame Overview

Figur 4.1: Underside view of the DarwinFPV Darwin79 frame, highlighting the robust carbon fiber construction.
The Darwin79 features a unibody bottom plate and separate top plate, providing a strong and lightweight structure. Ensure all screws securing the frame components are tightened appropriately.
4.2. Motor and Propeller Installation
The motors are typically pre-installed. Ensure they are securely fastened to the arms.
- Identify the correct rotation direction for each motor (CW/CCW).
- Attach the corresponding propellers (CW for CW motors, CCW for CCW motors) using the provided nuts. Ensure they are tightened firmly but do not overtighten.
- Double-check that no wires are pinched or obstructing propeller rotation.

Figure 4.2: Detail of a motor and propeller assembly, showing the propeller nut and motor bell.
4.3. FPV Camera and VTX Setup
The 1200TVL FPV camera and 200mW VTX are integrated into the quadcopter.
- Sørg for, at kameralinsen er ren og fri for blokeringer.
- Verify the VTX antenna is securely connected. Never power on the VTX without an antenna attached, as this can damage the unit.
- Refer to the VTX documentation (if provided separately or online) for instructions on changing video channels and power levels.

Figure 4.3: The FPV camera securely mounted within the carbon fiber frame, providing the pilot's view.
4.4. Installation og tilslutning af modtager (PNP-version)
If you have the PNP (Plug-N-Play) version, you will need to install your own radio receiver.
- Connect your chosen receiver to the flight controller according to the flight controller's wiring diagram (typically UART connection for SBUS, IBUS, CRSF, etc.).
- Secure the receiver within the frame, ensuring its antennas are positioned optimally for signal reception and away from carbon fiber or power wires.
- Bind your receiver to your radio transmitter following the specific instructions for your receiver and transmitter model.
4.5. Flight Controller Configuration (Betaflight/Cleanflight)
The F4 OSD flight controller requires configuration using software like Betaflight Configurator.
- Download and install the latest Betaflight Configurator software on your computer.
- Connect the quadcopter to your computer via a USB cable.
- Update the flight controller firmware to the latest stable version.
- Configure the receiver protocol, ESC protocol (e.g., DSHOT600), OSD settings, modes (Arm, Angle, Acro, etc.), and motor directions.
- Perform accelerometer calibration.
- Always remove propellers before connecting to Betaflight and testing motor outputs.
5. Betjeningsvejledning
5.1. Tjek før flyvning
- Ensure battery is fully charged and securely mounted with a strap.
- Kontroller, at propellerne er korrekt installeret og spændt.
- Check for any loose wires or damaged components.
- Turn on your radio transmitter and FPV goggles/monitor.
- Confirm clear FPV video feed and OSD display.
- Check arming switch and flight modes on your transmitter.
5.2. Tilkobling og frakobling
The quadcopter will not arm if it detects an issue (e.g., low battery, no receiver signal, accelerometer not calibrated).
- Tilkobling: With the quadcopter on a level surface, move the arming switch on your transmitter to the 'armed' position. The motors will typically spin slowly, indicating readiness.
- Deaktivering: To disarm, move the arming switch back to the 'disarmed' position. Motors will stop immediately. In an emergency, you can also disarm by setting throttle to minimum and yawing left (or right, depending on configuration) for a few seconds.
5.3. Grundlæggende flyvekontrol
Standard Mode 2 (left stick throttle/yaw, right stick pitch/roll) controls:
- Gashåndtag (venstre greb op/ned): Styrer højden.
- Drej (venstre pind venstre/højre): Rotates the quadcopter horizontally.
- Toneleje (højre pind op/ned): Tilts the quadcopter forward/backward.
- Rul (højre pind venstre/højre): Tilts the quadcopter left/right.
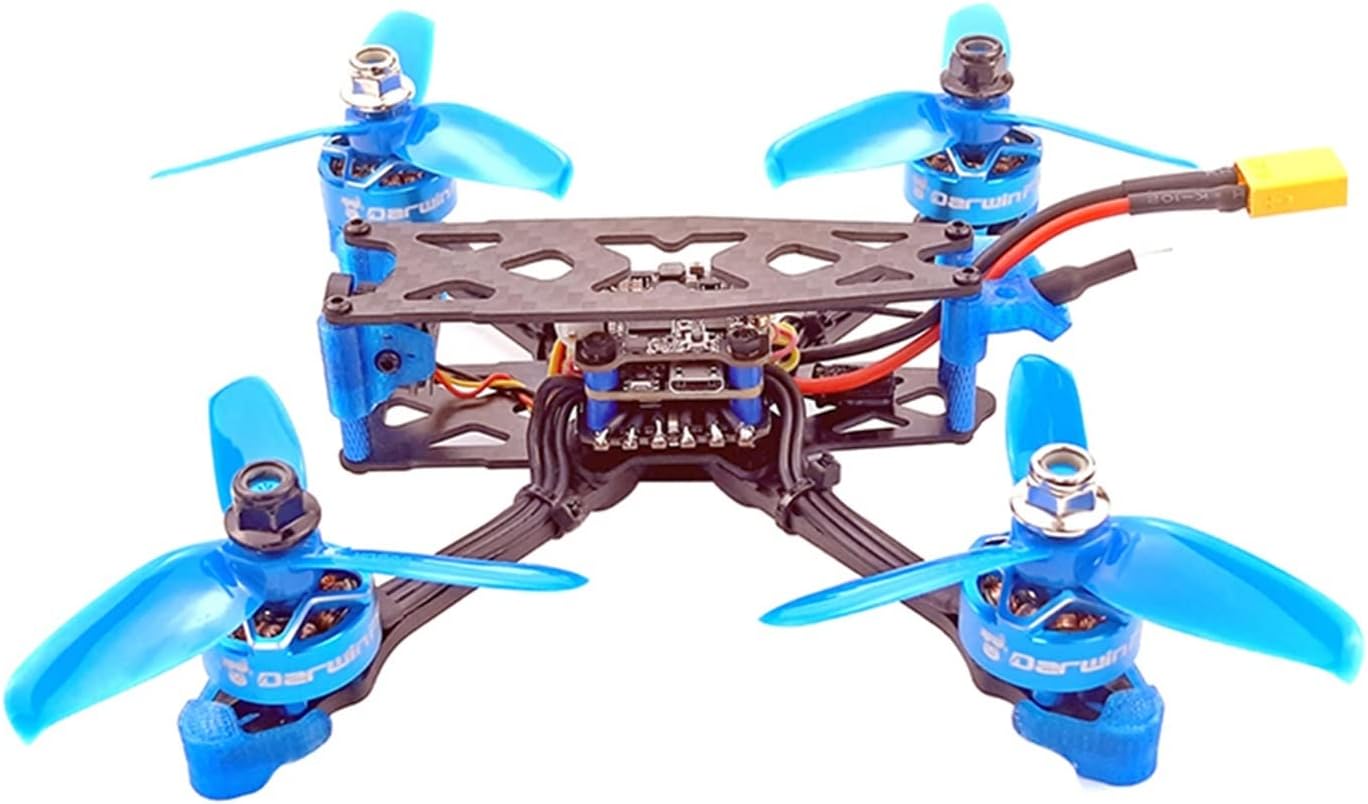
Figure 5.1: The DarwinFPV Darwin79 from an angled perspective, ready for flight.
6. Vedligeholdelse
Regular maintenance ensures the longevity and safe operation of your DarwinFPV Darwin79.
- Inspektion efter flyvning: After each flight, check for bent or cracked propellers, loose screws, damaged wires, or signs of impact.
- Udskiftning af propel: Replace any damaged propellers immediately. Even minor damage can cause vibrations and affect flight performance.
- Rensning: Keep the frame, motors, and electronics free from dirt, dust, and debris. Use compressed air or a soft brush. Avoid using liquids directly on electronics.
- Motorlejer: Listen for unusual noises from motors. Worn bearings may need replacement.
- Firmwareopdateringer: Periodically check for new firmware versions for your flight controller and ESCs. Updates can improve performance and add features.
7. Fejlfinding
Dette afsnit omhandler almindelige problemer, du kan støde på.
| Problem | Mulig årsag | Løsning |
|---|---|---|
| Quadcopteren aktiveres ikke. | Low battery, no receiver signal, accelerometer not calibrated, flight controller error. | Charge battery, check receiver connection/binding, calibrate accelerometer in Betaflight, check OSD messages for error codes. |
| Motors not spinning or spinning unevenly. | Damaged motor/ESC, incorrect motor direction, ESC calibration issue, loose wiring. | Inspect motors/ESCs for damage, verify motor direction in Betaflight, recalibrate ESCs (if applicable), check all solder joints. |
| No FPV video signal or poor quality. | Loose VTX antenna, incorrect VTX channel, damaged camera/VTX, interference. | Ensure VTX antenna is tight, verify VTX channel matches goggles, check camera/VTX connections, try a different channel. |
| Ustabil flyvning eller drift. | Bent/damaged propellers, incorrect PID tuning, unbalanced quadcopter, accelerometer drift. | Replace damaged propellers, recalibrate accelerometer, consider adjusting PID values (advanced users), ensure battery is centered. |
8. Specifikationer
Key technical specifications for the DarwinFPV Darwin79:
- Model: Darwin79
- Rammemateriale: 3K Carbon Fiber
- Akselafstand: 140 mm
- Propeller Size: 3 tommer
- Flyveleder: F4 OSD
- ESC'er: 30A BLHeli_S
- Videosender (VTX): 40CH 200mW
- FPV-kamera: 1200TVL
- Approximate Weight (without battery): 143.1g (as shown in Figure 8.1)
- Fabrikant: GUANGPENG
- ASIN: B0BNGHS75X

Figure 8.1: The DarwinFPV Darwin79 on a scale, indicating its approximate weight without a battery.
9. Garanti og support
For warranty information and technical support, please refer to the specific terms provided by your retailer or the manufacturer, SHENGANG. Keep your proof of purchase for any warranty claims.
For further assistance or advanced troubleshooting, consider consulting online FPV communities and forums, which often provide valuable resources and peer support.


