1. Produktet er slutview
The STINGER Audio MT20001 is a 1-channel monoblock Class D amplifier designed to deliver 2000 Watts RMS of continuous power for car audio subwoofer systems. Its compact design and advanced features ensure high efficiency and precise sound control. This amplifier is engineered for robust performance and includes a remote bass knob for convenient level adjustments.

Figure 1: STINGER Audio MT20001 Monoblock Amplifier and Remote Bass Knob.
Video 1: Officiel videovisningasing the STINGER Audio MT Amplifier Series, highlighting key features and design.
2. Sikkerhedsoplysninger
Læs venligst alle instruktioner omhyggeligt, inden du installerer og bruger din ampleverandør. Manglende overholdelse af disse retningslinjer kan resultere i skade på amphøjttalere eller køretøj, og det kan ugyldiggøre din garanti.
- Professionel installation anbefales: På grund af kompleksiteten af bilstereosystemer anbefales professionel installation på det kraftigste.
- Strømkilde: Sørg for, at køretøjets batteri er frakoblet, før du foretager strømtilslutninger, for at undgå kortslutninger.
- Korrekt jording: Tilslut altid amplifier's ground terminal securely to a clean, unpainted metal surface of the vehicle chassis.
- Ventilation: Monter amplifier in a location that allows for adequate air circulation to prevent overheating. Avoid covering the ampafdækning med tæpper eller andre materialer.
- Ledningsføring: Use appropriate gauge wiring for power, ground, and speaker connections as specified in the installation section. Incorrect wiring can lead to fire or equipment damage.
- Væskeeksponering: Behold amplifier away from moisture and liquids.
- Høreværn: Langvarig eksponering for høje lydtryksniveauer kan forårsage permanent høreskade. Vær forsigtig, når du justerer lydstyrken.
3. Installation og opsætning
3.1 Ledningsforbindelser
Proper wiring is crucial for optimal performance and safety. Refer to the diagrams and instructions below for correct connections.
- Strøm (+12V): Connect a 0/1 gauge power cable from the vehicle's positive battery terminal to the amplifier's +12V terminal. An inline fuse (not included) must be installed within 18 inches of the battery.
- Jord (GND): Connect a 0/1 gauge ground cable from the amplifier's GND terminal to a clean, unpainted metal point on the vehicle chassis. The ground cable should be as short as possible.
- Fjernbetjening (REM): Connect a 18-gauge remote turn-on wire from your head unit's remote output to the ampforsyningens REM-terminal. Denne ledning tænder amptænd og sluk for støjrelæet med din hovedenhed.
- RCA-indgang: Connect RCA cables from your head unit's subwoofer output to the amplifier's RCA INPUT terminals.
- RCA Bridge In/Out: Use the BRIDGE IN/OUT terminals to link multiple MT series amplifiers for a bridged system.
- Mono Output (Speakers): Connect your subwoofer(s) to the MONO OUTPUT terminals. This amplifier supports a minimum impedance of 1 Ohm. Use 8 gauge speaker wire for optimal performance.

Figur 2: Bagside view af amplifier showing power, ground, remote, and mono output terminals.
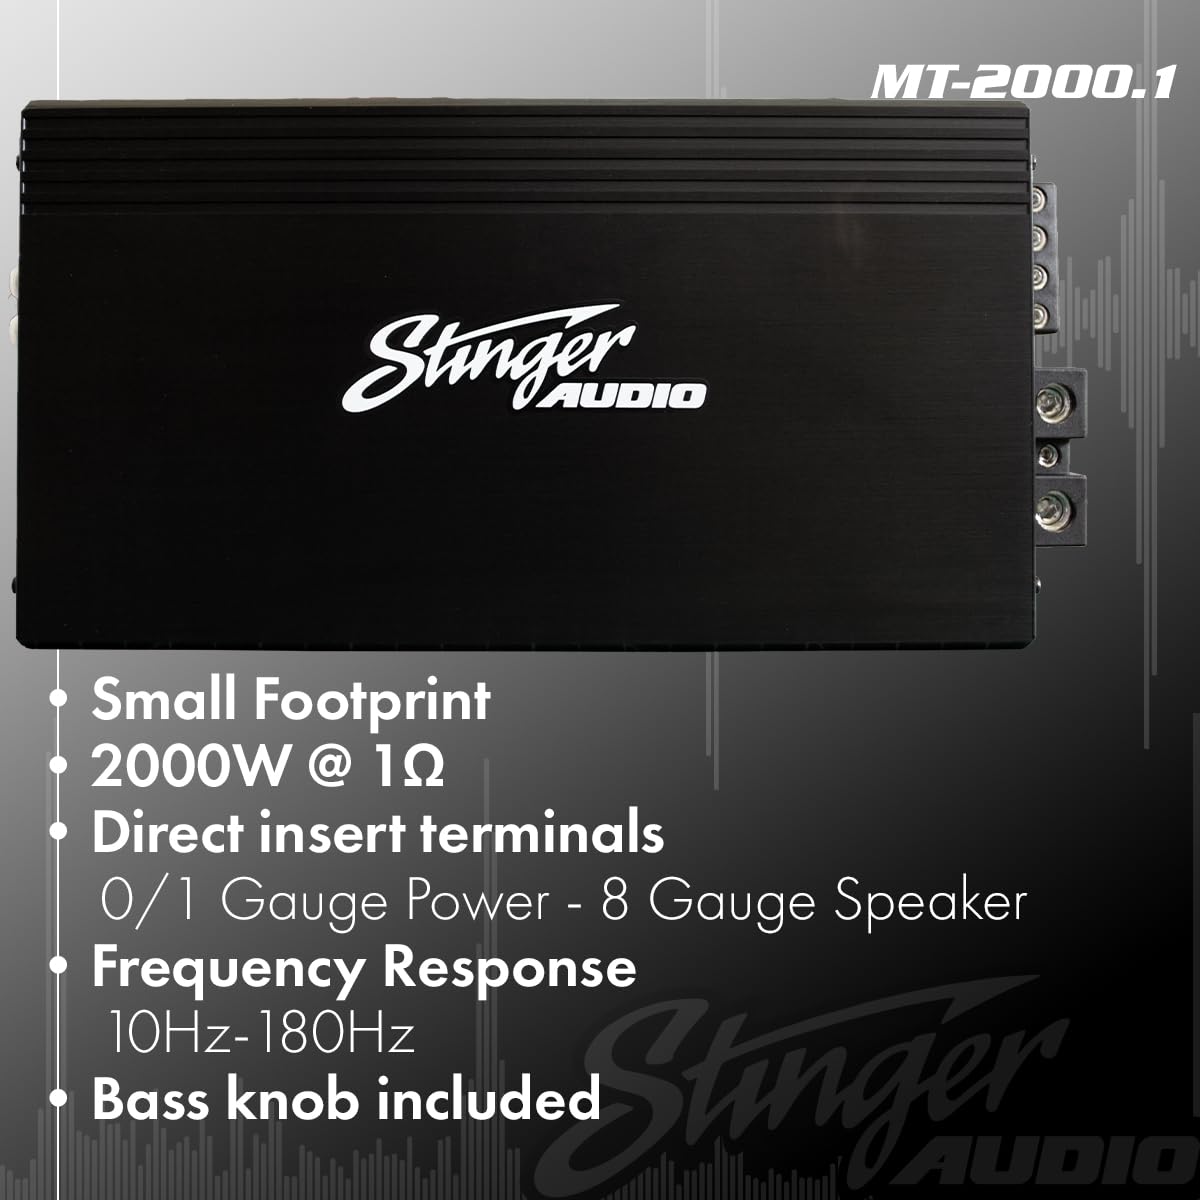
Figur 3: Amplifier features including terminal sizes for power (0/1 Gauge) and speaker (8 Gauge).
3.2 Betjening og justeringer
MT20001 amplifier features several controls to fine-tune your audio system.
- Gain (Level): Justerer indgangsfølsomheden for ampvæske, der matcher udgangsvolumenettage på din hovedenhed. Start med minimumsforstærkningen og øg langsomt, indtil den ønskede lydstyrke opnås uden forvrængning.
- Lavpasfilter (LPF): This filter allows frequencies below the set point to pass through to the subwoofer. Adjustable from 40Hz to 180Hz. Set this to match your subwoofer's frequency response and blend with your main speakers.
- Subsonisk filter: This filter removes ultra-low frequencies that are inaudible and can cause damage to your subwoofer. Adjustable from OFF to 50Hz.
- Basforstærkning Q: Provides a variable bass boost from 0dB to 12dB at a selectable frequency (30Hz or 80Hz). Use sparingly to avoid distortion.
- Fjernbassknap: The included remote bass knob allows for convenient adjustment of the bass level from your listening position.

Figur 4: Amplifier control panel showing input, gain, LPF, subsonic, frequency, and bass boost settings.

Figure 5: The remote bass knob for convenient bass level adjustment.
Video 2: Detailed feature overview video for the STINGER Audio MT Amplifier Series, demonstrating its capabilities.
4. Betjeningsvejledning
Når amplifier is correctly installed and wired, follow these steps for operation:
- Tænd: Tænd for bilens tænding og hovedenhed. ampStrømindikatoren på strømforsyningen skal lyse.
- Indledende lydstyrkeindstilling: Start with the head unit's volume at a low level.
- Forstærkningsjustering: Langsomt øge amplifier's gain control (Level) until the desired volume is reached without any audible distortion. If distortion occurs, reduce the gain.
- Filterjustering: Adjust the Low Pass Filter (LPF) and Subsonic Filter to optimize the subwoofer's performance and blend with your other speakers. Experiment with settings to find the best sound for your system.
- Bass Boost: If additional bass impact is desired, carefully adjust the Bass Boost Q. Excessive boost can lead to distortion and potential damage.
- Fjernbassknap: Use the remote bass knob for quick and easy adjustments to the subwoofer's output level while listening.
5. Vedligeholdelse
Regelmæssig vedligeholdelse er med til at sikre din bils levetid og ydeevne. amplivligere.
- Rensning: Rengør med jævne mellemrum ampRengør ydersiden af apparatet med en blød, tør klud. Undgå at bruge skrappe kemikalier eller slibende rengøringsmidler.
- Ventilation: Sørg for, at amplifier's cooling fins are free from dust and debris. Blocked fins can lead to overheating.
- Tilslutningskontrol: Annually, inspect all power, ground, remote, and speaker connections to ensure they are secure and free from corrosion. Loose connections can cause performance issues or damage.
- Miljøfaktorer: Beskyt amplifier from extreme temperatures and direct sunlight.
6. Fejlfinding
Hvis du oplever problemer med din ampLifier, skal du konsultere følgende fejlfindingsvejledning, før du kontakter support.
| Problem | Mulig årsag | Løsning |
|---|---|---|
| Ingen strøm / Ingen indikatorlampe | Blown fuse; Loose power/ground/remote connection; Faulty wiring. | Check and replace fuse; Verify all connections are secure; Test wiring for continuity. |
| Ingen lydudgang | RCA cables disconnected; Speaker wires disconnected/shorted; Gain set too low; Head unit not providing signal. | Check RCA and speaker connections; Increase gain; Verify head unit output. |
| Forvrænget lyd | Gain set too high; Improper filter settings; Speaker impedance mismatch; Damaged speaker. | Reduce gain; Adjust LPF/Subsonic filters; Verify speaker impedance (min 1 Ohm); Inspect speakers for damage. |
| AmpOverophedning af væske | Utilstrækkelig ventilation; For lav højttalerimpedans; Langvarig brug af høj lydstyrke. | Sørg for god luftgennemstrømning omkring amplifier; Verify speaker impedance; Reduce volume or allow cooling time. |
| Remote Bass Knob Not Working | Cable disconnected; Faulty knob. | Check connection cable; Contact support if knob is faulty. |
7. Specifikationer
Key technical specifications for the STINGER Audio MT20001 Monoblock Amplivligere.
| Feature | Detalje |
|---|---|
| Mærke | STINGER |
| Modelnummer | MT20001 |
| Produktmål (L x B x H) | 12.16 x 6.1 x 2.09 tommer (309 x 155 x 53 mm) |
| Vægt | 8 pund |
| Voltage | 9 volt (DC) |
| Monteringstype | Flush Mount |
| Strømudgang | 2000W @ 1 Ohm (Continuous) |
| Frekvensrespons | 10Hz-180Hz |
| Topologi | Digital klasse-D |
| MOSFET Technology | HEXFET Power MOSFET |
| Inkluderet tilbehør | Remote Control Bass Knob |

Figure 6: Detailed dimensions of the STINGER Audio MT20001 Amplivligere.

Figure 7: Internal components of the ampløfter, showcasing robust power supplies and HEXFET MOSFET technology.

Figur 8: Sideprofile illustrating the Digital Class-D and compact design of the amplivligere.
8. Garanti og support
For warranty information, technical support, or service inquiries, please refer to the official STINGER Audio webwebstedet eller kontakt deres kundeserviceafdeling. Gem din købskvittering som købsbevis i tilfælde af garantikrav.
For yderligere ressourcer og produktinformation, besøg STINGER-butik på Amazon.


