Indledning
Welcome to the user manual for your new Cmokifuly Puppy Cute 60% Mini 64 Keys Mechanical Keyboard Kit. This kit provides a unique and customizable foundation for building your own mechanical keyboard. Featuring an acrylic stacked case with a distinctive puppy head design, RGB backlighting, and hot-swappable 5-pin sockets, this kit is designed for enthusiasts who enjoy personalizing their gaming and typing experience. Please note that this product is a keyboard kit and does not include MX switches or keycaps, which must be purchased separately.

Image: The Cmokifuly Puppy Cute Mechanical Keyboard Kit fully assembled with keycaps and switches, showcasing its unique design and vibrant RGB lighting.
Hvad er der i æsken
Kontroller venligst, at alle følgende varer er inkluderet i din pakke:
- Keyboard PCB Plate Stacked Case (with integrated PCB)
- Afbryder/tastaturaftrækker
- USB Type-C-kabel
- Keyboard Grease
- Rengøringsbørste
Note: MX switches and keycaps are NOT included and must be purchased separately. The images in this manual showing a complete keyboard are for display purposes only.
Opsætningsvejledning
Follow these steps to assemble and set up your mechanical keyboard kit.
1. Installation af afbrydere
This keyboard kit features hot-swappable sockets, allowing for easy installation and removal of switches without soldering.
- Forbered afbrydere: Ensure your chosen 3-pin or 5-pin MX-style mechanical switches are straight and free of bent pins. If pins are bent, gently straighten them with tweezers.
- Juster kontakter: Align the pins of the switch with the holes on the PCB. The switch should fit snugly into the socket.
- Indsæt afbrydere: Gently press the switch straight down until it clicks into place. Do not force it, as this can bend or damage the pins or the socket. Repeat for all desired switch positions.

Image: The keyboard kit's PCB and plate, showing the hot-swappable sockets where mechanical switches are to be inserted. The puppy head design is visible on the right.
2. Installing Keycaps
Once all switches are installed, you can attach your keycaps.
- Align Keycaps: Align the cross-shaped stem on the underside of each keycap with the stem on the top of the installed switch.
- Press Keycaps: Gently press the keycap down onto the switch until it is firmly seated. Repeat for all keycaps.
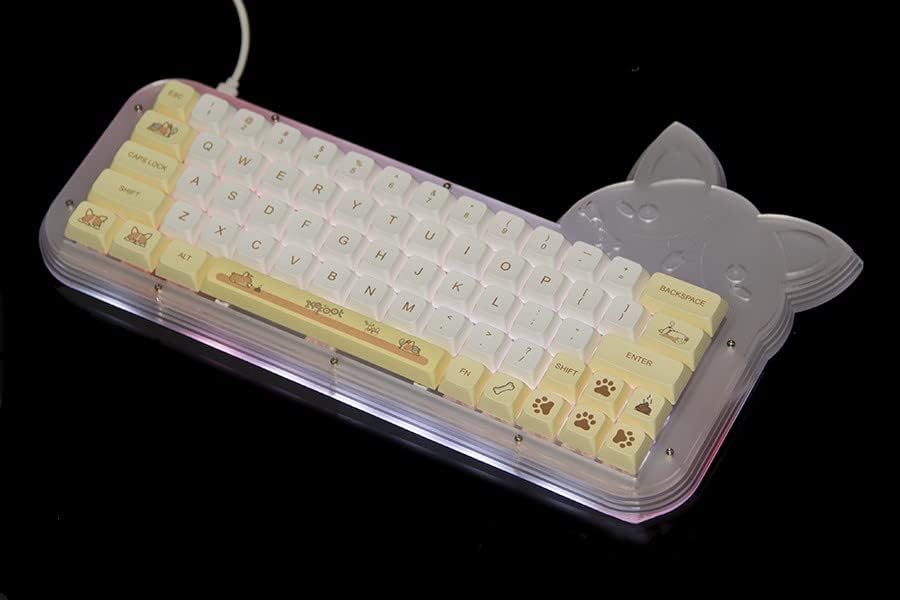
Image: The assembled keyboard kit with white and yellow keycaps installed, demonstrating the vibrant RGB backlighting effects.
3. Tilslutning af tastaturet
Your keyboard uses a detachable USB Type-C cable for connection.
- Tilslut USB-C: Insert the smaller USB Type-C end of the provided cable into the port on the keyboard.
- Tilslut til computer: Insert the standard USB-A end of the cable into an available USB port on your computer (PC or laptop).
- Driver installation: The keyboard is plug-and-play and typically does not require additional drivers. Your operating system should automatically recognize the device.
Betjeningsvejledning
Grundlæggende funktionalitet
Once connected, your keyboard is ready for use. It functions as a standard 64-key mechanical keyboard.
RGB-baggrundsbelysningskontrol
The keyboard features extensive RGB backlighting with over 10 lighting modes. Specific key combinations are typically used to control lighting effects. Refer to the keyboard's default keymap or the VIA software for detailed controls. Common controls often include:
- Fn + [Tast]: To cycle through different lighting modes.
- Fn + [Tast]: To adjust brightness levels.
- Fn + [Tast]: To change lighting speed or direction.
- Fn + [Tast]: To select specific colors or color palettes.
For advanced customization of key assignments and RGB effects, the keyboard is programmable via VIA software. Please visit the official VIA website for software download and instructions on how to use it with your keyboard.

Image: The keyboard kit with RGB lighting active, viewed from an angle, highlighting the illuminated PCB and the translucent acrylic case.
Hot-Swappable Sockets
The hot-swappable sockets allow you to change switches without soldering. This is ideal for experimenting with different switch types (linear, tactile, clicky) to find your preferred typing feel or to replace a faulty switch.
- Fjern tastehætte: Use the provided keycap puller to gently remove the keycap from the switch.
- Fjern kontakt: Use the provided switch puller to grasp the top and bottom clips of the switch. Gently rock and pull the switch upwards until it detaches from the socket.
- Installer ny switch: Follow the "Installing Switches" steps in the Setup Guide to insert a new switch.
Opretholdelse
Proper maintenance will extend the lifespan and performance of your keyboard.
- Regelmæssig rengøring: Use the provided cleaning brush to remove dust and debris from between the keycaps and around the switches. For deeper cleaning, remove keycaps and use compressed air.
- Tør ned: Brug en blød, let damp cloth (water only, no harsh chemicals) to wipe down the acrylic case. Ensure no liquid enters the keyboard's internal components.
- Kabelpleje: Avoid sharp bends or kinks in the USB-C cable. Store it neatly when not in use.
- Undgå spild: Keep liquids away from the keyboard to prevent damage to the electronics.
Fejlfinding
Hvis du støder på problemer med dit tastatur, kan du prøve følgende løsninger:
- Tastaturet reagerer ikke:
- Sørg for, at USB-C-kablet er korrekt tilsluttet til både tastaturet og computeren.
- Prøv at tilslutte tastaturet til en anden USB-port på din computer.
- Test tastaturet på en anden computer for at udelukke et computerspecifikt problem.
- Sørg for, at alle afbrydere er korrekt placeret i deres sokler.
- Specifikke taster virker ikke:
- Remove the keycap and switch for the problematic key.
- Inspect the switch pins for bends or damage. Straighten bent pins carefully or replace the switch if damaged.
- Reinsert the switch firmly into the socket.
- Problemer med RGB-belysning:
- Sørg for, at tastaturet er korrekt tilsluttet og modtager strøm.
- Try cycling through RGB modes using the keyboard's function keys (refer to VIA software or default keymap).
- If using VIA, ensure the firmware is correctly loaded and settings are applied.
- Keyboard Detected but Input Lag/Errors:
- Try a different USB port, preferably a direct port on the motherboard for desktops.
- Ensure no other software is interfering with keyboard input.
If these steps do not resolve your issue, please contact Cmokifuly customer support for further assistance.
Specifikationer
| Modelnavn | 60% Mini 64 Keys Mechanical Keyboard Kit (Corgi) |
| Mærke | Smukt |
| Antal nøgler | 64 |
| Tastaturbeskrivelse | Only Keyboard Kit (Switches and Keycaps not included) |
| Forbindelsesteknologi | USB Type-C med kabel |
| Kompatible enheder | Laptop, PC |
| Særlige funktioner | Dog Head Shape Case, Stacked Structure, Hot-Swappable 5-pin Sockets, Programmable VIA, RGB Backlighting |
| Tastatur baggrundsbelysning | RGB (over 10 lighting modes) |
| Etui materiale | Acrylic (Translucent Milk-White) |
| Varens vægt | 2.03 pund (ca. 0.92 kg) |
| Pakkedimensioner | 15.12 x 9.29 x 2.52 tommer (ca. 38.4 x 23.6 x 6.4 cm) |
Garanti og support
For warranty information and technical support, please refer to the official Cmokifuly brand store or contact their customer service directly.
Online ressourcer:
- Official Cmokifuly Store: Besøg butik
- Brugermanual (PDF): Download PDF
Gem venligst din købsbevis i tilfælde af garantikrav.


