1. Introduktion
The Sonic Blast Digital Alarm Clock with Projection is designed to provide a reliable and effective wake-up experience, especially for heavy sleepers. It combines an extra-loud alarm with a bright strobe light, time projection, Bluetooth audio, and a USB charging port. This manual will guide you through the setup, operation, and maintenance of your device.

Image 1.1: The Sonic Blast Digital Alarm Clock with Projection, showing its display, time projection, and USB charging capability.
2. Sikkerhedsoplysninger
- Læs alle instruktioner, før du betjener enheden.
- Hold enheden væk fra vand eller overdreven fugt.
- Udsæt ikke enheden for ekstreme temperaturer eller direkte sollys.
- Brug kun den medfølgende strømadapter.
- Forsøg ikke selv at skille enheden ad eller reparere den. Overlad al service til kvalificeret personale.
- Sørg for korrekt ventilation omkring enheden.
3. Pakkens indhold
- Sonic Blast Digital Alarm Clock with Projection (Model SB775B)
- Strømadapter
- Brugermanual
4. Produktet er slutviewBetjeningselementer og indikatorer
Familiarize yourself with the various buttons, ports, and indicators on your Sonic Blast alarm clock.

Billede 4.1: Forside view of the Sonic Blast alarm clock highlighting display and feature icons.
Frontpanel
- LED display: Shows current time, alarm status (AL1, AL2), PM indicator, and Bluetooth (BT) status.
- Strobe lys: Flashes during alarm.
Toppanel

Image 4.2: Top panel controls, including the SNOOZE/DIMMER button.
- POWER -knap: Tænder/slukker enheden.
- VOL- / VOL+ knapper: Juster lydstyrken.
- AL.SET Button: Used to set alarms.
- DIMMER-knap: Adjusts display brightness (5 levels).
- TIME / MIN-knapper: Adjust time and alarm settings.
- SNOOZE knap: Activates snooze function.
- BUZZER/TONE Switch: Selects alarm sound type.
- ALM1 / ALM2 / VIB Switch: Selects alarm mode (Alarm 1, Alarm 2, or Vibration).
- PROJECTION IMAGE ON/OFF / ROTATE Button: Controls the projection feature.
- FOCUSING Wheel: Adjusts the clarity of the projected time.
Bagpanel

Billede 4.3: Bagside view of the Sonic Blast alarm clock, showing USB and AUX ports.
- DC IN-stik: Til tilslutning af strømadapteren.
- USB opladningsport: Til opladning af eksterne enheder.
- AUX IN -stik: Til tilslutning af eksterne lydkilder.
- VIBRATOR Jack: For connecting an optional bed shaker (sold separately).
5. Opsætning
5.1 Strømtilslutning
- Plug the power adapter into the DC IN jack on the rear of the alarm clock.
- Sæt den anden ende af adapteren i en almindelig stikkontakt.
- Urdisplayet vil lyse.
5.2 Installation af batteribackup
A CR2032 lithium battery (not included) can be installed to maintain time and alarm settings during a power outage.

Image 5.1: Illustration of the CR2032 battery for backup power.
- Find batterirummet i bunden af enheden.
- Åbn batterirummets dæksel.
- Isæt et CR2032 lithiumbatteri, og sørg for den korrekte polaritet (+/-).
- Luk batterirummets dæksel forsvarligt.
5.3 Indstilling af klokkeslæt
- Tryk og hold på TID knappen, indtil displayet blinker.
- Brug TIME og MIN buttons to set the current hour and minute.
- Tryk på TID knappen igen for at bekræfte indstillingen.
6. Betjeningsvejledning
6.1 Indstilling af alarmer (Alarm 1 og Alarm 2)
Uret understøtter to uafhængige alarmer.

Image 6.1: The Sonic Blast alarm clock supporting dual alarms.
- Tryk og hold på AL.SET button. AL1 will flash on the display.
- Brug TIME og MIN knapperne til at indstille det ønskede alarmtidspunkt for Alarm 1.
- Trykke AL.SET again to set Alarm 2, repeating the process.
- After setting both alarms, press AL.SET one more time to exit alarm setting mode.
- To activate an alarm, slide the ALM1 / ALM2 / VIB switch to the desired alarm (AL1 or AL2). The corresponding indicator will light up.
- To select the alarm sound, slide the BUZZER/TONE switch to BUZZER or TONE.
6.2 Snooze -funktion
Når alarmen lyder, skal du trykke på SLUM button to temporarily silence the alarm for a preset duration.

Image 6.2: Adjustable snooze feature for customized wake-up delays.
- The snooze duration is adjustable. Refer to the full manual for specific steps to adjust snooze time.
6.3 Justering af lydstyrke og tone
Customize your alarm sound to your preference.

Image 6.3: Graphic illustrating the adjustable volume feature.
- Brug VOL- og VOL+ buttons to adjust the alarm volume.
- Skub til BUZZER/TONE switch to select between a standard buzzer or an adjustable tone.

Image 6.4: Close-up of the tone adjustment controls.
6.4 Projektionsfunktion
Project the time onto your ceiling or wall for easy viewing.
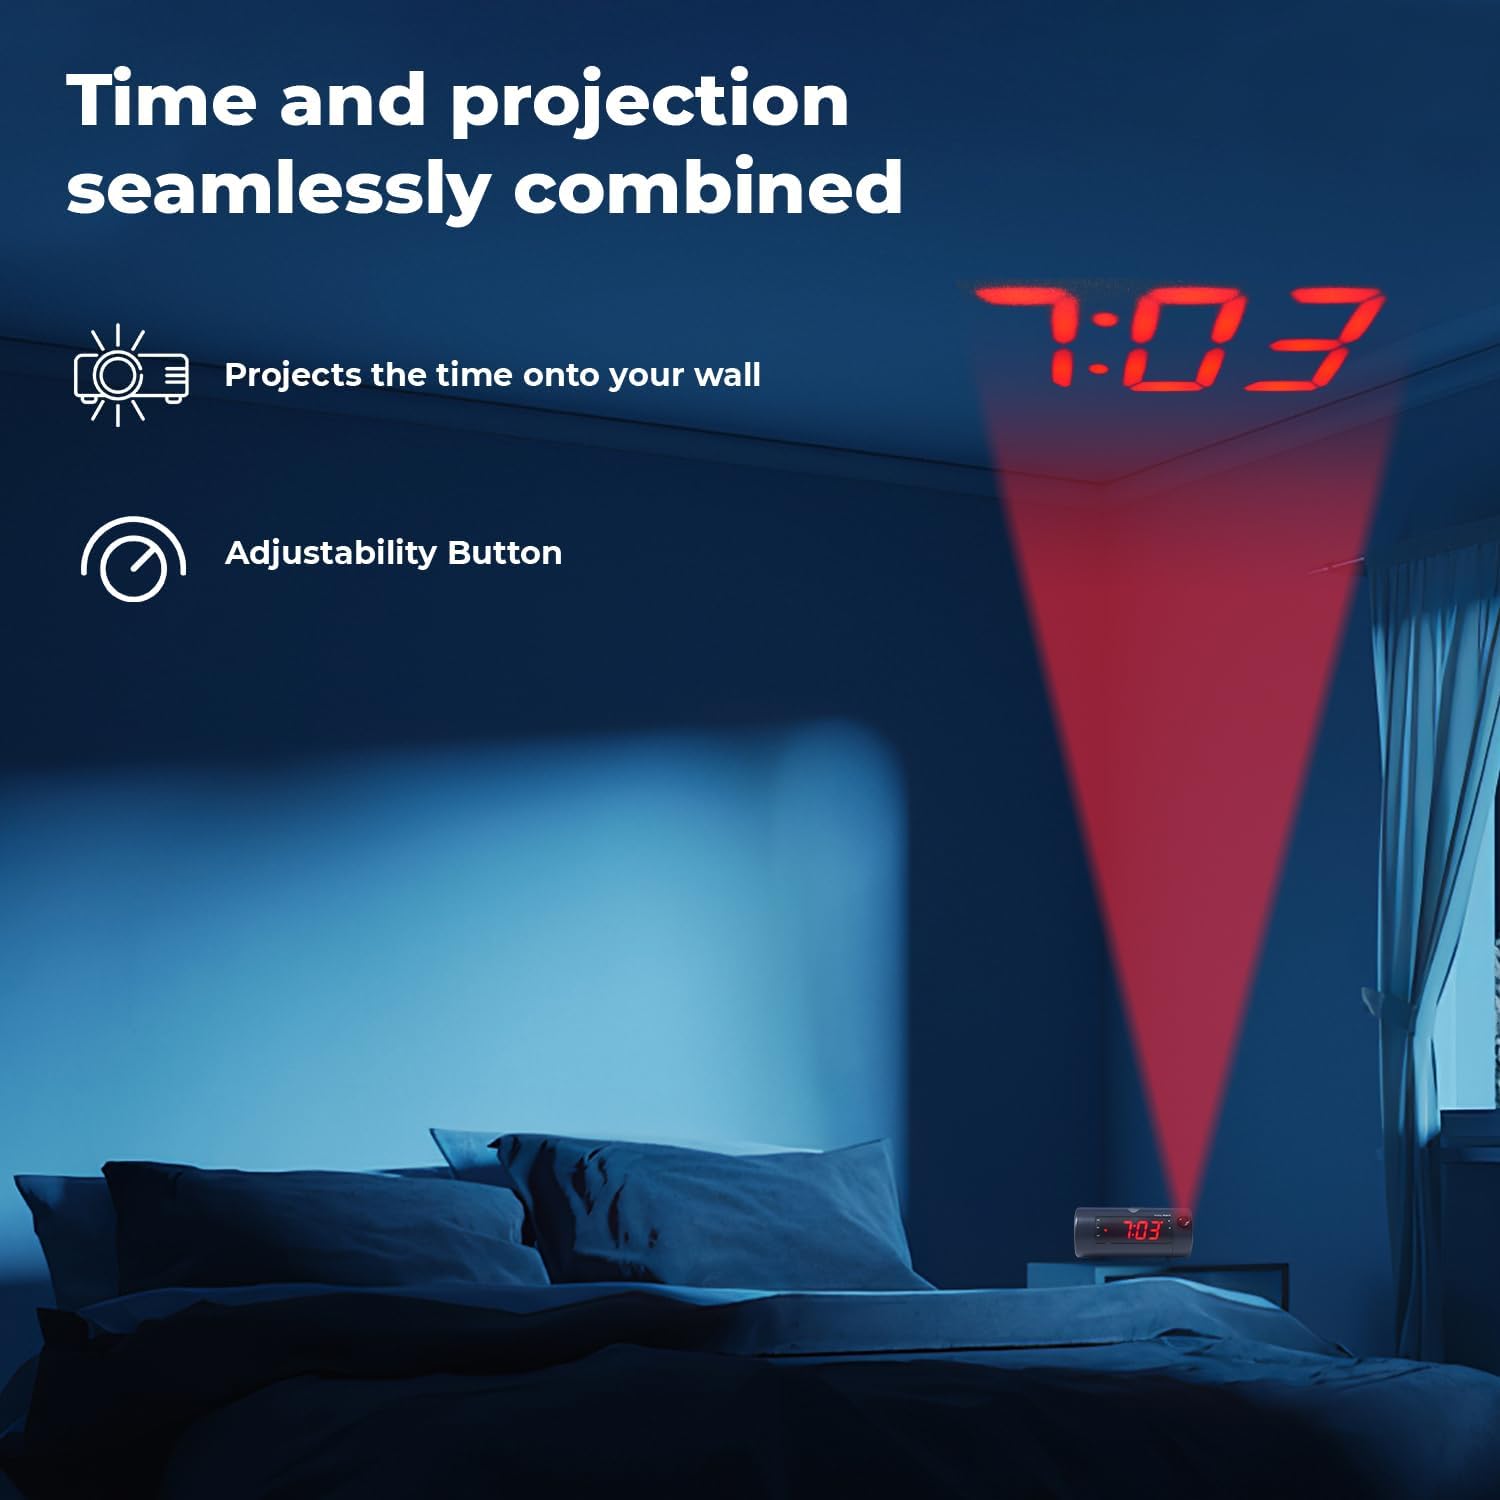
Image 6.5: Time projected onto a bedroom wall.
- Tryk på PROJECTION IMAGE ON/OFF knappen for at tænde eller slukke for projektionen.
- Brug FOKUSERING wheel to adjust the clarity of the projected image.
- Tryk og hold på PROJECTION IMAGE ROTATE button to rotate the projected time to the desired orientation.

Image 6.6: Close-up of the projection focus, on/off, and rotation controls.
6.5 Bluetooth-højttalerparring
Connect your smartphone or tablet to play audio through the alarm clock's speaker.
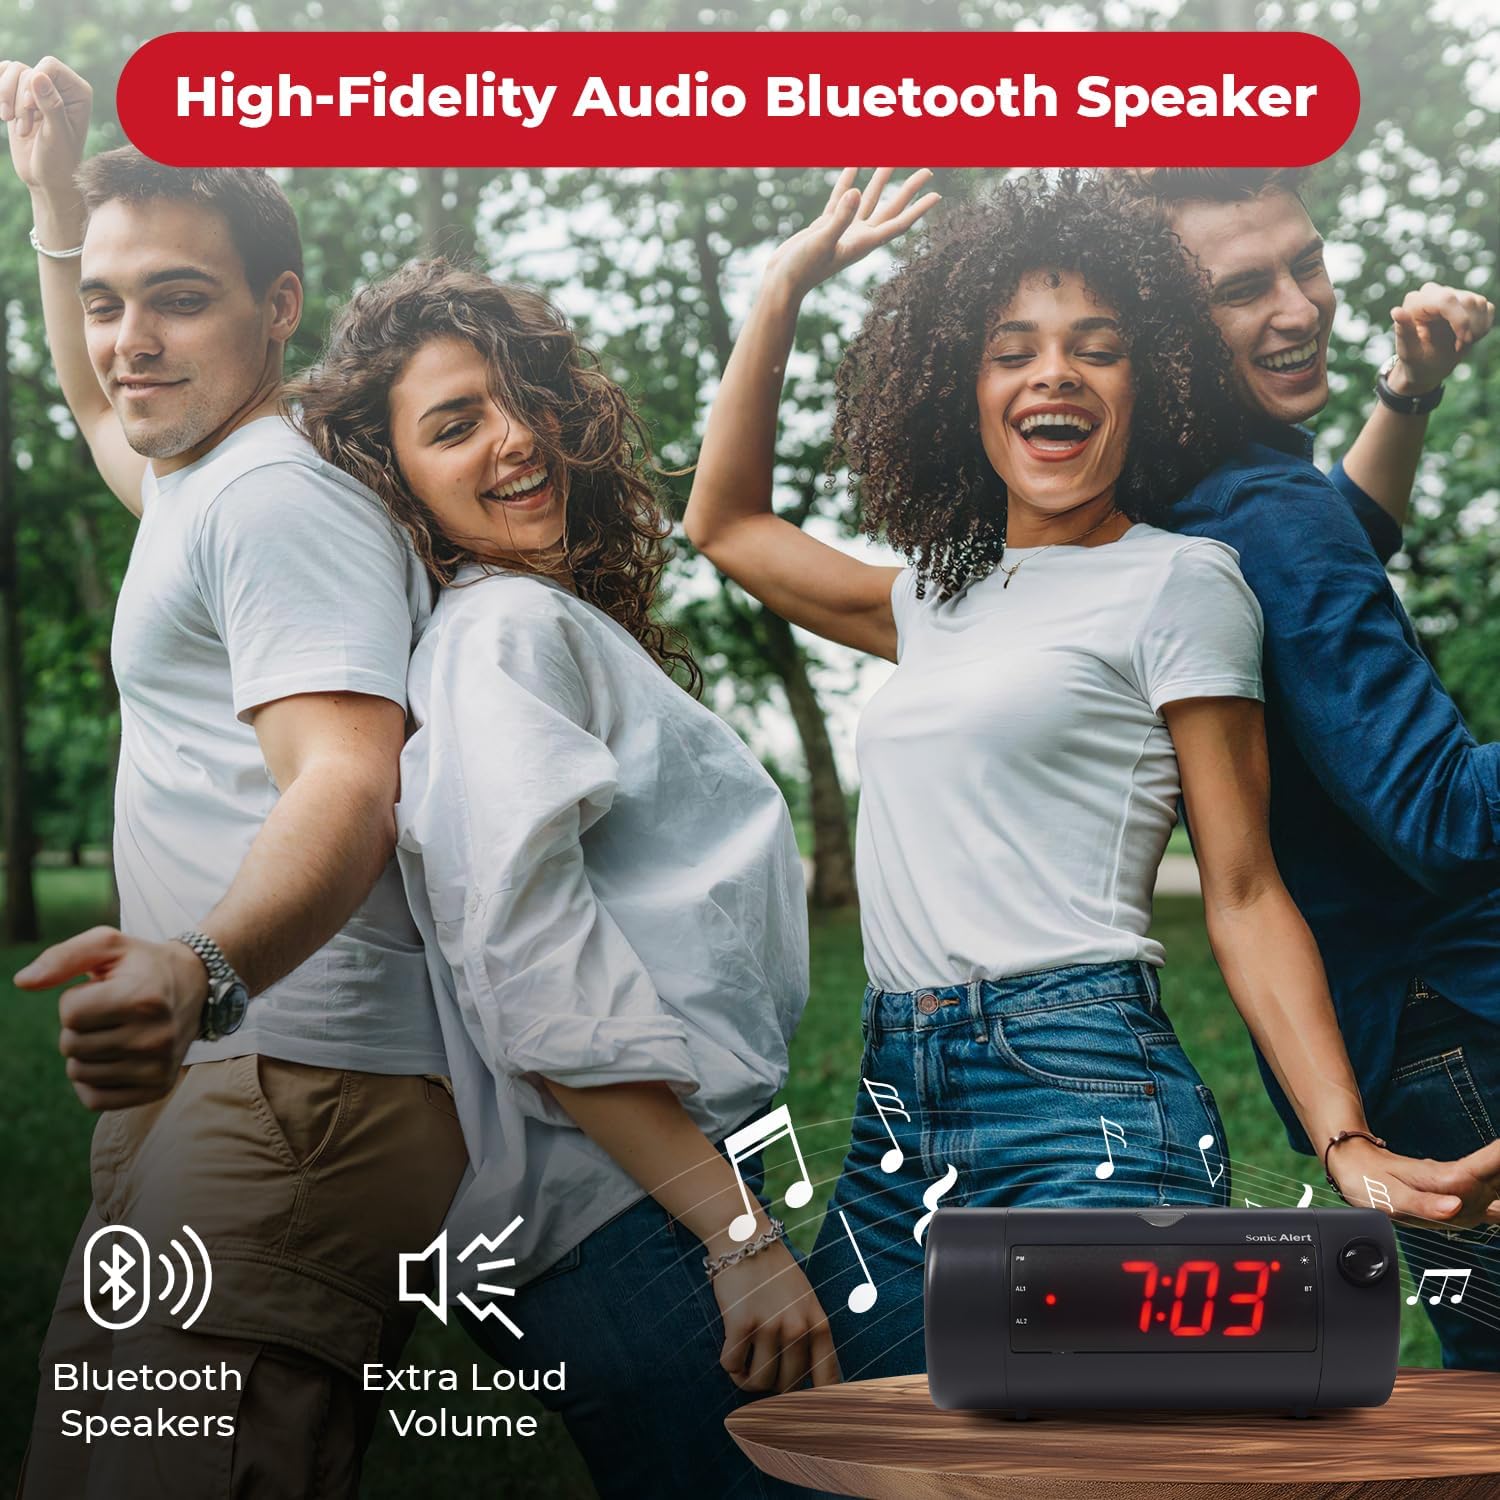
Image 6.7: The Sonic Blast alarm clock functioning as a Bluetooth speaker.
- Sørg for, at vækkeuret er tændt.
- Aktiver Bluetooth på din mobilenhed.
- Søg efter "Sonic Blast" in your device's Bluetooth settings and select it to pair.
- The "BT" indicator on the clock display will illuminate when successfully paired.
6.6 USB Charging Port Usage
Use the built-in USB port to charge your compatible devices.

Image 6.8: Smartphone charging via the alarm clock's USB port.
- Connect your device's USB charging cable to the USB port on the rear of the alarm clock.
- The alarm clock must be connected to power for the USB charging port to function.
6.7 Recordable Alarm
The Sonic Blast allows you to record a custom alarm message.

Image 6.9: The recordable alarm feature in use.
- Refer to the detailed instructions in the full manual for recording and setting your custom alarm message.
6.8 12/24 timers visning
- To switch between 12-hour and 24-hour time format, press the TID button briefly while the time is displayed.
7. Vedligeholdelse
- Rengør enheden med en blød, tør klud. Brug ikke flydende rengøringsmidler eller slibende materialer.
- Hold enheden fri for støv og snavs.
- If the battery backup is used, replace the CR2032 battery annually or when the low battery indicator appears.
8. Fejlfinding
| Problem | Løsning |
|---|---|
| Urvisningen er slukket. | Ensure the power adapter is securely connected. Check the wall outlet. Press the POWER button to turn the unit on. |
| Alarmen lyder ikke. | Verify that the alarm is activated (AL1 or AL2 indicator is on). Check alarm volume. Ensure the correct alarm mode (BUZZER/TONE) is selected. |
| Projektionen er sløret eller ikke synlig. | Juster FOKUSERING wheel. Ensure the projection is turned on. Check the distance to the projection surface. |
| Bluetooth-enheden kan ikke parres. | Ensure Bluetooth is enabled on your device and the alarm clock. Move devices closer. Try restarting both devices. |
| USB-opladning virker ikke. | Ensure the alarm clock is connected to a power source. Check the USB cable and the device being charged. |
9. Specifikationer
| Feature | Detalje |
|---|---|
| Modelnummer | SB775B |
| Mærke | Sonic Alert |
| Alarmvolumen | Op til 113 dB |
| Display Type | Digital LED with 5-level dimmer |
| Særlige funktioner | Adjustable Projection Clock, Bluetooth Wireless Audio, USB Charging Port, Dual Alarm, Bright Flashing Light, Adjustable Volume & Tone, Adjustable Snooze, Recordable Alarm, Vibrating Bed Shaker Port (for optional SS5V shaker) |
| Strømkilde | Elektrisk med ledning |
| Batteri backup | 1 x CR2032 Lithium Cell (not included) |
| Produktdimensioner | Approximately 1"W x 1"H (Note: This dimension seems incorrect based on typical alarm clock sizes and product images. Please refer to product packaging for accurate dimensions.) |
| Varens vægt | 1.39 pund (0.63 kilo) |
10. Garanti og support
For warranty information and customer support, please refer to the official Sonic Alert webwebstedet eller kontakt deres kundeserviceafdeling. Gem din købskvittering til garantikrav.
Kontaktoplysninger: Please visit the Sonic Alert webhjemmeside for de mest opdaterede kontaktoplysninger.


