Indledning
Thank you for choosing the ROCAM CR1023 7-Inch Digital Alarm Clock. This manual provides detailed instructions for setting up, operating, and maintaining your new alarm clock. Please read this manual thoroughly before use to ensure optimal performance and longevity of your device.

The ROCAM CR1023 digital alarm clock features a large blue LED display, with a smartphone and wireless earbuds charging via its integrated USB ports.
Pakkens indhold
Tjek venligst pakken for følgende varer:
- 1 x ROCAM CR1023 Digital Alarm Clock
- 1 x Power Adapter with Cable (AC 100-240V compatible)
- 1 x brugermanual

The package includes the ROCAM CR1023 digital alarm clock, a power adapter with cable, and a user manual.
Produktegenskaber
- 7-Inch Large LED Display: Clear and bold digital time display.
- Dobbelte alarmer: Indstil to uafhængige alarmer til forskellige vækketidspunkter.
- Snooze-funktion: Provides an additional 9 minutes of sleep.
- Adjustable Brightness (Dimmer): 0-100% dimming for display.
- Touch Control Night Light: Integrated night light with adjustable brightness.
- USB & Type-C Charging Ports: Conveniently charge your mobile devices (5V, 1A output).
- 7-Level Volume Adjustment: Customize alarm volume.
- 12/24 Hour & DST Mode: Switch between time formats and activate Daylight Saving Time.
- Batteri-sikkerhedskopi: Retains time and alarm settings during power outages (requires 2 x AAA batteries, not included).
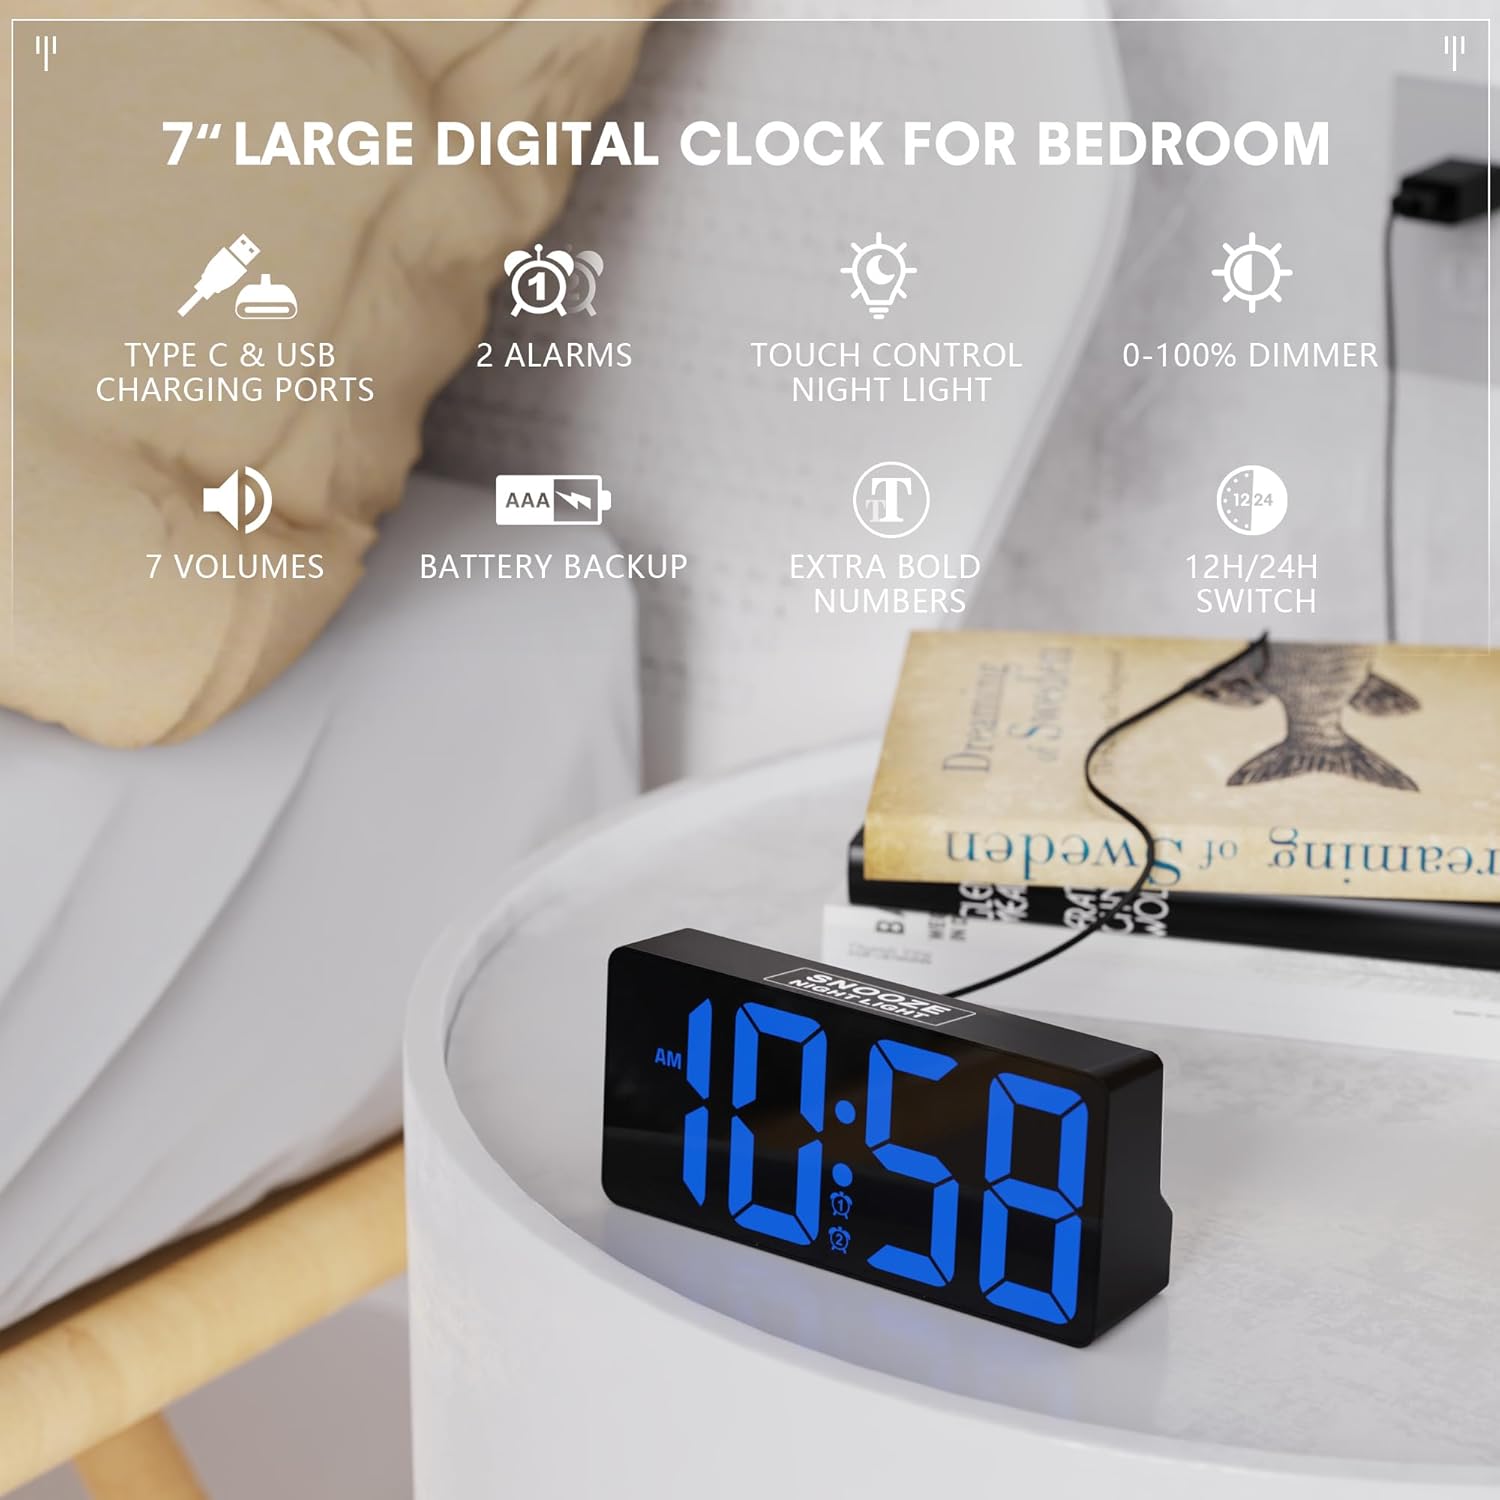
This image illustrates the ROCAM CR1023 digital alarm clock's main features, including its 7-inch display, dual alarms, touch-controlled night light, and USB charging capabilities.
Opsætning
1. Strømtilslutning
- Unpack the alarm clock and all accessories.
- Connect the provided power adapter cable to the DC IN port on the back of the clock.
- Plug the power adapter into a standard AC 100-240V wall outlet. The clock display will light up.
2. Battery Backup Installation (Optional but Recommended)
The battery backup function is designed to save your time and alarm settings during a power outage. The display will not remain on when operating on battery backup alone.
- Locate the battery compartment on the bottom of the clock.
- Åbn batterirummets dæksel.
- Insert 2 x 1.5V AAA batteries (not included) according to the polarity markings (+/-).
- Luk batterirummets dæksel forsvarligt.
Betjeningsvejledning
1. Indstilling af tid
- Tryk og hold på TIME/DST button on the back of the clock until the hour digits flash.
- Brug + or - knapper for at justere timen.
- Tryk på TIME/DST Tryk på knappen igen for at bekræfte timeindstillingen og gå videre til minutindstillingen. Minuttifrene blinker.
- Brug + or - knapper for at justere minutterne.
- Tryk på TIME/DST button one more time to confirm and exit time setting mode.
2. Indstilling af alarmer (Alarm 1 og Alarm 2)
Uret understøtter to uafhængige alarmer.
- Tryk og hold på ALARM 1 knap (for Alarm 1) eller ALARM 2 button (for Alarm 2) on the back until the alarm hour digits flash.
- Brug + or - knapper for at justere alarmtiden.
- Press the respective alarm button again to confirm the hour and move to minute setting. The alarm minute digits will flash.
- Brug + or - knapper til at justere alarmens minutter.
- Press the respective alarm button one more time to confirm and exit alarm setting mode.
3. Activating/Deactivating Alarms
- Tryk kort på ALARM 1 or ALARM 2 knappen for at slå alarmen til eller fra.
- An alarm icon will appear on the display when the alarm is active.

The dual alarm feature allows for two separate wake-up times, and the snooze function provides an additional 9 minutes of sleep.
4. Snooze-funktion
When an alarm sounds, touch the SNOOZE/NIGHT LIGHT area on the top of the clock to activate the snooze function. The alarm will pause for 9 minutes and then sound again.
5. Display Brightness Adjustment (Dimmer)
Drej på DIMMER knob on the back of the clock to adjust the display brightness from 0% (off) to 100% (brightest).

The clock offers a 0-100% adjustable dimming feature, allowing users to set the display brightness from completely off to high, suitable for any environment.
6. Natlys funktion
Tryk på SNOOZE/NIGHT LIGHT area on the top of the clock to turn the night light on or off. Hold the touch area to adjust the brightness of the night light.

The integrated night light can be activated and controlled via a touch-sensitive area on the top of the clock, providing soft illumination.
7. 12/24 Hour Format and DST
- Tryk kort på 12/24H button on the back to switch between 12-hour and 24-hour time formats.
- Tryk kort på TIME/DST button to activate or deactivate Daylight Saving Time (DST). An indicator will appear on the display when DST is active.

Users can easily switch between 12-hour and 24-hour time formats, and activate Daylight Saving Time (DST) mode as needed.
Using the USB and Type-C Charging Ports
The ROCAM CR1023 features both a standard USB-A port and a Type-C port (5V, 1A output) for charging your mobile devices.
- Connect your device's charging cable to either the USB-A or Type-C port on the back of the clock.
- Ensure the clock is powered via the AC adapter for the charging ports to function.
- The charging ports are for convenience and provide standard 5V/1A output. Charging speed may vary depending on your device.

The clock provides convenient charging for mobile devices through its integrated USB and Type-C ports, as shown with two smartphones connected.
Specifikationer
| Feature | Detalje |
|---|---|
| Model | CR1023 |
| Vise | 7-inch LED HD Display |
| AC-adapterindgang | AC 100-240V |
| Display lysdæmper | 0-100% justerbar |
| USB-opladningsporte | Type C & USB (5V, 1A) |
| Backup batteri | 2 x 1.5V AAA-batterier (medfølger ikke) |
| Produktets vægt | Ca. 0.23 kg (0.5 lbs) |
| Produktdimensioner | Ca. 16.5 x 7.6 x 4.5 cm (6.5 x 3 x 1.77 tommer) |
Opretholdelse
- Rensning: Tør uret af med en blød, tør klud. Brug ikke slibende rengøringsmidler eller opløsningsmidler.
- Placering: Place the clock on a stable, flat surface away from direct sunlight, heat sources, and moisture.
- Udskiftning af batteri: If using battery backup, replace AAA batteries annually or when they are depleted to ensure settings are retained during power interruptions.
Fejlfinding
- Clock display is blank:
- Ensure the power adapter is securely plugged into both the clock and a working wall outlet. If using battery backup during a power outage, the display will be blank, but settings are retained.
- Alarmen lyder ikke:
- Check if the alarm is activated (alarm icon visible on display). Ensure the alarm volume is not set to minimum. Verify the alarm time is set correctly.
- USB/Type-C charging not working:
- Confirm the clock is connected to AC power. Check if the charging cable is properly connected to both the clock and your device. Ensure your device is compatible with 5V/1A charging.
- Tidspunktet er forkert efter strømafbrydelsetage:
- If backup batteries were not installed or were depleted, the time may reset. Re-set the time manually. Ensure fresh AAA batteries are installed for future backup.
Garanti og support
For warranty information or technical support, please refer to the contact details provided with your purchase or visit the official ROCAM webwebsted. Behold din købskvittering som købsbevis i tilfælde af garantikrav.


