Indledning
Thank you for choosing the Isafenest Photoelectric Smoke Alarm. This device is designed to provide early warning of smoke and fire, helping to protect your home and family. It features a 10-year product life and a 5-year replaceable DC 9V battery, offering reliable and long-lasting protection. Please read this manual thoroughly before installation and use to ensure proper operation and safety.

Image: Two Isafenest Photoelectric Smoke Alarms, showing their compact, white design with a central test button and LED indicator.
Vigtige sikkerhedsoplysninger
Please observe the following safety precautions to ensure the safe and effective operation of your smoke alarm:
- Do not paint the smoke alarm. Painting can interfere with the sensor's ability to detect smoke.
- Regularly test the smoke alarm using the test button to ensure it is functioning correctly.
- Replace the battery every 5 years or immediately when the low battery warning sounds.
- Do not install the smoke alarm in areas with high humidity, extreme temperatures, or excessive dust, as this can lead to false alarms or malfunction.
- Clean the smoke alarm regularly to prevent dust accumulation from affecting its performance.
- This smoke alarm is designed for residential use. For commercial or industrial applications, consult relevant safety standards.
- In case of a real fire, evacuate immediately and call emergency services. Do not re-enter the building until declared safe.
Pakkens indhold
Bekræft at alle varer er til stede i pakken:
- Isafenest Photoelectric Smoke Alarm Unit (2 Pack)
- Monteringsbeslag (2)
- DC 9V Batteries (2)
- Screws and Anchor Plugs (for mounting)
- Brugermanual

Image: Contents of the Isafenest smoke alarm package, showing two smoke alarms, two mounting brackets, two 9V batteries, mounting hardware, and the user manual.
Opsætning og installation
Follow these steps for proper installation of your smoke alarm:
- Unscrew Mounting Bracket: Gently twist the mounting bracket counter-clockwise from the smoke alarm unit to separate it.
- Installer batteri: Connect the included 9V battery to the battery clip inside the smoke alarm unit. Ensure correct polarity.
- Markér borepunkter: Hold the mounting bracket against the desired installation location on the wall or ceiling. Mark the two drilling points.
- Bore huller: Drill two 5mm diameter holes at the marked points. Insert the anchor plugs into the drilled holes.
- Sikker monteringsbeslag: Align the mounting bracket with the anchor plugs and secure it firmly using the provided screws.
- Attach Alarm Body: Align the smoke alarm unit with the mounted bracket and twist it clockwise until it clicks securely into place.
- Test alarmen: Press the 'TEST' button on the front of the alarm. The alarm should sound loudly, and the LED indicator should flash. This confirms proper installation and battery function.
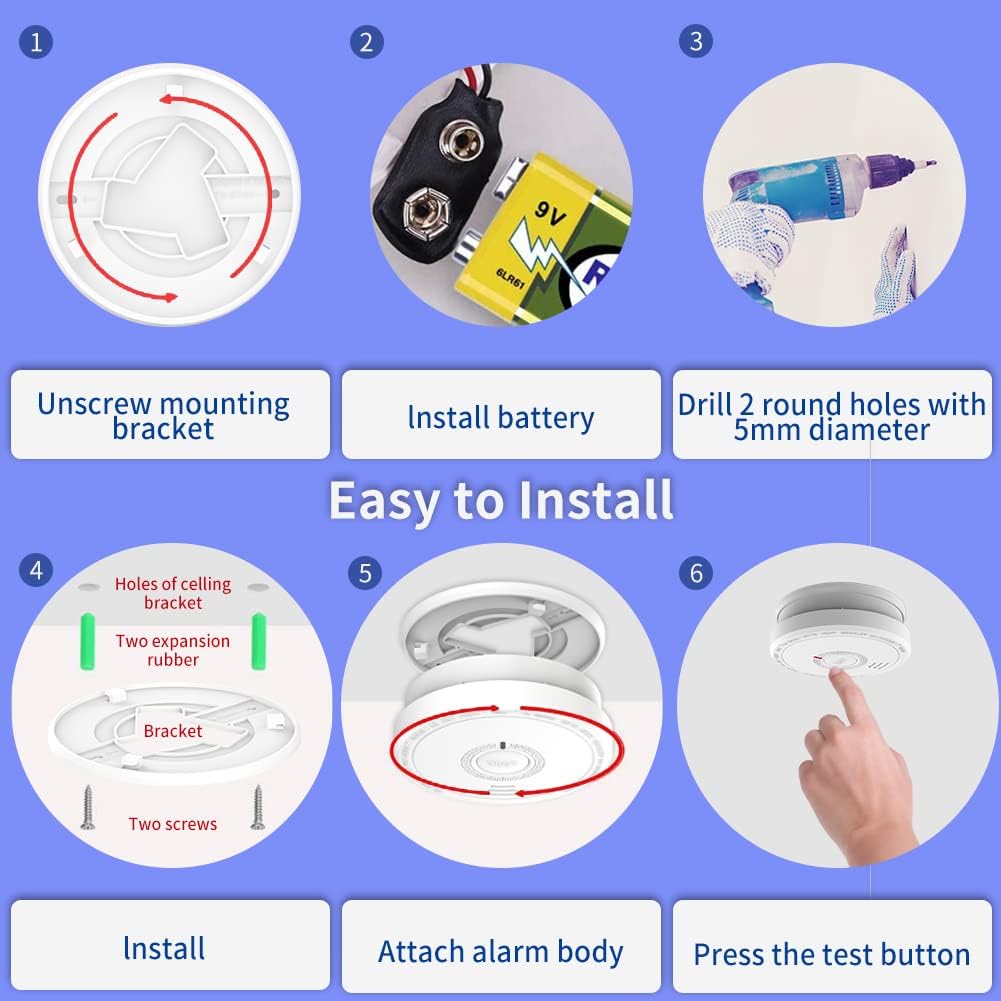
Image: A visual guide illustrating the six steps for installing the smoke alarm, from unscrewing the mounting bracket to testing the alarm.
Anbefalet placering
For optimal protection, install smoke alarms in every sleeping area, outside each separate sleeping area, and on every level of your home, including the basement.
- Avoid placing alarms in "dead air" spaces, such as corners where walls and ceilings meet, or within 10 cm (4 inches) of a wall when mounted on the ceiling.
- When mounting on a wall, the top of the alarm should be between 10 cm (4 inches) and 30 cm (12 inches) from the ceiling.
- Do not install near windows, doors, or air vents where drafts could interfere with smoke detection.
- Keep away from kitchens and bathrooms to avoid false alarms from cooking fumes or steam.

Image: A diagram illustrating recommended placement of smoke alarms (green circles) throughout a multi-story home for comprehensive safety coverage.
Operation
Test knap
The 'TEST' button is used to verify the alarm's functionality. Press and hold the 'TEST' button for a few seconds. The alarm will sound a loud, pulsating siren, and the LED indicator will flash rapidly. Release the button to stop the test.
- Ugentlig test: It is recommended to test your smoke alarm weekly to ensure it is working correctly.
- After Battery Replacement: Always test the alarm after replacing the battery.

Billede: Et nærbillede view of the smoke alarm's 'TEST' button, highlighting its function and the 85dB alarm sound level.
Silence/Hush Button
In case of a non-emergency alarm (e.g., from cooking fumes), you can temporarily silence the alarm by pressing the 'HUSH' button (which is the same as the 'TEST' button). The alarm will silence for approximately 10 minutes. After this period, if smoke is still present, the alarm will reactivate.
- Vigtig: Brug ikke lydløshedsfunktionen i en reel brandsituation. Evakuer straks.
- The silence feature is designed for nuisance alarms only.

Image: A visual representation of the 'HUSH' button function, showing a hand pressing the button to temporarily silence the alarm.
Opretholdelse
Udskiftning af batteri
The smoke alarm is designed with a 5-year replaceable DC 9V battery. When the battery is low, the alarm will chirp approximately once every 30-40 seconds, and the LED indicator will flash. Replace the battery immediately when this occurs.
- Twist the smoke alarm unit counter-clockwise to remove it from the mounting bracket.
- Disconnect the old 9V battery from the clip.
- Connect a new DC 9V battery, ensuring correct polarity.
- Reattach the smoke alarm unit to the mounting bracket by twisting clockwise until secure.
- Test the alarm using the 'TEST' button to confirm proper operation with the new battery.
Rengøring af din røgalarm
Dust and debris can accumulate on the smoke alarm and affect its performance. Clean your smoke alarm at least once a month.
- Use a soft brush attachment on your vacuum cleaner to gently remove dust from the alarm's cover and vents.
- Do not use cleaning solvents or sprays on the alarm, as these can damage the sensor.
- Never paint the smoke alarm.
Fejlfinding
If your smoke alarm is not functioning as expected, refer to the following table for common issues and solutions:
| Problem | Mulig årsag | Løsning |
|---|---|---|
| Alarmen bipper hvert 30-40 sekund. | Lavt batteri. | Replace the 9V battery immediately. |
| Alarmen lyder ofte uden røg. | Støvophobning, høj luftfugtighed, mados, damp. | Clean the alarm. Relocate if near kitchen/bathroom or high humidity areas. Use Hush button for nuisance alarms. |
| Alarmen lyder ikke under testen. | Dead or improperly installed battery, faulty unit. | Check battery connection and replace if necessary. Ensure alarm is securely attached to mounting bracket. If problem persists, the unit may be faulty and needs replacement. |
| LED-indikatoren blinker ikke. | No power, faulty LED. | Check battery. If battery is new and correctly installed, contact support. |
Specifikationer
| Feature | Detalje |
|---|---|
| Modelnummer | LZ-1903 |
| Sensortype | fotoelektrisk |
| Strømkilde | DC 9V Battery (included) |
| Batterilevetid | 5 år (udskiftelig) |
| Produktliv | 10 år |
| Alarmhøjde | 85dB ved 3 meter |
| Driftsfugtighed | Op til 95 % RH (ikke-kondenserende) |
| Produktdimensioner | 10.8 x 10.8 x 5 cm |
| Varens vægt | 180 g |
| Certificeringer | CE, British BRE Certification (EN 14604) |
Garanti og support
Isafenest products are manufactured to high-quality standards. For specific warranty details, please refer to the warranty card included with your product or contact Isafenest customer support.
If you encounter any issues or have questions regarding your smoke alarm, please contact the seller or Isafenest customer service for assistance.


