1. Introduktion
This manual provides detailed instructions for the safe and effective use of your OMMO 16 Lines Green Laser Level. This tool is designed for precise leveling and alignment tasks, featuring two 360° horizontal lines and two 360° vertical lines, providing comprehensive coverage for various applications. Please read this manual thoroughly before operating the device and retain it for future reference.
2. Sikkerhedsoplysninger
ADVARSEL: This is a Class II laser product. Avoid direct eye exposure to the laser beam. Staring directly into the laser beam can cause eye injury.
- Kig ikke ind i laserstrålen.
- Ret ikke laserstrålen mod mennesker eller dyr.
- Brug ikke enheden i eksplosive atmosfærer, f.eks. i nærheden af brandfarlige væsker, gasser eller støv.
- Opbevar enheden utilgængeligt for børn.
- Brug kun de specificerede batterier og opladere.
- Forsøg ikke at modificere eller skille laserniveauet ad.
3. Pakkens indhold
Bekræft, at alle nedenstående varer er inkluderet i din pakke:
- 1 x OMMO 16 Lines Green Laser Level
- 2 x genopladelige Li-ion-batterier
- 1 x fjernbetjening
- 1 x Magnetic Wall Bracket
- 1 x Lifting Base
- 1 x 1/4" Mounting Screw
- 1 x strømadapter/oplader
- 1 x Bracket Patch (Metal Plate)
- 1 x bæretaske
- 1 x Brugermanual (dette dokument)
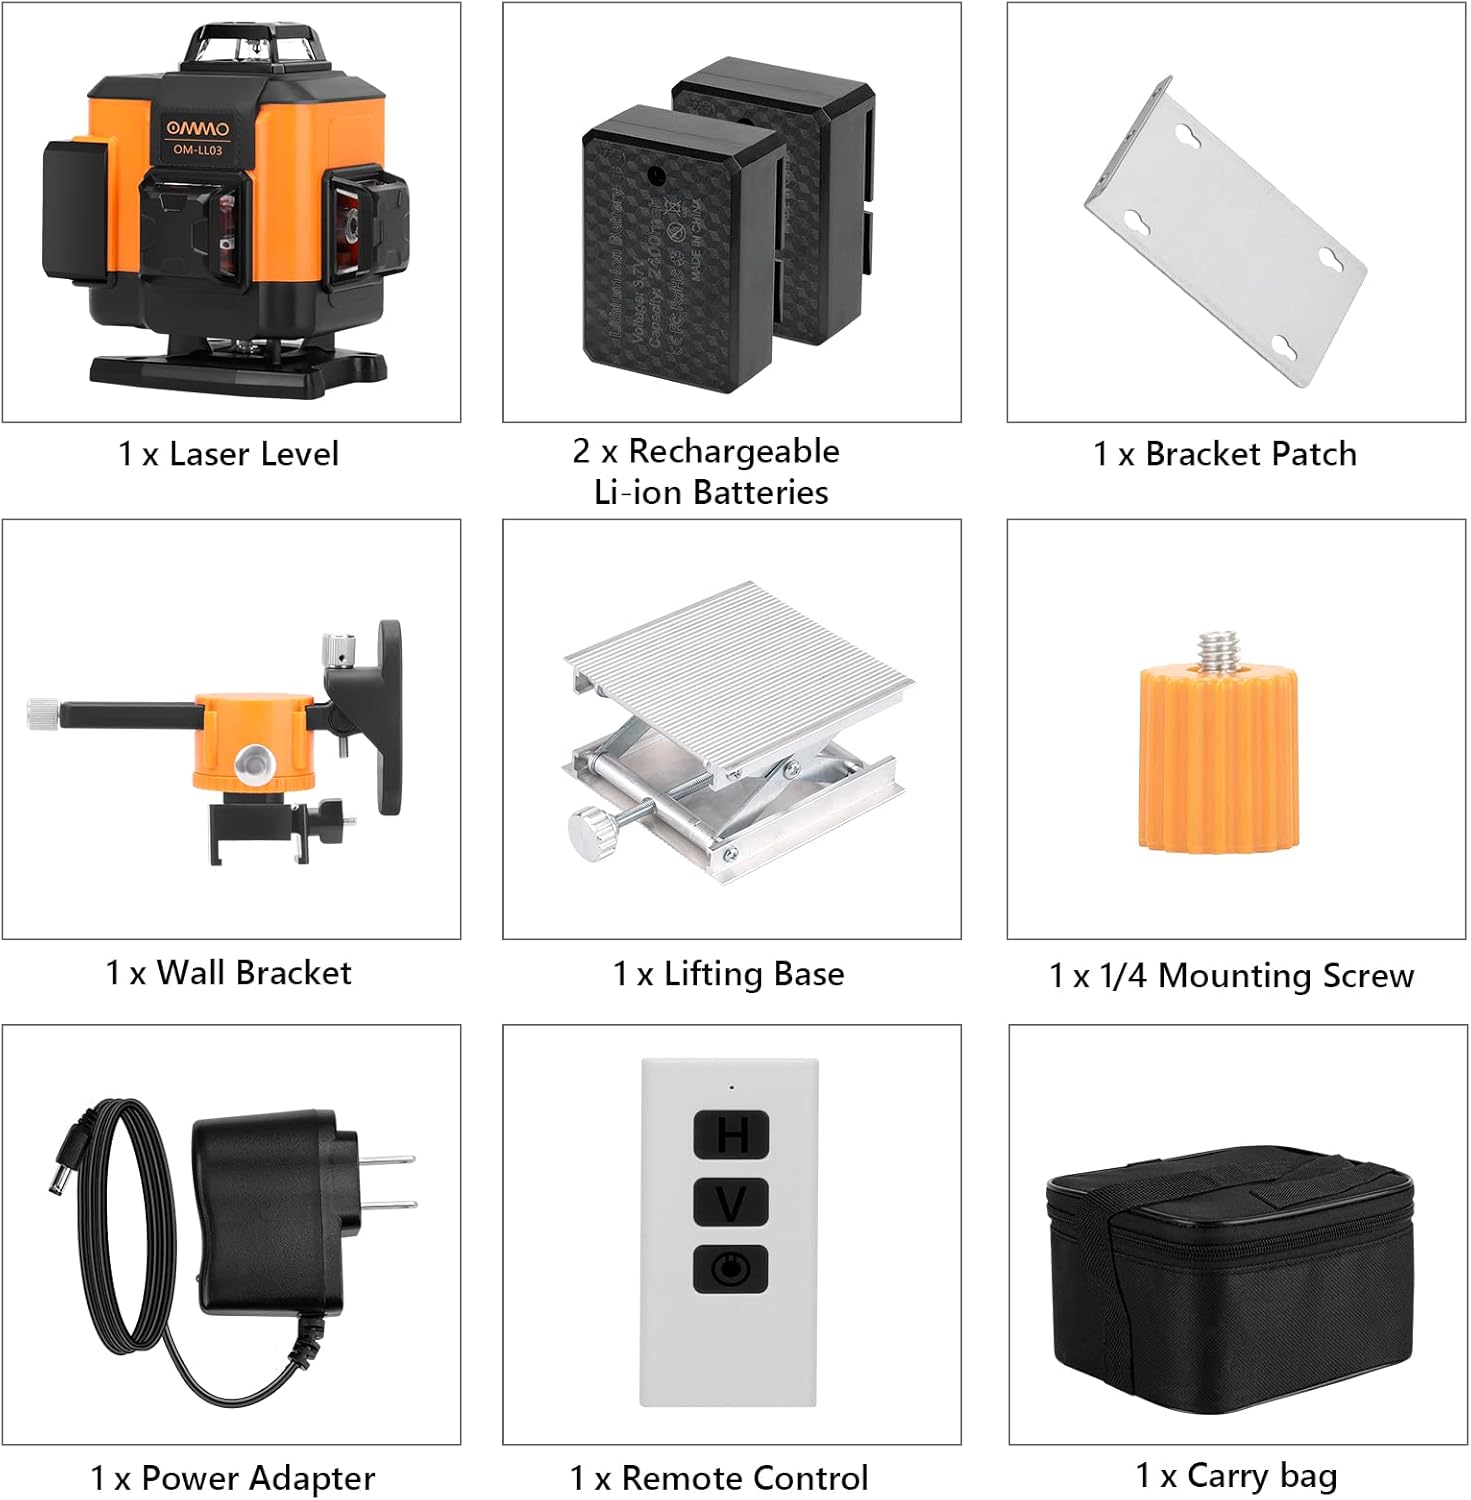
Figure 1: Contents of the OMMO 16 Lines Green Laser Level package, including the laser level, batteries, remote, various mounts, charger, and carrying case.
4. Produktet er slutview
Familiarize yourself with the components of your laser level:

Figure 2: Key components of the OMMO 16 Lines Green Laser Level.
- Tænd/sluk -knap: Located on the top panel.
- Horizontal Line Button (H): Aktiverer/deaktiverer vandrette laserlinjer.
- Vertical Line Button (V): Aktiverer/deaktiverer lodrette laserlinjer.
- Batterirum: Indeholder det genopladelige Li-ion-batteri.
- 1/4" monteringsgevind: For attaching to tripods or other mounting accessories.
- Pendullåskontakt: Located on the side, controls self-leveling and manual modes.
5. Opsætning
5.1 Batteriinstallation og opladning
- Open the battery compartment cover on the side of the laser level.
- Insert the rechargeable Li-ion battery, ensuring correct polarity.
- Luk batterirummets dæksel forsvarligt.
- To charge, connect the power adapter to the charging port on the device and plug it into a power outlet. The indicator light will show charging status.

Figure 3: Battery installation and charging port location.
5.2 Montering af laserniveauet
The laser level can be mounted using various accessories:
- Stativ montering: Attach the laser level to a standard tripod using the 1/4" mounting thread at the bottom.
- Magnetic Wall Bracket: Use the magnetic wall bracket to attach the device to metal surfaces. The bracket also allows for height and angle adjustments.
- Løftebase: The included lifting base provides fine height adjustment for precise positioning on flat surfaces.

Figure 4: Different installation methods for the laser level.
6. Betjeningsvejledning
6.1 Selvnivellerende tilstand
- Slide the pendulum lock switch to the "ON" (unlocked) position.
- Tryk på tænd/sluk-knappen for at tænde enheden.
- The laser level will automatically self-level within a range of ±3°. If the device is outside this range, the laser lines will flash and an audible alarm will sound, indicating it is not level. Adjust the device's position until it is within the self-leveling range.
- Use the "H" button to activate/deactivate horizontal lines and the "V" button to activate/deactivate vertical lines.

Figure 5: Self-leveling mode operation.
6.2 Manuel tilstand (låst tilstand)
- Slide the pendulum lock switch to the "OFF" (locked) position.
- Press and hold the Power ON/OFF button for 3 seconds to turn on the device.
- In manual mode, the self-leveling function is disabled, allowing you to project laser lines at any desired angle. The laser lines will not flash or beep in this mode.
- Use the "H" and "V" buttons to control the laser lines.

Figure 6: Manual mode operation for angled projections.
6.3 Brug af fjernbetjeningen
Fjernbetjeningen giver mulighed for bekvem betjening på afstand.
- The remote has buttons corresponding to the laser level's functions (Power ON/OFF, Horizontal Line, Vertical Line).
- Ensure the remote is pointed towards the laser level for optimal signal reception.

Figure 7: Remote control in use for different applications.
7. Vedligeholdelse
- Rensning: Tør enheden af med en blød, damp klæde. Brug ikke slibende rengøringsmidler eller opløsningsmidler.
- Opbevaring: When not in use, store the laser level in its carrying case in a dry, cool place, away from direct sunlight. Ensure the pendulum lock switch is in the "OFF" (locked) position to protect the pendulum mechanism.
- Batteripleje: Fjern batterierne, hvis enheden ikke skal bruges i en længere periode.

Figure 8: The laser level is designed to be dustproof and shockproof (IP54 rated).
8. Fejlfinding
| Problem | Mulig årsag | Løsning |
|---|---|---|
| Laser lines are flashing and beeping in self-leveling mode. | Device is outside its ±3° self-leveling range. | Place the device on a more level surface or adjust its position until it is within the self-leveling range. |
| Laserlinjerne er svage eller ikke synlige. | Low battery; Bright ambient light. | Charge the battery; Use the device in lower light conditions or closer to the working surface. |
| Enheden tændes ikke. | Battery is dead or incorrectly installed; Pendulum lock switch is in "OFF" position and power button not held for 3s for manual mode. | Charge or reinstall the battery; Ensure pendulum lock is "ON" for self-leveling or hold power button for 3s for manual mode. |
| Fjernbetjening virker ikke. | Remote battery is dead; Obstruction between remote and device. | Replace remote battery; Ensure clear line of sight to the laser level. |
9. Specifikationer
| Mærke | OMMO |
| Modelnummer | OM0893 |
| Laser linjer | 16 Lines (2x360° Horizontal, 2x360° Vertical) |
| Laser farve | Grøn |
| Synlighedsområde | Op til 150 fod |
| Selvudjævningsområde | ±3° |
| Materiale | Acrylonitril Butadien Styren (ABS) |
| Strømkilde | Batteridrevet (2 litium-ion-batterier medfølger) |
| Varens vægt | 3.56 pund |
| Beskyttelsesvurdering | IP54 (Dustproof and Splashproof) |
10. Garanti og support
For warranty information or technical support, please refer to the contact details provided with your purchase or visit the official OMMO webwebsted. Behold din købskvittering som købsbevis i tilfælde af garantikrav.
OMMO Official Store: Visit OMMO Store on Amazon


