1. Introduktion
This manual provides detailed instructions for assembling your ROBOTIME Kiki's Magic Emporium DIY Miniature House Kit. This 1/20 scale miniature dollhouse is part of the Mystic Archives Series, featuring intricate details such as broomsticks, magic books, crystal balls, pharaoh's eyes, and magic potions. It is designed as an engaging arts and craft project for individuals aged 14 and up.

Figure 1.1: Assembled Kiki's Magic Emporium Miniature House.

Figure 1.2: The Mystic Archives Series, featuring Kiki's Magic Emporium.
Video 1.1: Overståetview of the ROBOTIME DIY Miniature House Kit, showcasing the Kiki's Magic Emporium model and its features.
2. Hvad er inkluderet
Your Kiki's Magic Emporium kit contains 148 pieces made primarily from plywood, paper, and metal. All necessary components are organized into clearly labeled bags to facilitate assembly. The kit also includes specialized tools and materials for construction.
2.1 Sættets indhold:
- Pre-cut wooden pieces (plywood) for structural components and furniture.
- Printed paper sheets for decorative elements, wallpaper, and small accessories.
- Metal components for intricate details and lighting fixtures.
- LED light components for illumination.
- Adhesive (glue) for assembly.
- Small tools (e.g., tweezers, paint brush) for precision assembly.
- Instruction manual with detailed diagrams.

Figur 2.1: Overview of the kit contents, including various materials and tools.

Figure 2.2: Product details: Kiki's Magic Emporium, 148 pieces, assembled size 8.4x6.0x6.9 inches.
3. Opsætning og montering
Assembly of the Kiki's Magic Emporium kit requires patience and attention to detail. Follow the step-by-step instructions provided in the manual, paying close attention to the clear diagrams and material lists for each component. It is recommended to work on a clean, well-lit surface.
3.1 Forberedelse:
- Unpack all bags and identify components using the provided labels and material lists.
- Ensure you have a pair of AAA batteries for the LED light (not included in the kit).
- Gather any additional tools that may assist in assembly, such as small wire snips, a razor blade, and miniature clothespins for holding glued pieces.
3.2 Monteringstrin:
- Begin by assembling the base structure as indicated in the manual.
- Carefully cut out and fold paper components according to the dotted and solid lines.
- Assemble furniture and decorative items piece by piece, using the provided adhesive. Allow sufficient drying time for glued parts.
- Integrate the LED lighting system as instructed. Ensure proper connection of wires to the battery box.
- Place all assembled miniature items within the house structure to complete your Kiki's Magic Emporium.
Video 3.1: Detailed assembly process for the Kiki's Magic Emporium miniature house kit.
Video 3.2: Step-by-step guide for assembling the DG155 model, highlighting key construction techniques.

Figure 3.1: Intricate details of the assembled Kiki's Magic Emporium interior.
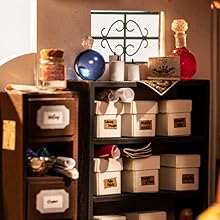
Figur 3.2: Detaljeret view of miniature shelves and storage boxes.
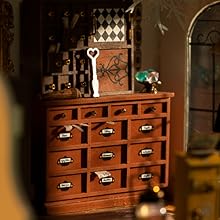
Figure 3.3: Close-up of miniature drawers and their contents.
4. Operating the LED Light
The Kiki's Magic Emporium kit includes an LED lighting system to illuminate your miniature house. To operate the light:
- Insert 2 AAA batteries into the designated battery box, typically located at the back or side of the assembled house. Ensure correct polarity.
- Locate the small switch on the battery box.
- Flip the switch to the 'ON' position to activate the LED light. Flip to 'OFF' to turn it off.
Video 4.1: Demonstration of the LED light feature in the Kiki's Magic Emporium kit.
5. Vedligeholdelse
To ensure the longevity and appearance of your miniature house:
- Rensning: Gently dust the assembled house with a soft, dry brush or cloth. Avoid using water or cleaning solutions, as they may damage the paper and wood components.
- Opbevaring: Store the miniature house in a dry environment, away from direct sunlight and extreme temperatures, to prevent warping or fading of materials.
- Udskiftning af batteri: If the LED light dims or stops working, replace the AAA batteries in the battery box.
6. Fejlfinding
| Problem | Mulig årsag | Løsning |
|---|---|---|
| LED-lyset tændes ikke. | Batteries are dead or incorrectly inserted. Wiring is loose or disconnected. | Check and replace batteries, ensuring correct polarity. Verify all wire connections are secure. |
| Brikkerne passer ikke sammen. | Incorrect piece selection or orientation. Excess glue obstructing fit. | Refer to the instruction manual's diagrams to confirm correct pieces and orientation. Gently remove any excess dried glue. |
| Finished item appears fragile. | Insufficient adhesive or drying time. | Apply additional adhesive to weak joints and allow ample time for it to dry completely. |
7. Specifikationer
- Model: RBT-DG155 (Kiki's Magic Emporium)
- Samlede dimensioner: 8.4 x 6.0 x 6.9 tommer
- Varens vægt: 1.3 pund
- Hovedmaterialer: Plywood, Paper, Metal
- Antal dele: 148 stk
- Anbefalet alder: 14 år og opefter
- Strømkilde: 2 x AAA Batteries (not included) for LED light
- Oprindelsesland: Kina
Figure 7.1: Key specifications of the Kiki's Magic Emporium kit.
8. Garanti og support
For any questions regarding assembly, missing parts, or general inquiries, please contact ROBOTIME customer support. Refer to the contact information provided in your kit packaging or visit the official ROBOTIME website for assistance. We are committed to providing support and will respond to inquiries within 24 hours.
Note: Batteries are not included in the package due to customs policy. Please prepare 2 pcs of AAA battery by yourself.


