1. Introduktion
This manual provides essential information for the safe and efficient use of your TechniSat DIGITRADIO 143 (V3) HiFi Internet Radio Tuner. Please read these instructions thoroughly before operating the device and retain them for future reference. The DIGITRADIO 143 (V3) is designed to enhance your existing stereo system with a wide range of modern audio reception and streaming capabilities.

Image 1.1: The TechniSat DIGITRADIO 143 (V3) integrated into a home audio setup.
The DIGITRADIO 143 (V3) is a versatile tuner without integrated speakers, allowing you to upgrade your stereo system with DAB+/DAB, FM, Internet radio, and various streaming options, including MP3 file playback. Its standard Hi-Fi component width of 43.5 cm ensures seamless integration with most existing audio systems.

Image 1.2: Highlighting the diverse radio reception capabilities of the device.
2. Sikkerhedsoplysninger
Always observe the following safety precautions to prevent damage to the device or injury to yourself:
- Udsæt ikke enheden for regn eller fugt.
- Åbn ikke enheden casing; overlad al service til kvalificeret personale.
- Sørg for korrekt ventilation for at forhindre overophedning.
- Brug kun den strømadapter, der fulgte med enheden.
- Hold enheden væk fra varmekilder og direkte sollys.
- Rengør kun enheden med en tør, blød klud.
3. Pakkens indhold
Bekræft at alle varer er til stede i pakken:
- TechniSat DIGITRADIO 143 (V3) HiFi Internet Radio Tuner (Black)
- Trådantenne
- Fjernbetjening
- Instruktionsmanual
4. Produktet er slutview
4.1 Frontpanel

Billede 4.1: Forside view of the DIGITRADIO 143 (V3), showing the display, controls, and USB port.
The front panel features a 3.2-inch color TFT display for clear information display, navigation buttons, a USB port for media playback and charging, and rotary controls for tuning and volume.

Billede 4.2: Detaljeret view of the 3.2-inch color display and front USB port.
4.2 Bagpaneltilslutninger
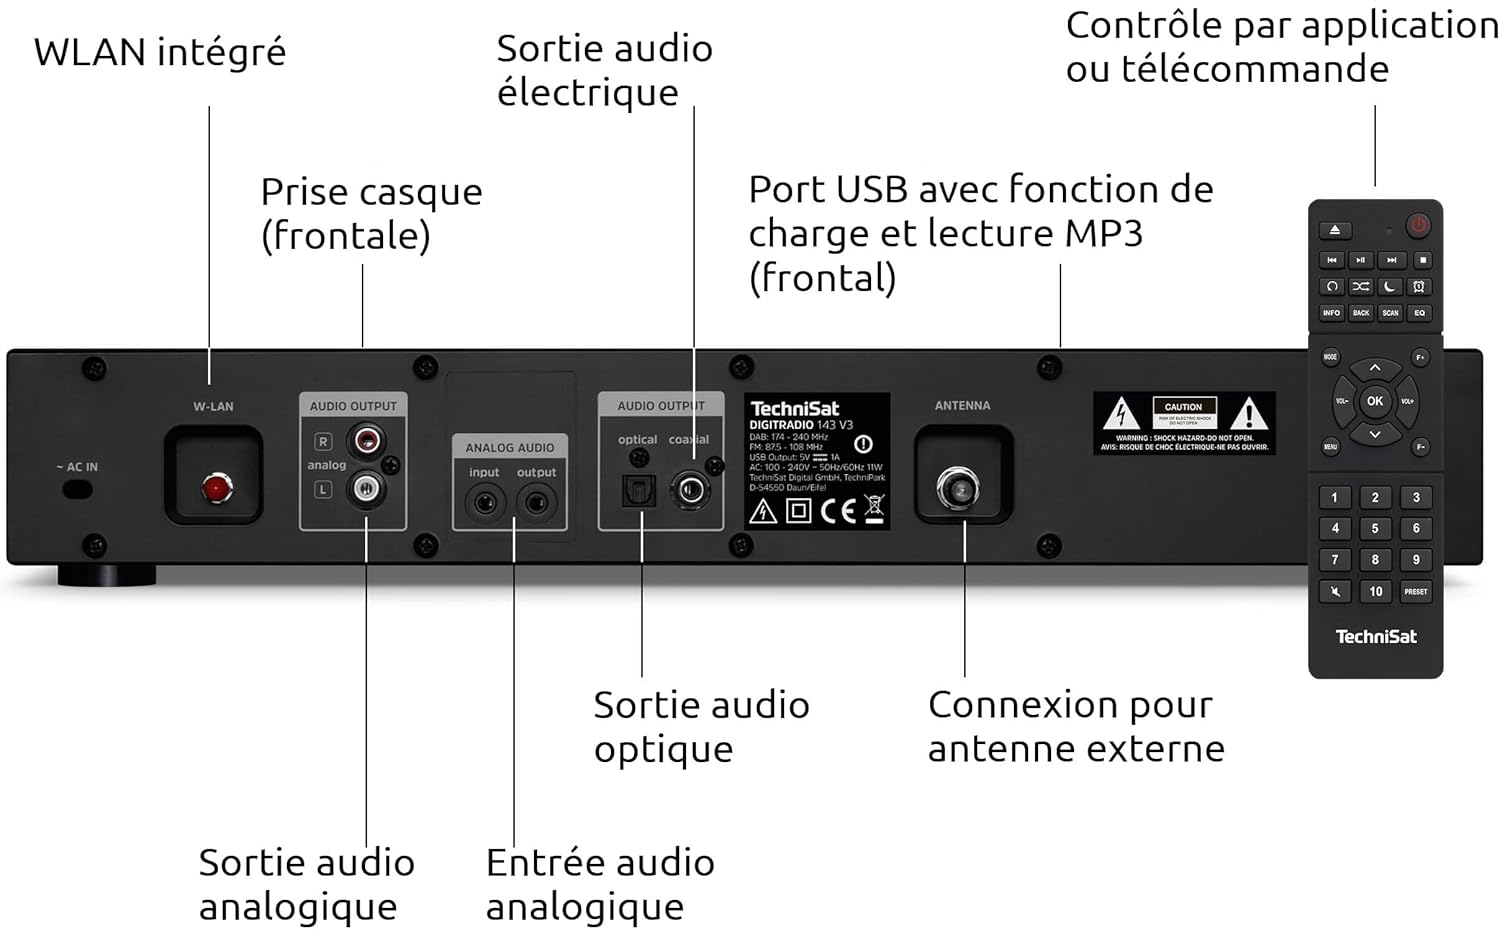
Image 4.3: Rear panel connections including Wi-Fi antenna, audio outputs, and antenna input.
- AC IN: Strømforbindelse.
- W-LAN: Integrated Wi-Fi antenna connection.
- AUDIO OUTPUT (Analog L/R): RCA connectors for analog audio output to an amplifier eller modtager.
- AUDIO INPUT (Analog L/R): RCA connectors for analog audio input from an external source.
- OPTISK LYDUDGANG: Digital optisk lydudgang.
- COAXIAL AUDIO OUTPUT: Digital koaksial lydudgang.
- ANTENNE: F-type connector for external DAB+/FM antenna.
- HEADPHONE: 3.5mm jack for headphone connection (front panel).

Image 4.4: Numbered diagram of the rear panel connections for easy identification.
5. Opsætning
5.1 Placement and Integration
Place the DIGITRADIO 143 (V3) on a stable, flat surface, ensuring adequate ventilation around the unit. Its 43.5 cm width is designed to fit seamlessly into standard Hi-Fi racks alongside other components.

Image 5.1: The DIGITRADIO 143 (V3) fitting perfectly within a Hi-Fi system stack.
5.2 Tilslutning til strøm og lydsystem
- Antenneforbindelse: Connect the supplied wire antenna to the ANTENNA port on the rear panel. For improved reception, consider connecting an external DAB+/FM antenna.
- Lydudgang: Connect the DIGITRADIO 143 (V3) to your ampsender eller modtager ved hjælp af en af følgende metoder:
- Analog: Use RCA cables to connect the AUDIO OUTPUT (Analog L/R) ports to an available analog input on your amplivligere.
- Digital: Use an optical or coaxial cable to connect the corresponding digital output on the DIGITRADIO 143 (V3) to a digital input on your amplifier/modtager.
- Strømtilslutning: Plug the power cable into the AC IN port on the rear panel, then connect it to a wall outlet.
5.3 Guide til indledende opsætning
Upon first power-on, the device will guide you through an initial setup wizard. Follow the on-screen prompts to configure language, time, date, and network settings (Wi-Fi). Ensure your Wi-Fi network name (SSID) and password are available.
6. Betjening
6.1 Radiotilstande (DAB+, FM, internetradio)
Use the MODE button on the front panel or remote control to switch between DAB+, FM, and Internet Radio modes. In each mode, use the TUNING/OK knob or navigation buttons to scan for stations and select your preferred broadcasts.

Image 6.1: The display showing details of an Internet Radio station.
6.2 Bluetooth-lydstreaming
To stream audio from a Bluetooth-enabled device (e.g., smartphone, tablet):
- Select Bluetooth mode on the DIGITRADIO 143 (V3).
- Aktiver Bluetooth på din eksterne enhed, og søg efter tilgængelige enheder.
- Select "DIGITRADIO 143" from the list to pair.
- Once paired, you can play audio from your device through the tuner.

Image 6.2: Wireless music enjoyment via Bluetooth or Spotify Connect.
6.3 Spotify Connect
The DIGITRADIO 143 (V3) supports Spotify Connect for both Free and Premium accounts. To use Spotify Connect:
- Ensure your DIGITRADIO 143 (V3) is connected to the internet.
- Åbn Spotify-appen på din smartphone, tablet eller computer.
- Play a song and tap the "Devices Available" icon.
- Select "DIGITRADIO 143" from the list of devices.
6.4 USB-afspilning
Indsæt en USB-lagerenhed, der indeholder MP3 files into the front USB port. The device will automatically detect the media and allow you to navigate and play your music files.
6.5 App kontrol
Control your DIGITRADIO 143 (V3) using a compatible smartphone application such as UNDOK or OKTIV. Download the app from your device's app store and follow the in-app instructions to connect to your tuner.

Image 6.3: The device can be conveniently controlled via a smartphone app.
7. Vedligeholdelse
To ensure the longevity and optimal performance of your DIGITRADIO 143 (V3):
- Rensning: Disconnect the power before cleaning. Use a soft, dry, lint-free cloth to wipe the exterior. Do not use liquid cleaners or abrasive materials.
- Ventilation: Sørg for, at ventilationsåbningerne ikke er blokerede.
- Opbevaring: Hvis enheden opbevares i længere tid, skal den afbrydes fra strømmen og opbevares et køligt og tørt sted.
8. Fejlfinding
| Problem | Mulig årsag | Løsning |
|---|---|---|
| Ingen strøm | Strømkabel ikke tilsluttet; stikkontakt defekt. | Kontrollér strømkablets forbindelse; prøv en anden stikkontakt. |
| No radio reception (DAB+/FM) | Antenna not connected or poorly positioned; weak signal. | Ensure antenna is securely connected and properly positioned. Consider an external antenna. |
| No Internet Radio/Streaming | No Wi-Fi connection; incorrect Wi-Fi password; router issue. | Check Wi-Fi settings and password. Restart your Wi-Fi router. Ensure strong Wi-Fi signal. |
| Problemer med Bluetooth-parring | Device not in pairing mode; external device Bluetooth off. | Ensure DIGITRADIO 143 (V3) is in Bluetooth mode. Enable Bluetooth on your external device and search again. |
| Fjernbetjening virker ikke | Batterierne er opbrugt; blokering mellem fjernbetjening og enhed. | Replace remote control batteries (2x AAA). Ensure clear line of sight to the unit's IR receiver. |
9. Specifikationer
- Mærke: TechniSat
- Model: DIGITRADIO 143 (V3)
- Farve: Sort
- Forbindelse: Wi-Fi, Bluetooth
- Tuningteknologi: DAB+, FM, internetradio
- Særlige funktioner: DAB+ radio, FM radio (with RDS and PLL), Internet radio, 3.2" color TFT display, Spotify Connect, Bluetooth audio streaming, app control, USB charge/playback function
- Input/output: USB (Type A, 1 port), Analog Audio L/R Input (RCA), Analog Audio L/R Output (RCA), Optical Digital Output, Coaxial Digital Output, 3.5mm Headphone Jack, External Antenna Connection (F-type)
- Produktmål (B x H x D): 43.5 x 7.5 x 29 cm
- Strømkilde: Elektrisk med ledning
- Inkluderede komponenter: DIGITRADIO 143, wire antenna, remote control, instruction manual
10. Garanti og support
This TechniSat DIGITRADIO 143 (V3) comes with a standard 2-year warranty from the date of purchase. This warranty covers manufacturing defects and material faults under normal use. It does not cover damage caused by misuse, accidents, unauthorized modifications, or normal wear and tear.
For technical support, warranty claims, or further assistance, please contact TechniSat customer service through their official website or the retailer where the product was purchased. Please have your proof of purchase and product model number (0000/2947) available when contacting support.


