1. Introduktion
Thank you for choosing the Scheppach HM305SL Miter Saw. This manual provides essential information for the safe and efficient operation, maintenance, and troubleshooting of your new tool. Please read this manual thoroughly before operating the machine and keep it for future reference.
The Scheppach HM305SL is a powerful and versatile compound miter saw designed for precise cutting of wood and plastic materials. Its robust construction and advanced features ensure high performance and safety for various woodworking tasks.
2. Sikkerhedsinstruktioner
ADVARSEL: Læs alle sikkerhedsadvarsler, instruktioner, illustrationer og specifikationer, der følger med dette elværktøj. Undladelse af at følge alle instruktionerne nedenfor kan resultere i elektrisk stød, brand og/eller alvorlig personskade.
2.1 Generelle sikkerhedsadvarsler for elværktøj
- Hold arbejdsområdet rent og godt oplyst. Rodede eller mørke områder inviterer til ulykker.
- Brug ikke elværktøj i eksplosive atmosfærer, såsom i nærheden af brændbare væsker, gasser eller støv.
- Hold børn og omkringstående væk, mens du betjener et elværktøj.
2.2 Elektrisk sikkerhed
- Elværktøjsstik skal passe til stikkontakten. Modificer aldrig stikket på nogen måde.
- Undgå kropskontakt med jordede eller jordede overflader, såsom rør, radiatorer, komfurer og køleskabe.
- Udsæt ikke elværktøj for regn eller våde forhold.
2.3 Personlig sikkerhed
- Brug altid øjenbeskyttelse, høreværn og støvmaske.
- Klæd dig ordentligt på. Bær ikke løstsiddende tøj eller smykker. Hold dit hår og tøj væk fra bevægelige dele.
- Vær opmærksom, hold øje med, hvad du laver, og brug din sunde fornuft, når du betjener et elværktøj.
2.4 Specifik sikkerhed for geringssav
- Sørg altid for, at emnet er sikkert fastgjortamped før skæring.
- Forsøg aldrig at skære frihånds.
- Ensure the saw blade is sharp and correctly installed.
- Lad klingen nå fuld hastighed, før du begynder at save.
- Do not remove cut-off material until the blade has completely stopped.
3. Pakkens indhold
Pak forsigtigt alle genstande ud, og kontroller dem for eventuelle skader. Sørg for, at alle komponenter er til stede, før du bortskaffer emballagen.
- Scheppach HM305SL Miter Saw Unit
- 305 mm HW Saw Blade (48 teeth)
- Emne Clamp
- Støvpose
- Assembly Tools (e.g., Hex Key)
- Brugermanual

Figure 3.1: Main unit of the Scheppach HM305SL Miter Saw, showing the saw blade, laser guide, and base.
4. Opsætning
4.1 Udpakning og montering
- Placer saven på en stabil, plan arbejdsbænk.
- Secure the saw to the workbench using appropriate fasteners through the mounting holes in the base.
- Install the saw blade:
- Sørg for, at saven er frakoblet.
- Tryk på spindellåseknappen.
- Brug den medfølgende skruenøgle til at løsne bladets fastholdelsesbolt.
- Carefully place the 305mm HW saw blade onto the spindle, ensuring the teeth are oriented correctly for cutting.
- Tighten the blade retaining bolt securely.
- Attach the dust bag to the dust extraction port.
4.2 Adjusting the Work Table and Saw Head
The swiveling work table can be adjusted for miter cuts, and the saw head can be tilted for bevel cuts.

Figure 4.1: The swiveling work table can be adjusted from -50° to +50° for precise miter cuts.
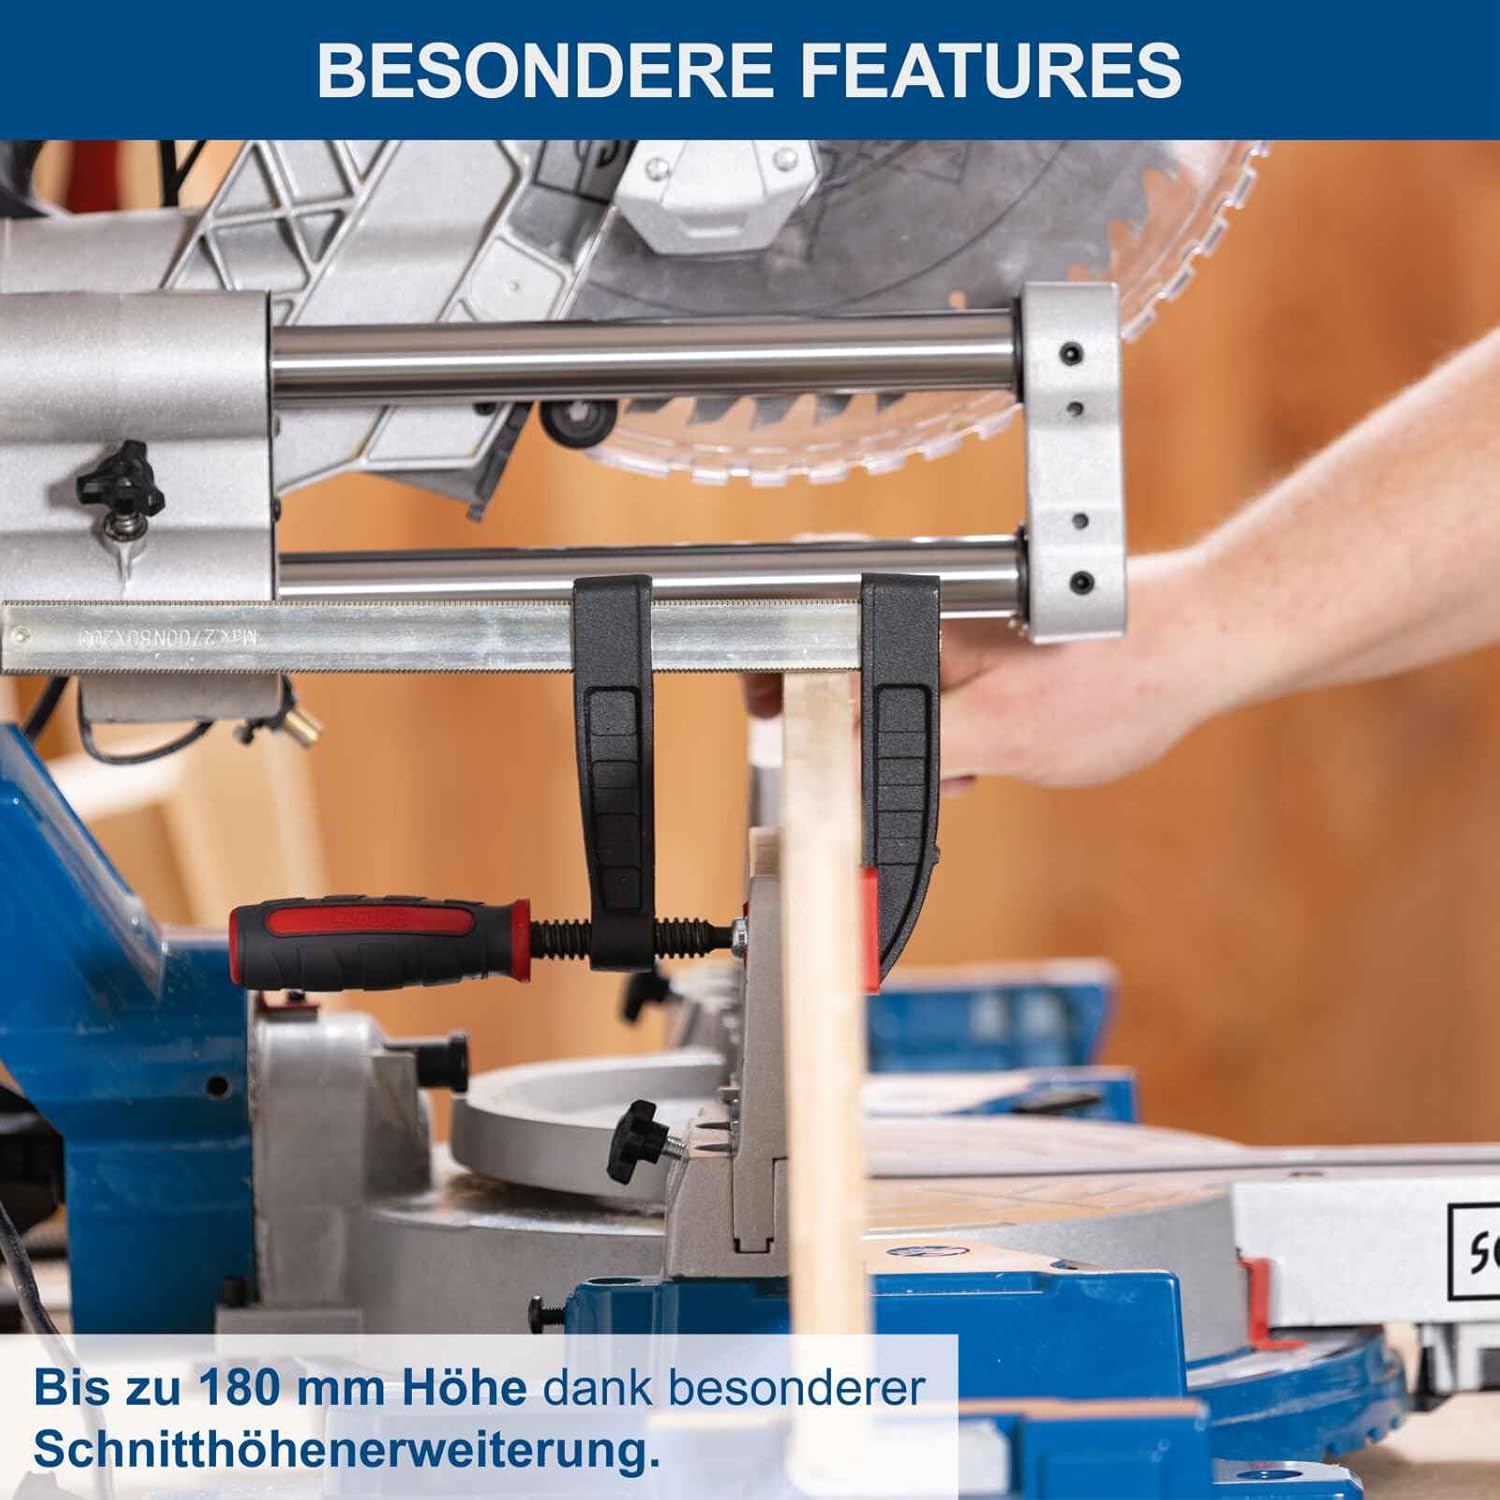
Figure 4.2: The saw head can be tilted up to 48° on both sides for accurate bevel cuts.
- To adjust the miter angle: Loosen the locking knob for the work table, rotate the table to the desired angle (-50° to +50°), and tighten the knob.
- To adjust the bevel angle: Loosen the locking lever for the saw head, tilt the saw head to the desired angle (up to 48° on both sides), and secure the lever.
4.3 Laserjustering
The integrated laser provides a precise cutting line for improved accuracy.
- The laser is typically pre-calibrated. If adjustment is needed, consult the detailed instructions in the full manual for laser alignment screws.
5. Betjeningsvejledning
5.1 Grundlæggende betjening
- Sæt saven i en passende 230V stikkontakt.
- Placer emnet fast mod anslaget og fastgør det med emneklemmen.amp.
- Align the laser line with your desired cut mark on the workpiece.
- Press the power switch to start the saw. The soft start function will ensure a smooth ramp-up to full speed.
- Once the blade reaches full speed, slowly and steadily lower the saw head through the workpiece. For wider materials, utilize the sliding function by pulling the saw head forward before lowering and pushing it back through the cut.
- After the cut is complete, release the power switch and allow the blade to come to a complete stop before raising the saw head and removing the workpiece.

Figure 5.1: The sliding function with double guide allows for cutting wider workpieces without needing space behind the machine.

Figure 5.2: The saw offers a high cutting capacity of up to 180 mm height for thicker materials.
5.2 Cutting Applications
The HM305SL is suitable for various cutting tasks:
- Tværsnit: Standard cuts across the grain of the wood.
- Geringssnit: Angled cuts across the face of the workpiece (e.g., for picture frames, trim).
- Skråsnit: Angled cuts through the thickness of the workpiece (e.g., for crown molding).
- Sammensatte snit: A combination of miter and bevel cuts.
- Grooves/Dadoes: Partial cuts for joinery (requires careful depth adjustment).

Figur 5.3: Eksamples of common cutting applications for the HM305SL miter saw.
6. Vedligeholdelse
Regelmæssig vedligeholdelse sikrer din geringsavs lange levetid og optimale ydeevne.
6.1 Rengøring
- Tag altid stikket ud af saven før rengøring.
- Remove sawdust and debris from the saw, especially around the blade guard, motor vents, and sliding mechanism. Use a brush or compressed air.
- Clean the work table and fence to ensure smooth operation and accurate measurements.
6.2 Pleje af blade
- Inspect the saw blade regularly for sharpness and damage. A dull blade can cause kickback and poor cut quality.
- Replace worn or damaged blades immediately. Always use a 305mm blade with a 30mm bore, suitable for the material being cut.
6.3 Smøring
- Apply a thin layer of machine oil or silicone spray to the sliding rails periodically to ensure smooth movement.
7. Fejlfinding
| Problem | Mulig årsag | Løsning |
|---|---|---|
| Saven starter ikke | No power supply; Faulty power cord/plug; Overload protection tripped. | Check power connection; Inspect cord/plug; Reset circuit breaker; Allow motor to cool. |
| Dårlig skærekvalitet (ru kanter, brændende) | Sløv eller forkert klinge; Forkert skærehastighed; Arbejdsemne er ikke fastgjort. | Replace blade; Use appropriate blade for material; Ensure workpiece is clamped firmly; Adjust cutting speed. |
| Laser line is inaccurate | Laser misaligned; Debris on laser lens. | Clean laser lens; Refer to manual for laser calibration instructions. |
| Savbladet sidder fast i emnet | Workpiece not supported correctly; Blade is dull; Forcing the cut. | Ensure proper workpiece support; Replace blade; Do not force the saw through the cut. |
Hvis problemet fortsætter efter at have forsøgt disse løsninger, bedes du kontakte Scheppachs kundesupport.
8. Tekniske specifikationer
| Feature | Specifikation |
|---|---|
| Model | HM305SL |
| Strømindgang | 2000 W |
| Voltage | 230 V |
| Savblads diameter | 305 mm |
| Bladets diameter | 30 mm |
| Max. Cutting Width (90°) | 340 mm |
| Maks. skærehøjde (90°) | 180 mm |
| Geringsvinkelområde | -50° til +50° |
| Affasningsvinkelområde | 0° to 48° (both sides) |
| Vægt | 24.6 kg |
| Særlige funktioner | Laser guide, Soft start, Sliding function |

Figure 8.1: Cutting capacities and blade specifications.

Figure 8.2: Power, laser, and design features.
9. Garanti og support
9.1 Garantioplysninger
Scheppach products are manufactured to high-quality standards and undergo rigorous quality control. This product is covered by a manufacturer's warranty against defects in materials and workmanship. Please refer to the warranty card included with your product for specific terms and conditions, including warranty period and claim procedures.
9.2 Kundesupport
For technical assistance, spare parts, or warranty claims, please contact Scheppach customer service. You can find contact information on the Scheppach webwebstedet eller i garantidokumentationen.
When contacting support, please have your product model (HM305SL) and serial number ready.
Besøg den officielle Scheppach webwebsted for mere information: www.scheppach.com


