Indledning
Tak for købetasing the KCT Large 2.5 x 3m Walk-in Galvanised Pet Run. This spacious and secure enclosure is designed to provide a safe environment for various small animals, including chickens, rabbits, dogs, and cats. This manual provides detailed instructions for assembly, operation, maintenance, and troubleshooting to ensure optimal use and longevity of your pet run.
Læs venligst alle instruktioner omhyggeligt, inden monteringen påbegyndes, og gem denne manual til senere brug.
Sikkerhedsadvarsler
- Sørg for, at alle komponenter er til stede og ubeskadigede før montering.
- Samlingen kræver mindst to personer for at sikre sikkerheden og nemheden.
- Wear appropriate safety gear, such as gloves, during assembly to prevent cuts or scrapes from metal edges.
- Vælg en plan og stabil overflade til installation.
- Secure the run to the ground using appropriate anchors (not included) to prevent tipping in strong winds.
- Keep children and pets away from the assembly area until the run is fully constructed and secured.
- Regularly inspect the run for any signs of wear, damage, or loose components.
Pakkens indhold
Before starting assembly, verify that all parts listed below are included in your package. If any parts are missing or damaged, please contact KCT customer support.

Image: All components of the KCT pet run laid out, including various lengths of metal poles, different types of connectors, a roll of chicken wire, and a white tarp cover, along with a bag of small parts and instructions.
The package includes all necessary parts for assembly, such as:
- Galvanised Steel Frame Poles (various lengths and bends)
- Frame Connectors (T-joints, L-joints, cross-joints, base plates)
- Chicken Wire Mesh Roll
- Waterproof and UV Blocking Cover (Tarp)
- Door Assembly Components (frame, latch)
- Fasteners and Clips (for securing mesh and cover)
- Instruktionsmanual (dette dokument)
Opsætning og montering
Follow these steps carefully to assemble your KCT pet run. Refer to the included diagrams for visual guidance.
Trin 1: Saml bundrammen
Lay out the straight galvanised steel poles on a flat surface to form the rectangular base of the run. Connect them using the appropriate corner and straight connectors. Ensure all connections are secure.
Step 2: Erect the Vertical Supports and Roof Arches
Insert the vertical support poles into the base frame connectors. Then, attach the curved roof arch poles to the top of the vertical supports, forming the arched roof structure. Secure all connections firmly.

Image: A partially assembled KCT pet run frame, illustrating the arched roof and vertical support poles connected to the base.
Step 3: Install the Door Frame
Integrate the door frame section into the designated opening of the main structure. Ensure it is aligned correctly and can open and close smoothly. Attach the latch mechanism.
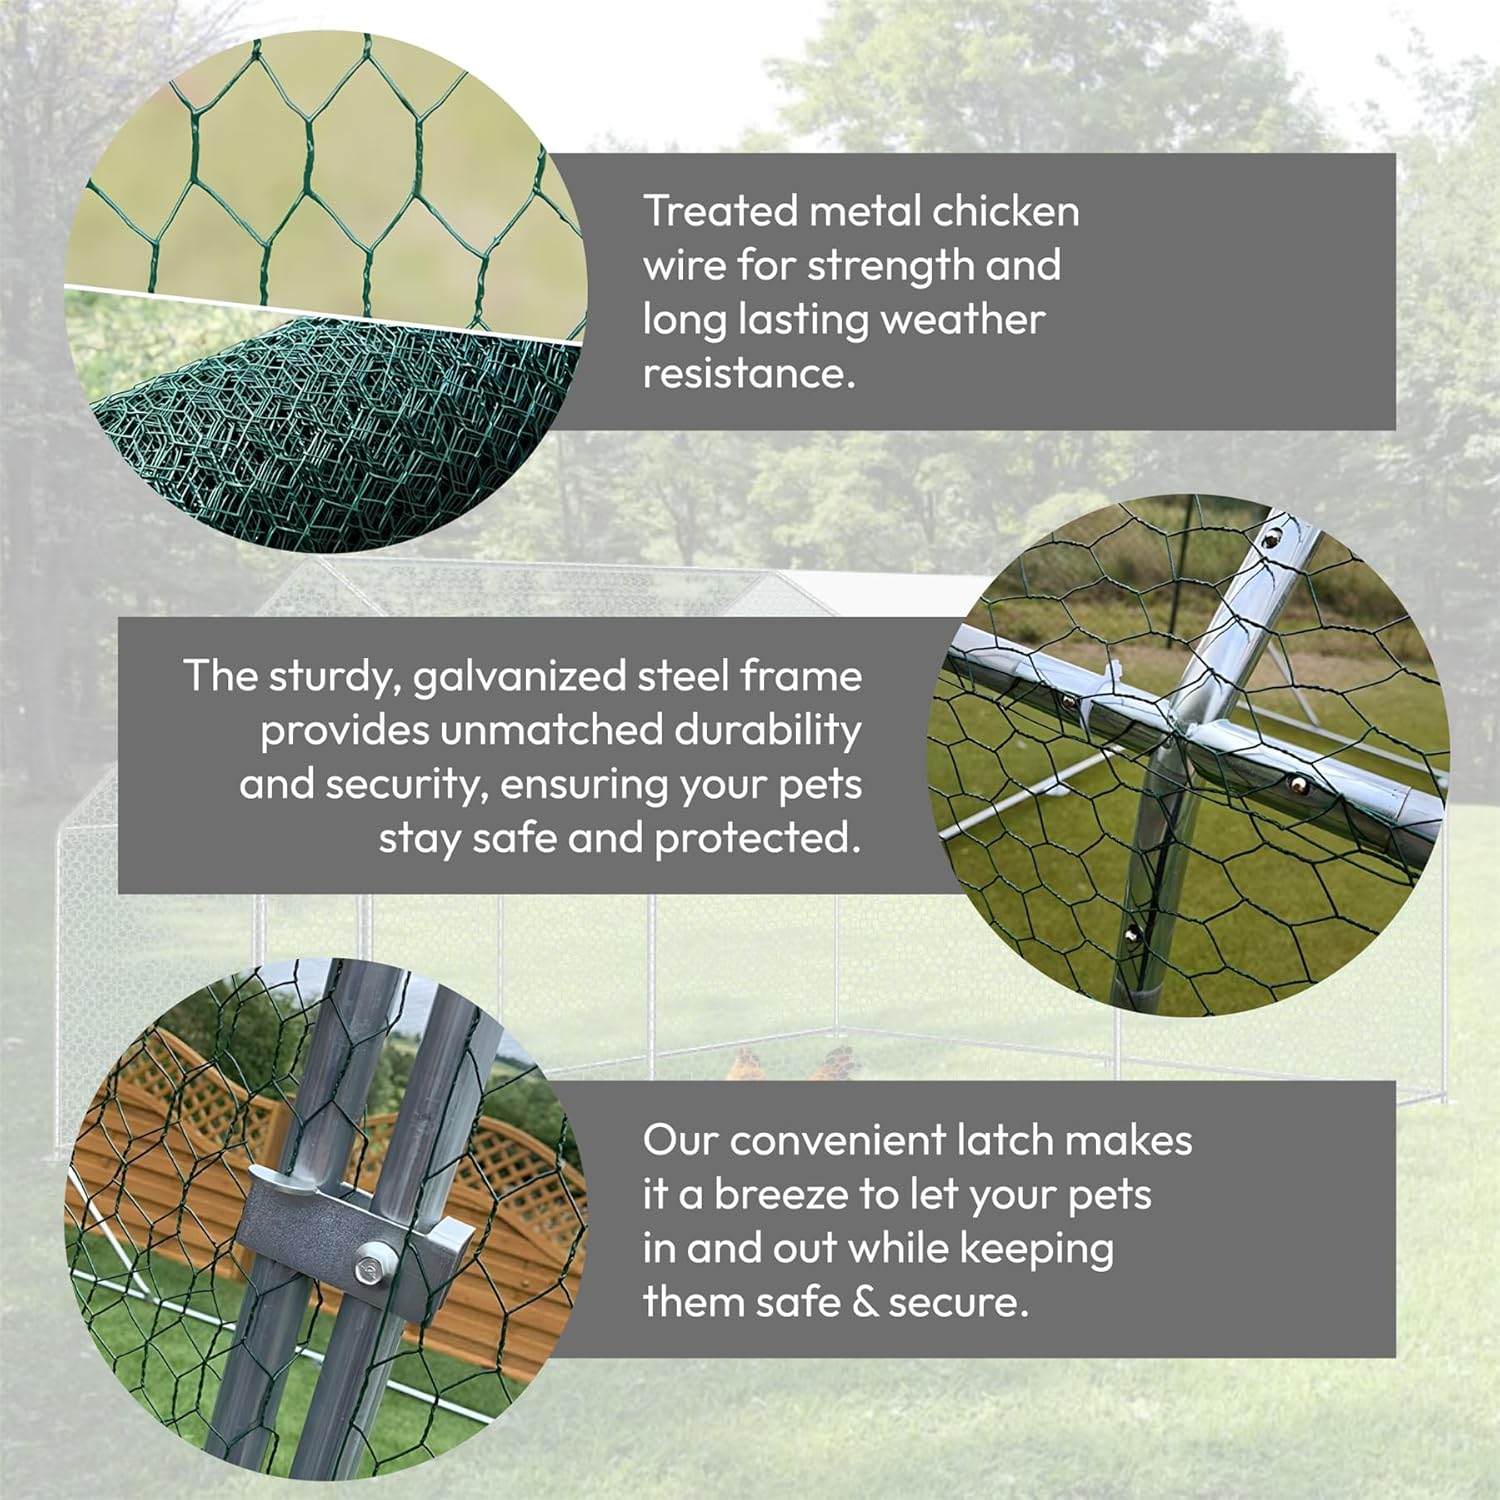
Billede: Detaljeret views of the treated chicken wire, a secure connection point for the galvanized steel frame, and the robust latch mechanism on the door, highlighting key structural and security features.
Step 4: Attach the Chicken Wire Mesh
Unroll the chicken wire mesh and begin attaching it to the frame, starting from one end. Use the provided fasteners or clips to secure the mesh tightly to all poles and connectors. Ensure there are no gaps that pets could escape through or predators could enter.

Image: A complete KCT pet run, showcasing the full structure with the chicken wire mesh securely attached around all sides and a portion of the roof covered by the protective tarp.
Step 5: Install the Waterproof and UV Blocking Cover
Drape the waterproof and UV blocking cover over the arched roof section. Secure it firmly to the frame using the elastic cords or ties provided. This cover offers protection from sun and rain.
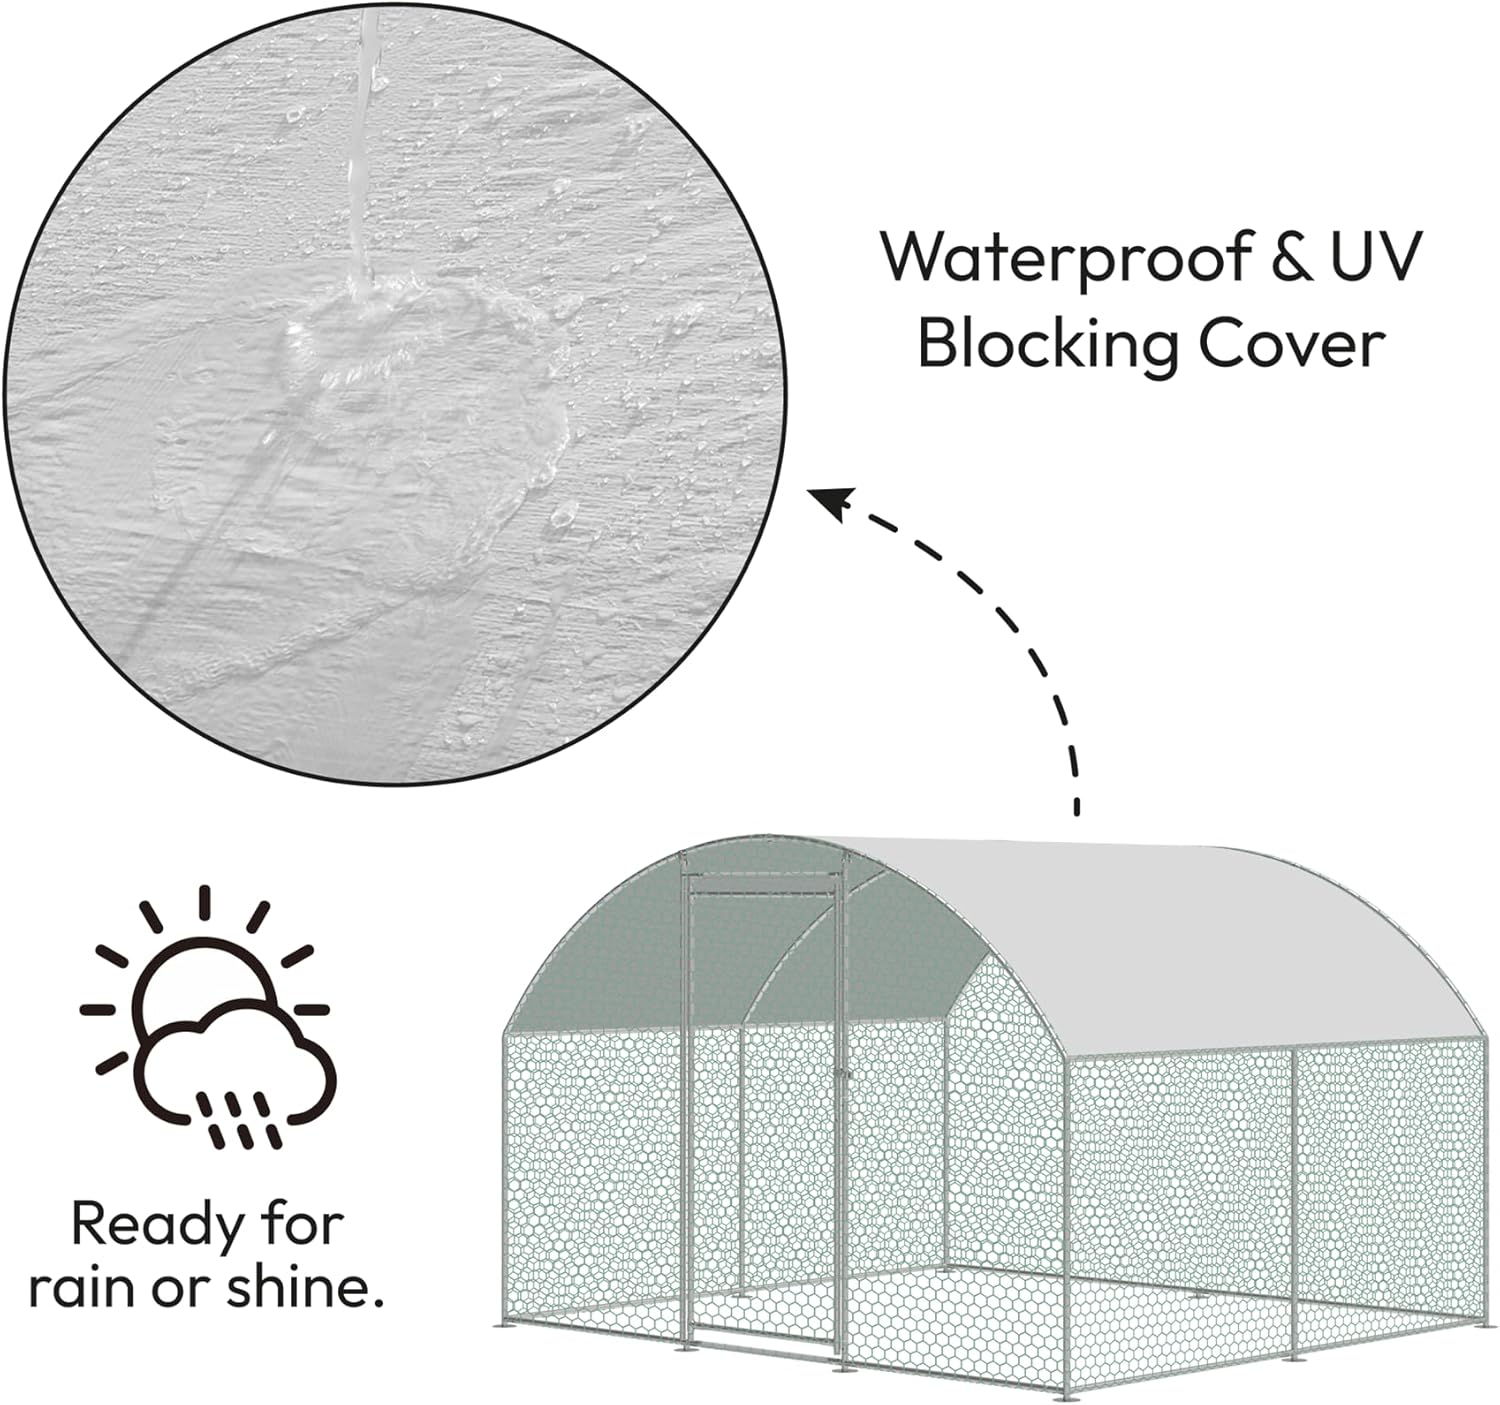
Billede: Et nærbillede view demonstrating the waterproof quality of the cover, with water droplets visible on its surface. An accompanying graphic indicates the cover's suitability for all weather conditions, including rain or shine.
Step 6: Final Inspection and Ground Anchoring
Once assembled, perform a thorough inspection to ensure all connections are tight, the mesh is secure, and the door operates correctly. For added stability, especially in windy conditions, anchor the base of the run to the ground using ground stakes or other suitable anchoring methods (not included).
Operation
The KCT Walk-in Pet Run is designed for ease of use and provides a secure outdoor space for your animals.
- Adgang: Use the front door to enter and exit the run. Ensure the latch is securely closed after each use to prevent escapes.
- Placering: Position the run on a level surface in your garden or outdoor area. Consider placing it in a shaded spot or utilizing the provided cover for sun protection.
- Kompatibilitet: This run is suitable for various small animals. It can be used as a standalone enclosure or connected to existing hutches or coops for extended space.

Image: The KCT pet run depicted with a variety of animals such as a goose, rabbit, chicken, and dog, illustrating its suitability for multiple animal types.
Opretholdelse
Regular maintenance will extend the life of your KCT pet run and ensure the safety of your animals.
- Rensning: Periodically clean the chicken wire mesh and frame with mild soap and water. Rinse thoroughly and allow to air dry.
- Omslagspleje: The waterproof cover can be wiped clean with a damp cloth. Ensure it is securely fastened, especially during windy weather.
- Inspektion: Regularly check all frame connections, mesh attachments, and the door latch for tightness and security. Tighten any loose bolts or clips.
- Rustforebyggelse: While the frame is galvanised, inspect for any scratches or damage to the coating that could lead to rust. Touch up with rust-inhibiting paint if necessary.
- Jordstabilitet: Re-check ground anchors periodically, especially after heavy rain or strong winds, to ensure the run remains stable.
Fejlfinding
Her er nogle almindelige problemer og deres løsninger:
| Problem | Mulig årsag | Løsning |
|---|---|---|
| Run feels unstable or wobbly. | Loose frame connections; uneven ground; insufficient anchoring. | Tighten all bolts and connectors. Move to a level surface. Install ground anchors. |
| Mesh is sagging or has gaps. | Insufficiently secured mesh; damaged clips. | Re-attach mesh using additional clips or ties. Replace any broken clips. |
| Døren lukker eller låser ikke korrekt. | Misalignment during assembly; bent door frame/latch. | Check door frame alignment and adjust if possible. Inspect latch for damage and repair/replace if needed. |
| Water pooling on roof cover. | Cover not taut enough; improper installation. | Ensure cover is stretched tightly and secured to prevent sagging. Adjust positioning. |
Specifikationer
Key specifications for the KCT Large Walk-in Galvanised Pet Run:
- Model: PPH295
- Dimensioner (L x B x H): 250 cm x 300 cm x 195 cm (2.5m x 3m x 1.95m)
- Materiale: Galvanised Alloy Steel Frame, Treated Chicken Wire Mesh, Waterproof & UV Blocking Tarp Cover
- Varens vægt: Cirka 35.6 kg
- Farve: Brown (referring to the overall aesthetic, frame is typically silver/grey)
- Særlige funktioner: Waterproof, Spacious, Secure
- Velegnet til: Chickens, Rabbits, Dogs, Cats, and other small animals

Image: A diagram illustrating the overall dimensions of the KCT pet run, clearly marking its height as 195cm, length as 300cm, and width as 250cm.
Garanti og support
KCT products are manufactured to high standards. For any issues, missing parts, or warranty claims, please contact your retailer or KCT customer support directly.
Please have your model number (PPH295) and proof of purchase ready when contacting support.
For yderligere hjælp, besøg KCT Store on Amazon.


