1. Introduktion
This manual provides detailed instructions for the installation, operation, and maintenance of your UNITOPSCI 9-inch Android Car Stereo. Please read this manual thoroughly before using the product to ensure proper functionality and to maximize your user experience. Keep this manual for future reference.
2. Produktet er slutview
2.1 Nøglefunktioner
- Android 13-system: Equipped with 2GB RAM and 64GB ROM for smooth operation.
- 9-Inch HD Capacitive Touchscreen: 1024x600 resolution for clear visuals.
- Trådløs Apple CarPlay og Android Auto: Problemfri smartphone-integration til navigation, opkald og musik.
- Indbygget Bluetooth 4.2: Supports hands-free calling, phone book sync, and A2DP music streaming.
- GPS-navigation: Supports online and offline maps (preloaded with Here WeGo, compatible with Google Maps, Waze, Sygic).
- WiFi-forbindelse: Access online functions like streaming, browsing, and social media via a WiFi hotspot.
- FM/RDS-radio: 18 preset stations for news, music, and weather broadcasts.
- Mirror Link funktion: Display content from Android (via WiFi or USB) and iOS (via WiFi) phones.
- Understøttelse af AHD-bakkamera: Automatic display of parking video with night vision and 170-degree viewvinkel.
- HiFi EQ Setting: Customizable audio effects for enhanced sound quality.
- Opdelt skærmfunktion: Kør to applikationer samtidigt på skærmen.
- Ratbetjening (SWC): Easily manage radio channels, songs, and volume for safer driving.
- Video output: Share video content to external monitors, such as headrest displays.
2.2 Hvad er der i æsken

Figure 2.2.1: Included Components and Product Dimensions.
This image displays the main unit with its dimensions and a detailed layout of all accessories included in the package, such as cables, antennas, and the backup camera.
- 1 x Android Car Stereo for VW
- 1 x AHD-bakkamera
- 1 x RCA-kabel
- 1 x GPS-antenne
- 1 x kameraindgangskabel
- 2 x strømkabler
- 2 x USB-kabler
- 1 x Canbus-dekoder
- 1 x radioadapter
3. Opsætning og installation
Proper installation is crucial for the optimal performance of your car stereo. If you are unsure about any steps, it is recommended to seek professional assistance.
3.1 Kompatibilitetskontrol
Before installation, confirm the compatibility of the stereo with your vehicle's original car system configuration, year, and central control map. This unit is designed for specific Volkswagen, SEAT, and Skoda models. Refer to the compatibility image below.
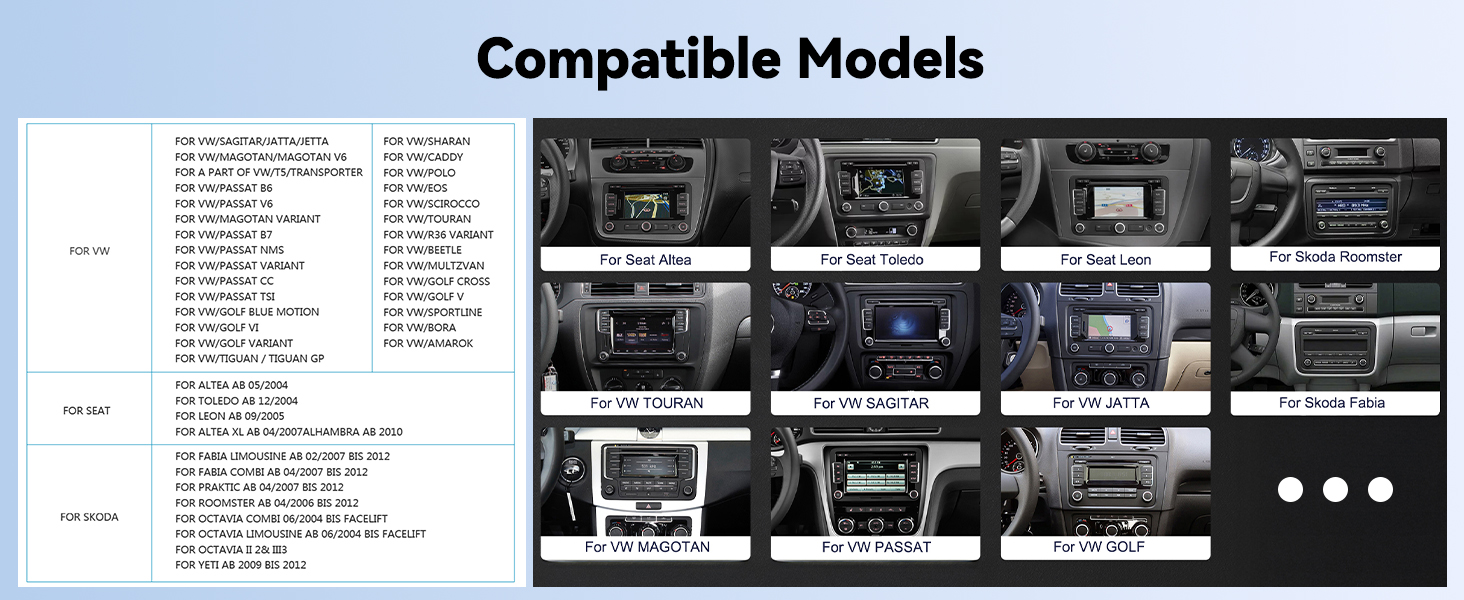
Figure 3.1.1: Compatible Vehicle Models.
This image provides a list of Volkswagen, SEAT, and Skoda models for which this car stereo is compatible. Please verify your vehicle model against this list.

Figure 3.1.2: Installation Compatibility Note.
Dette billede viser f.eks.amples of car dashboard layouts, distinguishing between configurations where the stereo can be installed (green checkmark) and where it cannot (red cross), based on the original car system's design.
3.2 Ledningsinstruktioner
The package includes both 36-pin and 40-pin harnesses. Choose the correct harness for your car model. Refer to the diagrams below for proper wiring connections.

Figure 3.2.1: Wiring Diagram (Canbus Connection).
This diagram illustrates how to connect the ACC (A, B plug) and Canbus. It shows plugging the Canbus into the port at the back of the unit to provide power to the Canbus.

Figure 3.2.2: Detailed Wiring Harness Connections.
Dette billede giver en detaljeret view of the 36-pin and 40-pin harnesses, indicating connections for power, RCA cables, reverse input, USB, Canbus, and GPS antenna. Ensure you select the correct harness for your vehicle.
- Frakobl køretøjets batteri, før du påbegynder nogen form for ledningsføring.
- Identify the correct wiring harness (36-pin or 40-pin) for your vehicle.
- Connect the main power cable to the vehicle's power supply, ensuring ACC and ground connections are secure.
- Tilslut Canbus-dekoderen, hvis dit køretøj kræver det til betjening på rattet eller andre integrerede funktioner.
- Tilslut GPS-antennen, og før den til en placering med en fri bane view af himlen.
- Tilslut USB-kablerne, og før dem til et tilgængeligt sted (f.eks. handskerum).
- For the backup camera, connect the video input cable to the stereo and the power/ground wires to the vehicle's reverse light circuit.
- Tilslut eventuelle ekstra RCA-kabler til ekstern amplifiers or video output.
- Once all connections are made, reconnect the vehicle's battery and test the unit before fully reassembling the dashboard.
4. Betjeningsvejledning
4.1 Trådløs Apple CarPlay og Android Auto
Connect your smartphone wirelessly to access navigation, make calls, send messages, and play music through the car stereo's interface.

Figure 4.1.1: Wireless CarPlay and Android Auto Interfaces.
This image shows the car stereo's display with both Apple CarPlay and Android Auto interfaces, demonstrating how smartphone apps are integrated for in-car use.
- Sørg for, at Bluetooth og Wi-Fi er aktiveret på din smartphone.
- Vælg CarPlay- eller Android Auto-appen på bilstereoen.
- Follow the on-screen prompts to pair your phone. For Apple CarPlay, select your car stereo from your iPhone's Bluetooth settings. For Android Auto, ensure the app is installed and follow the pairing process.
- Once connected, you can use voice commands (Siri or Google Assistant) for various functions.
4.2 Bluetooth-forbindelse
The built-in Bluetooth module allows for hands-free calling and wireless audio streaming.

Figure 4.2.1: Hands-Free Calling via Bluetooth.
This image illustrates the hands-free calling feature, showing a driver on a call with the car stereo displaying the call interface.
- Gå til Bluetooth-indstillingerne på bilstereoen.
- Aktiver Bluetooth på din smartphone, og søg efter tilgængelige enheder.
- Select "UNITOPSCI" (or similar device name) from your phone's list and pair.
- Når den er parret, kan du foretage/modtage opkald og afspille musik trådløst.
4.3 GPS-navigation
Utilize the integrated GPS for reliable navigation, with support for both online and offline maps.

Figur 4.3.1: GPS-navigationsgrænseflade.
This image shows the car stereo displaying a navigation map, along with icons representing different map applications like Google Maps, Waze, and Here WeGo.
- Access the Navigation application from the main menu.
- The unit comes preloaded with Here WeGo maps. You can download additional offline maps or use online navigation apps like Google Maps or Waze when connected to Wi-Fi.
- Indtast din destination for at modtage trinvise rutevejledninger.
4.4 WiFi-forbindelse
Connect to a Wi-Fi hotspot to access online features and applications.
Figure 4.4.1: WiFi and Online Applications.
This image highlights the Wi-Fi capability of the stereo, showing the Wi-Fi icon and various online applications that can be accessed, such as YouTube, Facebook, and web browsere.
- Gå til Indstillinger > Netværk og internet > Wi-Fi.
- Turn on Wi-Fi and select your desired hotspot from the list.
- Indtast adgangskoden, hvis du bliver bedt om det.
- Once connected, you can use online navigation, stream videos, browse the internet, and use other online applications.
4.5 FM/RDS-radio
Tune into your favorite radio stations with the built-in FM/RDS tuner.

Figur 4.5.1: FM/RDS-radiogrænseflade.
This image shows the car stereo's FM radio interface, displaying the current frequency, available preset stations, and controls for tuning.
- Select the Radio application from the main menu.
- Brug scanningsfunktionen til at finde tilgængelige stationer, eller stil manuelt ind på en bestemt frekvens.
- Save up to 18 of your favorite stations as presets for quick access.
- RDS (Radio Data System) provides additional information like station name and program type where available.
4.6 Spejllinkfunktion
Spejl din smartphones skærm direkte på bilstereoens display.

Figur 4.6.1: Funktionalitet for spejllink.
This image demonstrates the Mirror Link feature, where a smartphone's display is replicated on the car stereo screen. It also indicates connection methods for Android (WiFi or USB) and iOS (WiFi).
- For Android phones: Connect via Wi-Fi or USB cable.
- For iOS phones: Connect via Wi-Fi.
- Select the Mirror Link application on the stereo and follow the pairing instructions specific to your phone's operating system.
4.7 Opdelt skærmfunktion
Vis to applikationer samtidigt for forbedret multitasking.

Figur 4.7.1: Delt skærmvisning.
This image shows the car stereo's display divided into two sections, with a navigation map on one side and the FM radio interface on the other, demonstrating the split-screen capability.
- While an application is open, long-press the recent apps button or drag an app to one side of the screen (method may vary slightly based on Android version).
- Select a second application to occupy the other half of the screen.
4.8 Ratbetjening (SWC)
Configure your vehicle's steering wheel buttons to control the stereo functions.

Figur 4.8.1: Opsætning af ratbetjening.
This image displays a car steering wheel with its control buttons alongside the car stereo's interface for learning and configuring steering wheel controls, allowing users to map functions like volume, track skip, and mode selection.
- Gå til Indstillinger > Styringsindlæring (eller lignende mulighed).
- Follow the on-screen instructions to program each steering wheel button to its corresponding function on the stereo.
4.9 HiFi EQ Setting
Customize your audio experience with the integrated HiFi Equalizer.
Figure 4.9.1: HiFi EQ Settings.
This image shows the car stereo's graphic equalizer interface, allowing users to adjust various frequency bands and select from predefined sound presets like Custom, Classical, Jazz, Rock, and Pop.
- Få adgang til EQ-indstillingerne fra lydmenuen.
- Adjust frequency bands manually or select from preset sound modes (e.g., Pop, Rock, Jazz, Classical).
4.10 AHD bakkamera
Systemet viser automatisk bagsiden view når køretøjet er i bakgear.

Figure 4.10.1: Backup Camera Display and Wiring.
This image illustrates the clear rear-view display with parking guidelines provided by the AHD backup camera. It also includes a simplified diagram showing how to connect the camera to the stereo and the vehicle's reverse light for automatic activation.
- Ensure the backup camera is correctly installed and wired to the reverse light circuit.
- Når bilen sættes i bakgear, skifter stereoanlægget automatisk til kameraet. view.
- The camera features night vision and a 170-degree viewing angle for improved visibility.
5. Vedligeholdelse
- Rengøring af skærm: Brug en blød, fnugfri klud til forsigtigt at tørre berøringsskærmen af. Ved genstridige pletter, tør let afampRengør kluden med vand eller et skærmsikkert rengøringsmiddel. Undgå skrappe kemikalier eller slibende materialer.
- Softwareopdateringer: Tjek regelmæssigt for softwareopdateringer fra producenten for at sikre optimal ydeevne og adgang til nye funktioner.
- Generel pleje: Undgå at udsætte enheden for ekstreme temperaturer, direkte sollys i længere perioder eller for høj fugtighed.
6. Fejlfinding
Hvis du støder på problemer med din bilstereo, kan du se følgende almindelige fejlfindingstrin:
- Ingen strøm:
- Kontroller alle strømtilslutninger og sikringer.
- Sørg for, at køretøjets batteri er opladet.
- Verify the ACC wire is correctly connected and receiving power when the ignition is on.
- Ingen lyd:
- Kontroller højttalerledningernes forbindelser.
- Sørg for, at lydstyrken ikke er slået fra eller indstillet for lavt.
- Bekræft indstillingerne for lydudgang i stereomenuen.
- Problemer med Bluetooth-forbindelse:
- Sørg for, at Bluetooth er aktiveret på både stereoanlægget og din telefon.
- Slet tidligere parringer på begge enheder, og forsøg at parre dem igen.
- Genstart både stereoanlægget og din telefon.
- GPS virker ikke / unøjagtig:
- Sørg for, at GPS-antennen er korrekt tilsluttet og placeret på et sted med frit lys. view af himlen.
- Verify that location services are enabled in the stereo's settings.
- If using online maps, ensure a stable Wi-Fi connection.
- Unit Lagging / Slow Response:
- Luk unødvendige baggrundsapplikationer.
- Udfør en systemgenstart.
- Consider a factory reset if the issue persists (note: this will erase all user data and settings).
- Bakkamera viser ikke:
- Check the camera's video input connection to the stereo.
- Verify the camera's power and ground connections to the reverse light circuit.
- Ensure the reverse trigger wire (if applicable) is correctly connected.
If these steps do not resolve the issue, please contact UNITOPSCI customer support for further assistance.
7. Specifikationer
| Mærke | UNITOPSCI |
| Modelnummer | A3041 |
| Operativsystem | Android 13 |
| VÆDDER | 2 GB |
| ROM | 64 GB |
| Skærmstørrelse | 9 tommer |
| Skærmopløsning | 1024x600 |
| Strømudgang | 4x45W |
| Bluetooth version | 4.2 |
| Forbindelse | Wireless (CarPlay, Android Auto, Bluetooth, WiFi) |
| Map Type Compatibility | Google Map, Here WeGo, Waze, Sygic (North America, Worldwide) |
| Varens vægt | 3.14 pund |
| Produktdimensioner | 8.58 x 2.09 x 5.12 tommer |
8. Garanti og support
8.1 Produktgaranti
The UNITOPSCI A3041 car stereo comes with a 1 års garanti from the date of purchase, covering manufacturing defects. For specific warranty claims or details, please contact customer support.
8.2 Kundesupport
For technical assistance, troubleshooting, or warranty inquiries, please contact UNITOPSCI customer service:
- E-mail: UNITOPSCI@126.com
- Returpolitik: 30-day refund/replacement policy through Amazon.
- Beskyttelsesplaner: Optional 2-Year and 3-Year protection plans are available for purchase separately.

Figur 8.2.1: Kundesupportoplysninger.
This image provides details on customer support, including email contact, replacement policy, response times, and lifetime after-sales technical support.


