1.Overview
Thank you for choosing the Atlanta 1869 Digital Alarm Clock. This modern and functional alarm clock features a clear LED display, showing time, date, day, temperature, and humidity. It also includes a convenient pop-up alarm display and radio-controlled time synchronization for accuracy.
Nøglefunktioner:
- Digital LED Display with Time, Date, Day, Temperature, and Humidity
- Pop-up Alarm Display for easy viewing
- Radio Controlled Time Synchronization (where available)
- Snooze funktion
- Luminous Display for low-light conditions
- Automatic Summer Time (DST) adjustment
2. Pakkens indhold
- Atlanta 1869 Digital Alarm Clock
- Brugervejledning (dette dokument)
Bemærk: Batterier er ikke inkluderet og skal købes separat.
3. Opsætning
3.1 Batteriinstallation
- Find batterirummet på bagsiden af vækkeuret.
- Åbn batterirummets dæksel.
- Indsæt 2 AAA batterier, ensuring the correct polarity (+ and -) as indicated inside the compartment.
- Luk batterirummets dæksel forsvarligt.
3.2 Indstilling af starttidspunkt og dato
Upon battery installation, the clock will typically attempt to synchronize with a radio signal. If synchronization is not immediately successful or if you are in an area without radio signal reception, you may need to set the time and date manually.
Refer to the 'Operating Instructions' section for detailed steps on manual time and date setting.
3.3 Radiostyret tidssynkronisering
The Atlanta 1869 alarm clock is designed to automatically synchronize its time with a radio signal for precise accuracy. This process usually occurs overnight. Ensure the clock is placed in an area where it can receive a clear signal, away from electronic interference.

Image: The Atlanta 1869 Digital Alarm Clock displaying the radio controlled time synchronization icon on the main screen.
4. Betjeningsvejledning
4.1 Indstilling af tid og dato
Specific buttons for time/date adjustment are usually located on the back or side of the unit. Look for buttons labeled 'SET', 'MODE', '+', or '-'.
- Press the 'MODE' or 'SET' button repeatedly until the time or date setting mode is activated.
- Use the '+' and '-' buttons to adjust the hours, minutes, year, month, and day.
- Press 'SET' or 'MODE' again to confirm each setting and move to the next.
4.2 Indstilling af alarmen
The alarm time is displayed on the pop-up screen at the top of the clock.
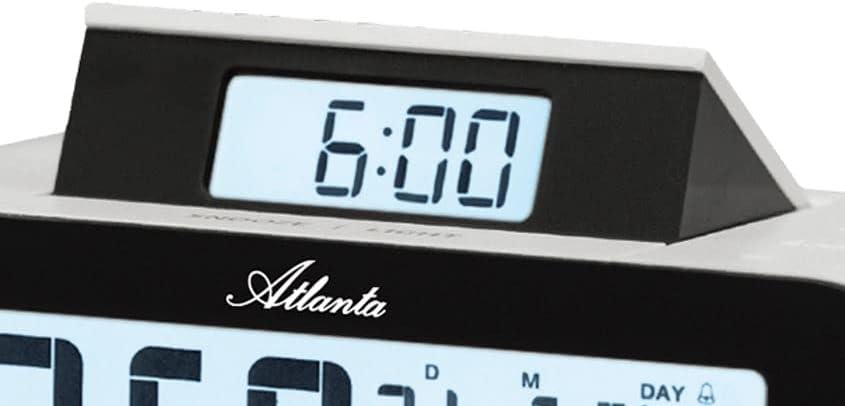
Billede: Et nærbillede view of the pop-up display on the Atlanta 1869 alarm clock, showing the alarm time.
- Locate the 'ALARM SET' button, usually near the pop-up display or on the back.
- Press and hold 'ALARM SET' until the alarm time starts flashing on the pop-up display.
- Use the '+' and '-' buttons to adjust the alarm hour and minute.
- Press 'ALARM SET' again to confirm.
- To activate/deactivate the alarm, look for an 'ALARM ON/OFF' switch or button. An alarm icon (bell) on the main display usually indicates the alarm is active.
4.3 Snooze -funktion
When the alarm sounds, press the large 'SNOOZE/LIGHT' button, typically located on the top of the clock. This will temporarily silence the alarm for a few minutes (e.g., 5-10 minutes) before it sounds again.
4.4 Display Functions (Temperature, Humidity, Calendar)
The main LED display shows the current time, date (day, month, year), day of the week, indoor temperature, and indoor humidity.
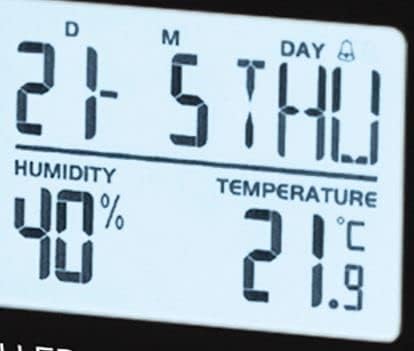
Billede: En detaljeret view of the Atlanta 1869 alarm clock's main display, highlighting the humidity percentage and temperature readings.
The temperature can usually be switched between Celsius (°C) and Fahrenheit (°F) by pressing a dedicated button (often labeled 'C/F' or integrated with another function button).
4.5 Summer Time (DST) Adjustment
The clock is designed to automatically adjust for Daylight Saving Time (Summer Time) if the radio control signal is active. If manual adjustment is needed, refer to the time setting instructions or a dedicated DST button if available.

Image: The Atlanta 1869 Digital Alarm Clock displaying the current time, date, day of the week, humidity, and temperature on its main screen, with the pop-up alarm display showing 6:00.
5. Pleje og vedligeholdelse
- Rensning: Tør uret af med en blød, tør klud. Brug ikke slibende rengøringsmidler eller opløsningsmidler, da de kan beskadige uret.asing eller display.
- Udskiftning af batteri: Replace batteries when the display dims or functions become erratic. Always replace all batteries at the same time with new ones of the same type.
- Opbevaring: If storing the clock for an extended period, remove the batteries to prevent leakage and damage.
- Miljø: Undgå at udsætte uret for ekstreme temperaturer, direkte sollys, høj luftfugtighed eller støvede omgivelser.
6. Fejlfinding
| Problem | Mulig årsag | Løsning |
|---|---|---|
| Skærmen er tom eller svag. | Lave eller døde batterier. | Udskift med nye AAA-batterier. |
| Alarm does not sound or cannot be set. | Alarm is not activated; internal malfunction. | Ensure alarm is switched 'ON'. Re-enter alarm time. If issue persists, batteries may be too low or there may be an internal fault. |
| Tidspunktet er forkert eller synkroniserer ikke. | Poor radio signal reception; manual setting error. | Move the clock to a location with better signal. Manually set the time if radio control is not available. |
| Temperatur-/fugtighedsaflæsningerne virker unøjagtige. | Clock placed near heat/cold sources or in high/low humidity areas. | Relocate the clock to a stable environment for accurate readings. |
7. Produktspecifikationer
| Feature | Detalje |
|---|---|
| Modelnummer | 1869 |
| Mærke | Atlanta |
| Farve | Hvid |
| Casing Materiale | Plast |
| Display Type | Digital LED |
| Strømkilde | Batteridrevet |
| Batterier påkrævet | 2 x AAA (medfølger ikke) |
| Produktmål (L x B x H) | 14.5 x 3.81 x 4.8 cm |
| Varens vægt | 191 gram |
| Stil | Moderne |
| Form | Oval |
| Særlige funktioner | Alarm, Summer Time (DST), LED Display, Calendar Display, Humidity Display, Temperature Display, Snooze, Wake-up, Luminous |
8. Garanti og support
Atlanta products are manufactured with high-quality standards. For warranty information and customer support, please refer to the contact details provided on the product packaging or the official Atlanta webwebsted. Gem din købskvittering som købsbevis i tilfælde af garantikrav.
For technical assistance or further inquiries, please contact Atlanta customer service.


