1. Introduktion
This manual provides essential information for the safe and effective operation, assembly, maintenance, and troubleshooting of your Vacmaster VK1330PWR 1300W 30L Wet/Dry/Shampoo Vacuum Cleaner. Please read these instructions thoroughly before first use and retain them for future reference. This appliance is designed for versatile cleaning tasks, including dry vacuuming, wet vacuuming, and shampooing carpets and upholstery.

Image: The Vacmaster VK1330PWR 1300W 30L Wet/Dry/Shampoo Vacuum Cleaner with its various attachments.
2. Sikkerhedsinstruktioner
Overhold altid grundlæggende sikkerhedsforanstaltninger ved brug af elektriske apparater for at mindske risikoen for brand, elektrisk stød eller personskade.
- Læs alle instruktioner: Gør dig bekendt med apparatet inden brug.
- Elektrisk sikkerhed: Sørg for, at strømforsyningen matcher voltage specified on the rating label. Do not use with a damaged cord or plug.
- Undgå vandkontakt: Do not immerse the appliance in water. Do not use outdoors or on wet surfaces unless specifically designed for it.
- Overvågning: Tæt opsyn er nødvendigt, når apparatet bruges af eller i nærheden af børn.
- Opretholdelse: Disconnect from the power supply before cleaning or performing maintenance.
- Brandfarlige materialer: Støvsug ikke brandfarlige eller brændbare væsker, varm aske eller skarpe genstande.
- Filtre: Always ensure appropriate filters are installed for the intended operation (dry or wet).
- Kemikalier: Use only recommended cleaning solutions for shampooing. Avoid harsh chemicals.
3. Pakkens indhold og produktoversigtview
Before assembly, ensure all components listed below are present and undamaged. Refer to the diagram for identification.
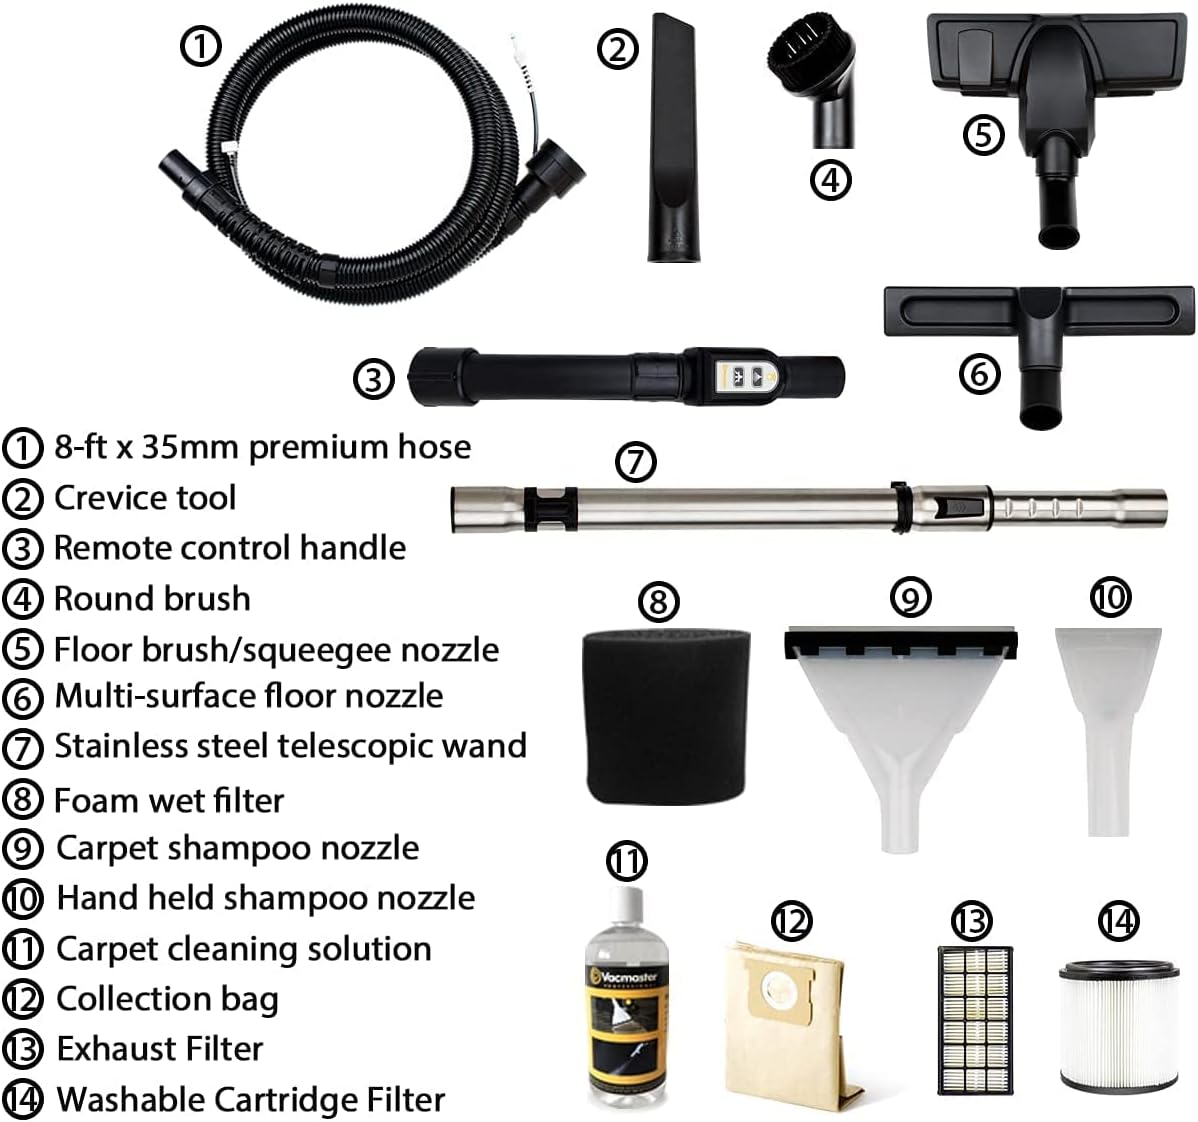
Billede: Detaljeret view of the Vacmaster VK1330PWR components and accessories.
Komponenter:
- 8-ft x 35mm Premium Hose
- Sprækkeværktøj
- Fjernbetjeningshåndtag
- Rund børste
- Gulvbørste/skrabermundstykke
- Multi-surface Floor Nozzle
- Stainless Steel Telescopic Wand
- Skum vådt filter
- Tæppe Shampoo Dyse
- Håndholdt Shampoo Dyse
- Carpet Cleaning Solution (sampdet)
- Collection Bag (for dry use)
- Udstødningsfilter
- Washable Cartridge Filter (for dry use)
Kontrolelementer:
The appliance features a remote control handle for convenient switching between vacuum and shampoo modes. An indicator light provides operational status.

Image: Close-up of the remote control handle with Vacuum Mode, Detergent Mode, and Indicator Light labels.
4. Samling og opsætning
Follow these steps to prepare your vacuum cleaner for operation.
Indledende samling:
- Attach the wheels to the base of the unit.
- Secure the main hose to the inlet port on the vacuum cleaner.
- Connect the desired accessory (e.g., telescopic wand, floor nozzle) to the end of the hose.
Filterinstallation:
The correct filter must be installed for the specific cleaning mode.
- Til tørstøvsugning: Install the Washable Cartridge Filter and, if applicable, a collection bag. Ensure the foam wet filter is removed.
- For Wet Vacuuming/Shampooing: Remove the Washable Cartridge Filter and install the Foam Wet Filter. Do not use a collection bag for wet operations.
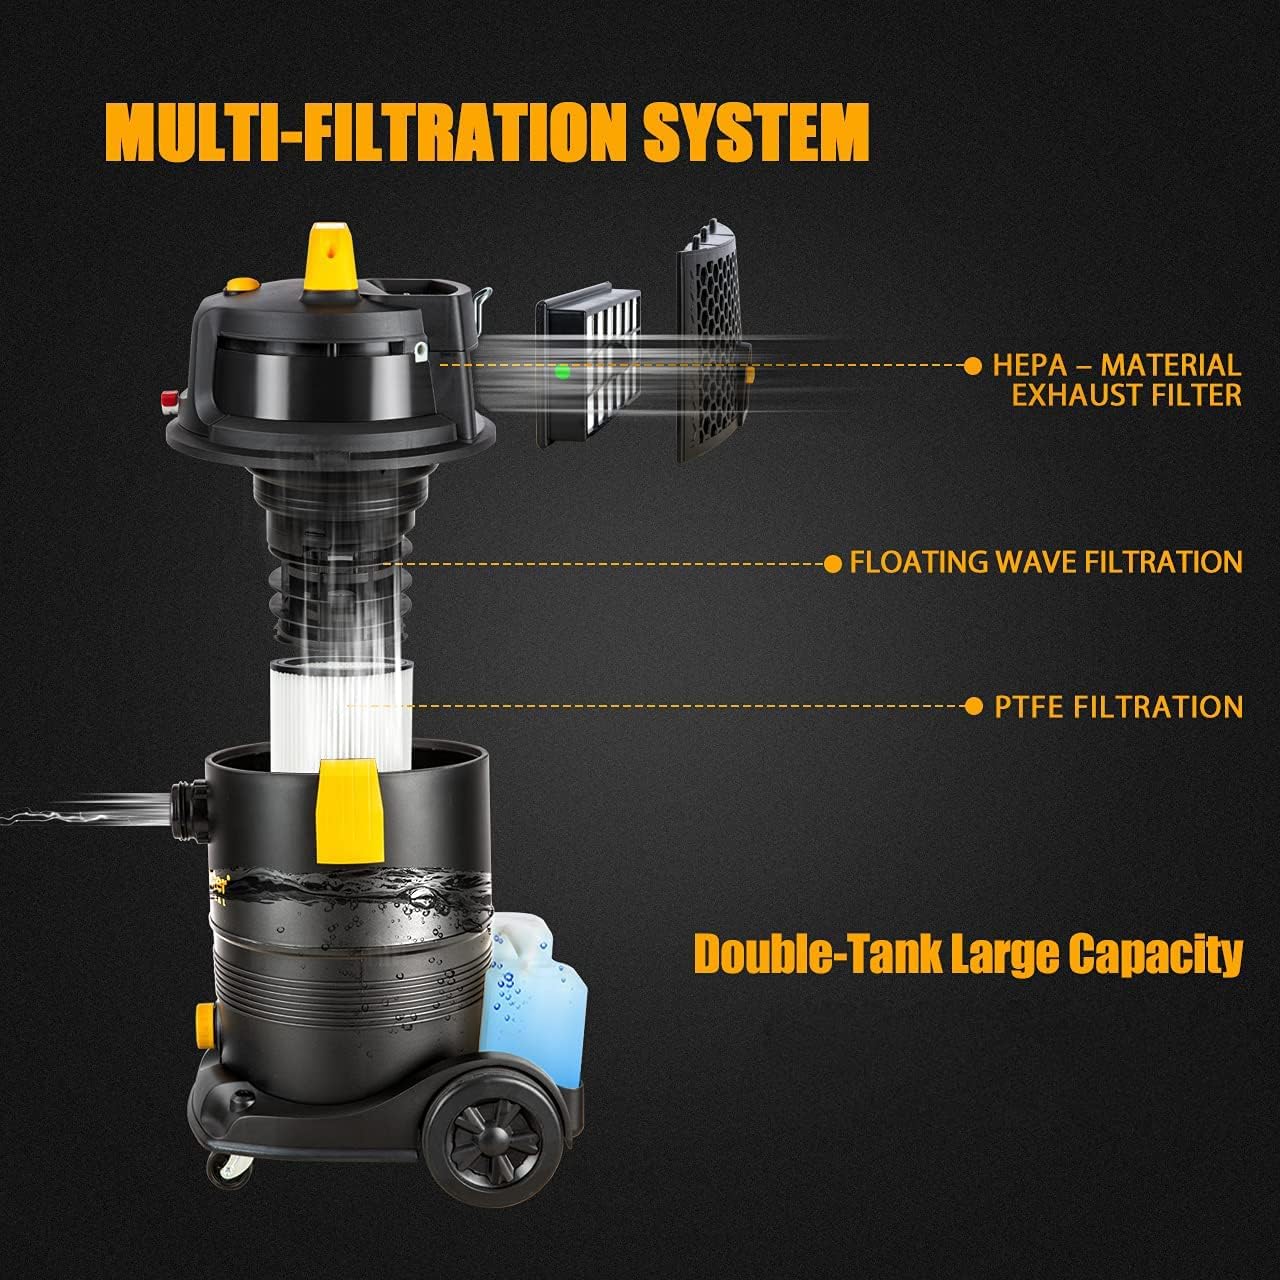
Image: Diagram illustrating the multi-filtration system, showing HEPA exhaust filter, floating wave filtration, and PTFE filtration.
Filling Detergent Tank (for Shampooing):
- Locate the clean water/detergent tank, typically located on the side of the unit.
- Fill the tank with clean water and the recommended carpet cleaning solution according to the solution's instructions. Do not overfill.
- Luk tankdækslet forsvarligt.
5. Driftstilstande
Your Vacmaster VK1330PWR offers three primary cleaning modes.
5.1 Tørstøvsugning
This mode is suitable for picking up dry debris, dust, and dirt from hard floors and carpets.
- Ensure the Washable Cartridge Filter is installed.
- Attach the appropriate dry vacuuming nozzle (e.g., multi-surface floor nozzle, crevice tool).
- Tilslut apparatet og tænd det.
- Move the nozzle slowly over the surface to be cleaned.
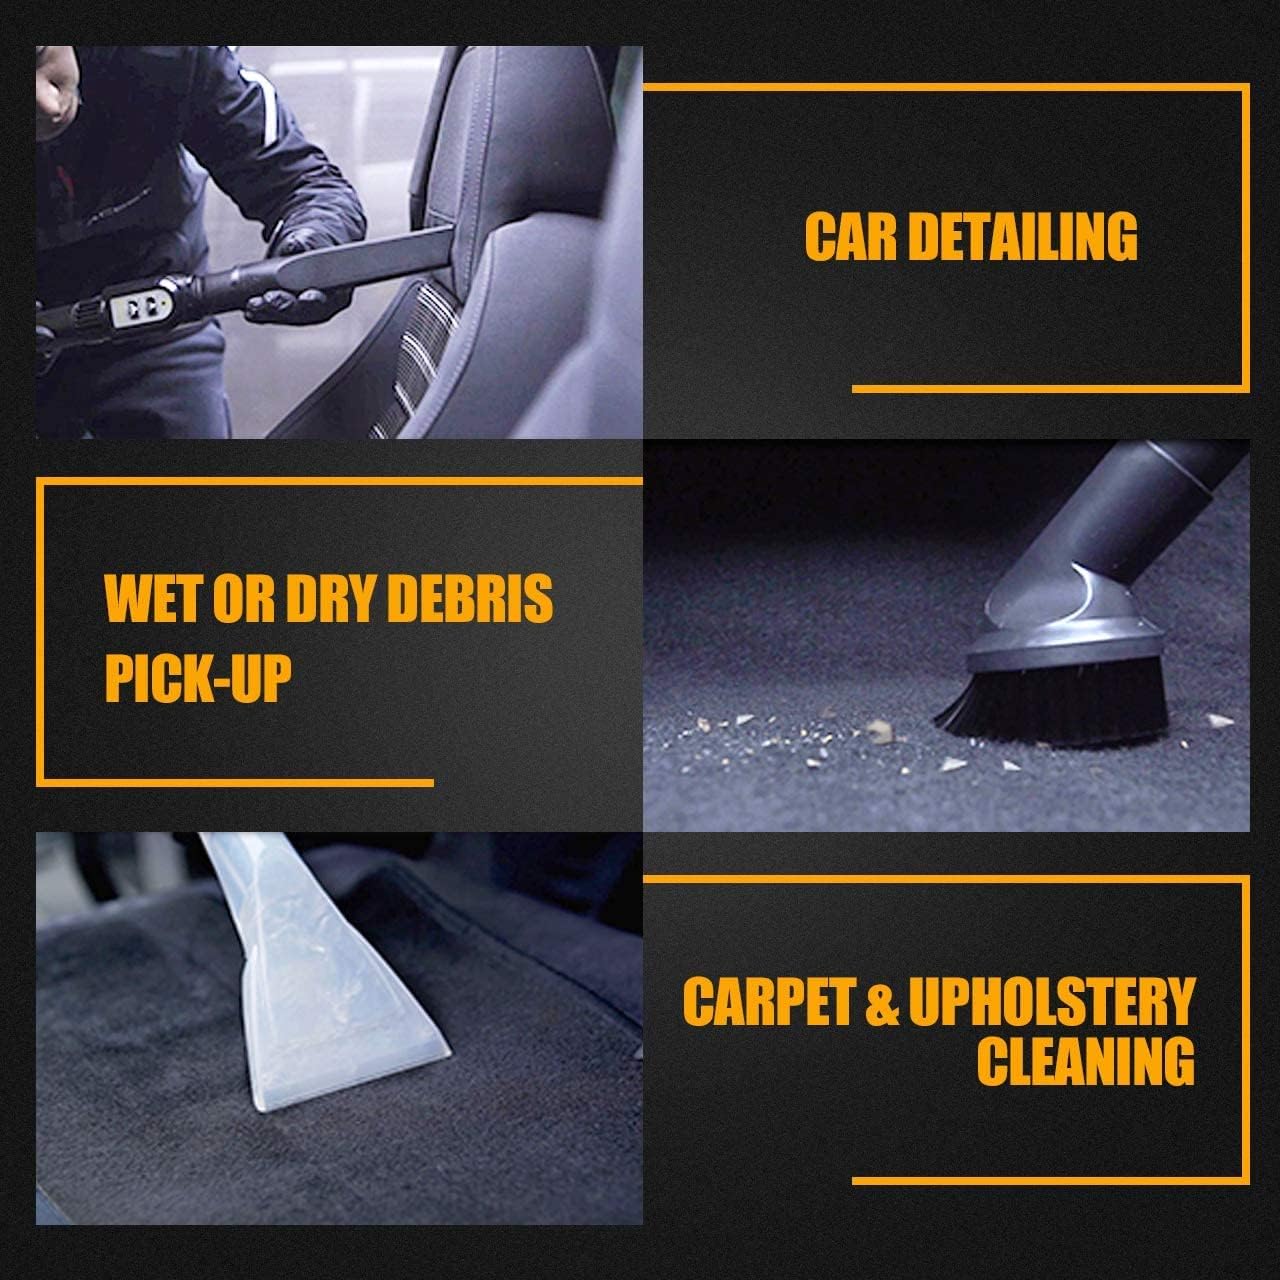
Image: Visual representation of the vacuum's versatility, including dry debris pick-up.
5.2 Vådstøvsugning
Use this mode for picking up liquid spills or for general wet cleaning tasks.
- Ensure the Foam Wet Filter is installed and the cartridge filter is removed.
- Attach the squeegee nozzle or other suitable wet pick-up tool.
- Tilslut apparatet og tænd det.
- Move the nozzle over the wet surface to extract liquids.
- Monitor the dirty water tank and empty it when full to prevent overflow.
5.3 Shampooing (Carpet and Upholstery Cleaning)
This mode is designed for deep cleaning carpets, rugs, and upholstery using a cleaning solution.
- Ensure the Foam Wet Filter is installed and the clean water/detergent tank is filled.
- Attach the Carpet Shampoo Nozzle for large areas or the Hand Held Shampoo Nozzle for upholstery and stairs.
- Tilslut apparatet.
- Use the remote control handle to switch to Detergent Mode.
- Press the spray trigger to apply cleaning solution while moving the nozzle over the surface.
- Release the spray trigger and make a second pass to vacuum up the dirty solution.
- Gentag trinene, indtil det udtrukne vand ser rent ud.

Image: The Vacmaster VK1330PWR demonstrating its 3-in-1 capability, showing spray and vacuum functions.

Image: The Vacmaster VK1330PWR being used to clean upholstery with the hand-held shampoo dyse.
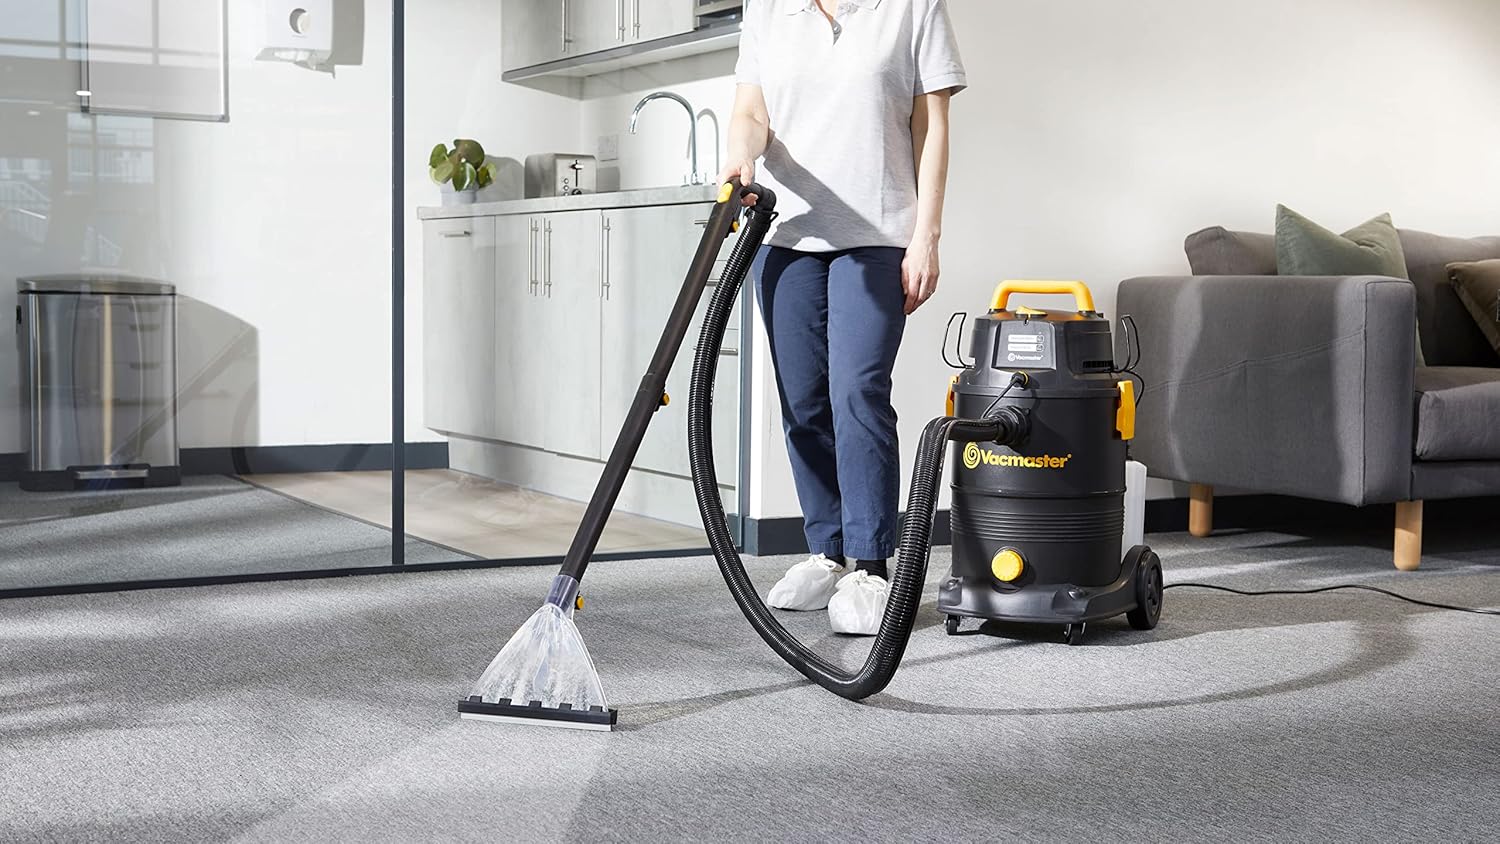
Image: The Vacmaster VK1330PWR being used to clean a carpet with the carpet shampoo dyse.
6. Vedligeholdelse og rengøring
Regelmæssig vedligeholdelse sikrer optimal ydeevne og forlænger apparatets levetid.
6.1 Emptying Tanks
- Beholder til snavset vand: After wet vacuuming or shampooing, always empty the dirty water tank. Disconnect the power, remove the tank, and dispose of the contents. Rinse the tank thoroughly with clean water.
- Clean Water/Detergent Tank: Empty any remaining solution after shampooing and rinse the tank.
6.2 Filterrensning
- Washable Cartridge Filter: For dry use, tap off excess dust. If heavily soiled, rinse under running water. Allow to air dry completely before reinstallation.
- Skum vådfilter: Rinse under running water after each wet use. Squeeze out excess water and allow to air dry completely.
- Udstødningsfilter: Check periodically and clean or replace as needed according to manufacturer guidelines.
6.3 Generel rengøring
- Tør støvsugeren af ydersiden med enamp klæde.
- Rinse all nozzles and accessories after use, especially after wet or shampooing operations, to prevent clogging and odor.
- Store the vacuum cleaner and accessories in a dry, clean place.
7. Fejlfinding
Se dette afsnit for almindelige problemer og deres løsninger.
| Problem | Mulig årsag | Løsning |
|---|---|---|
| Støvsugeren tænder ikke. | Ingen strømforsyning; beskadiget ledning/stik. | Check power outlet; inspect cord/plug for damage. |
| Lav sugeevne. | Clogged hose/nozzle; full dirty water tank; incorrect filter. | Clear obstructions; empty tank; ensure correct filter is installed and clean. |
| No spray/detergent flow. | Empty clean water tank; clogged spray nozzle; pump issue. | Refill tank; clean spray nozzle; contact customer support if pump is faulty. |
| Vand lækker fra enheden. | Tank not properly sealed; damaged tank/hose. | Ensure tanks are securely closed; inspect for cracks or damage. |
Hvis problemet fortsætter efter at have forsøgt disse løsninger, bedes du kontakte Vacmasters kundesupport.
8. Tekniske specifikationer
| Mærke | Vacmaster |
| Modelnummer | VK1330PWR 03 |
| Farve | 1300W 30L |
| Produktmål (L x B x H) | 60 x 35 x 45 cm |
| Kapacitet | 30 liter |
| Magt | 1300 watt |
| Voltage | 240 volt |
| Materiale | Stål |
| Støjniveau | 80 dB |
| Funktioner | HEPA, Portable, Wheel |
| Varens vægt | 10.8 kilo |
| Fabrikant | Cleva |
| Strømkilde | Elektrisk med ledning |
| Fremstillingsår | 2020 |
9. Garanti og kundesupport
For warranty information, please refer to the warranty card included with your product or consult the retailer from whom you purchased the Vacmaster VK1330PWR. For technical assistance, spare parts, or service inquiries, please contact the manufacturer, Cleva, or your local authorized service center. Contact details can typically be found on the manufacturer's official webwebstedet eller på din købsdokumentation.


