Indledning
This manual provides detailed instructions for the safe installation, operation, and maintenance of your bimar Wi-Fi Ceiling Fan, Model 1 (Ø 132). Please read this manual thoroughly before using the product and retain it for future reference.
Tiltænkt brug: This high-performance ceiling fan is designed for ventilation in indoor domestic environments. Any other use is considered improper and potentially hazardous. The manufacturer cannot be held responsible for any damages resulting from improper use or repairs performed by unqualified personnel.
Vigtige sikkerhedsinstruktioner
For at reducere risikoen for brand, elektrisk stød eller personskade, skal du være opmærksom på følgende:
- Læs alle instruktioner, før du installerer ventilatoren.
- Installationen skal udføres af en kvalificeret elektriker i overensstemmelse med alle lokale og nationale el-forskrifter.
- Ensure the installation site can support the fan's weight (approximately 6.2 kg).
- Afbryd altid strømmen ved hovedafbryderen før installation eller service.
- Brug ikke ventilatoren med en beskadiget netledning eller stik.
- Keep hands, hair, and clothing away from moving blades.
- Do not insert any objects into the fan blades while it is operating.
- Dette apparat er ikke beregnet til brug af personer (inklusive børn) med nedsatte fysiske, sensoriske eller mentale evner, eller mangel på erfaring og viden, medmindre de har fået opsyn eller instruktion i brugen af apparatet af en person, der er ansvarlig for deres sikkerhed.
- Børn skal være under opsyn for at sikre, at de ikke leger med apparatet.
Hvad er der i æsken
Your bimar Wi-Fi Ceiling Fan package includes the following components:
- bimar Wi-Fi Ceiling Fan unit (with 3 blades)
- Fjernbetjening
- Monteringsudstyr (skruer, beslag osv.)
- Instruktionsmanual (dette dokument)

Image: The bimar Wi-Fi Ceiling Fan, featuring three light-colored wooden blades and a brushed metal motor housing and downrod.
Opsætning og installation
1. Ventilatorinstallation
Professional installation by a qualified electrician is strongly recommended. Ensure the ceiling structure can safely support the fan's weight and that all wiring complies with local electrical codes.
- Forbered monteringsstedet: Turn off power at the circuit breaker. Securely attach the mounting bracket to a ceiling joist or a fan-rated outlet box.
- Saml nedstangen og motoren: Fastgør nedstangen til ventilatormotorhuset.
- Hæng ventilatoren: Løft forsigtigt ventilatorenheden op, og hæng den op fra monteringsbeslaget.
- Tilslut blæseren: Connect the electrical wires (live, neutral, ground) from the ceiling to the fan's wiring, following the wiring diagram provided in the separate installation guide (if applicable).
- Fastgør knivene: Securely fasten the three blades to the motor housing.
- Fastgør baldakinen: Raise the canopy to cover the wiring and mounting bracket, securing it in place.

Billede: Side view of the bimar ceiling fan, illustrating the angle of the light wood blades and the connection to the downrod.
2. Wi-Fi og app-forbindelse
The bimar Wi-Fi Ceiling Fan is compatible with the Bimar Live Smart app for advanced control and scheduling.
- Download appen: Søg efter "Bimar Live Smart" in your smartphone's app store (iOS or Android) and install it.
- Opret en konto: Åbn appen, og følg instruktionerne på skærmen for at oprette en ny brugerkonto eller logge ind, hvis du allerede har en.
- Tilføj enhed: Power on the ceiling fan. In the Bimar Live Smart app, tap "Add Device" or the "+" icon. Select "Ceiling Fan" or the appropriate device type.
- Opret forbindelse til Wi-Fi: Follow the app's instructions to put the fan into pairing mode (usually by pressing a button on the fan or remote for a few seconds). Connect the fan to your home 2.4GHz Wi-Fi network.
- Navngiv enheden: Once connected, you can name your fan for easy identification within the app.

Image: A modern living room featuring the bimar ceiling fan installed, with a smartphone displaying the Bimar Live Smart app interface, indicating Wi-Fi and voice control capabilities.
Betjeningsvejledning
Your bimar Wi-Fi Ceiling Fan offers multiple control options for convenience.
1. Betjening af fjernbetjening
The included remote control allows direct access to all fan functions.
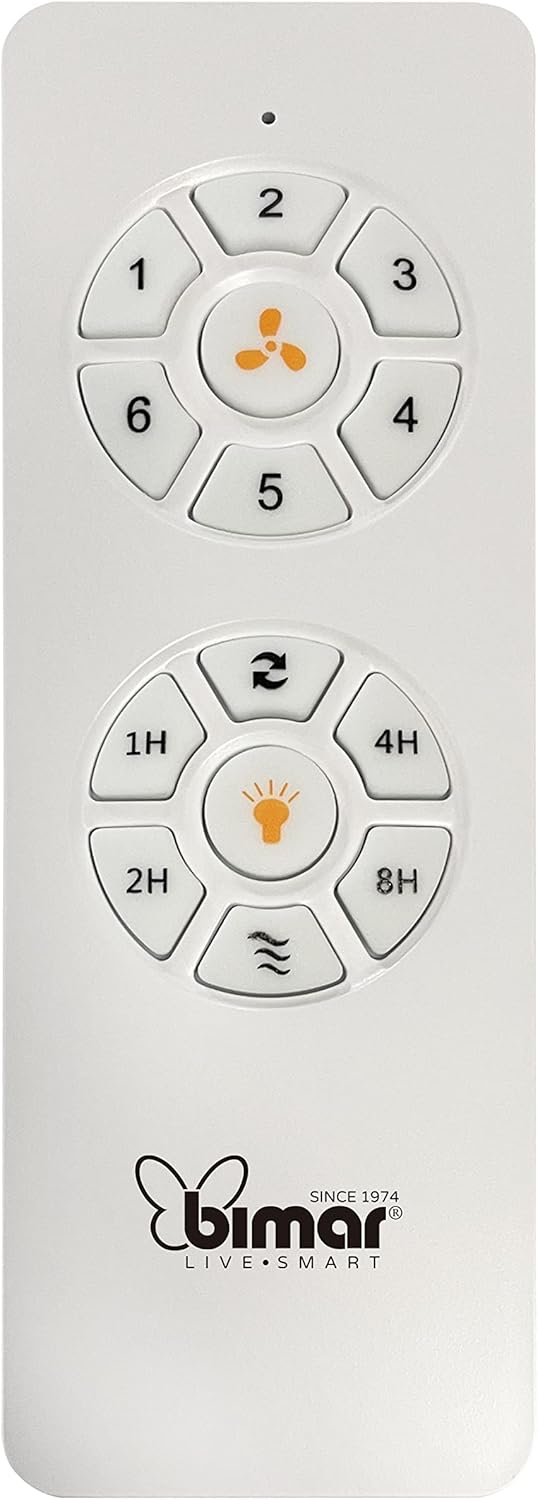
Image: The white remote control for the bimar ceiling fan, showing buttons for fan speed (1-6), fan on/off, timer (1H, 2H, 4H, 8H), mode selection, and reverse function.
- Tænd/sluk: Press the fan icon button to turn the fan on or off.
- Hastighedstilpasning: Use buttons 1-6 to select one of the six available fan speeds.
- Timer funktion: Press 1H, 2H, 4H, or 8H to set the fan to automatically turn off after the selected duration.
- Valg af tilstand: Use the mode button (often represented by waves or arrows) to cycle through Normal, Natural, Sleep, and Breeze modes.
- Sommer/vinter tilstand: The reverse button (often two arrows forming a circle) changes the blade rotation direction.
2. App Control (Bimar Live Smart)
Once connected to the Bimar Live Smart app, you can access enhanced features:
- Fjernbetjening: Control all fan functions from anywhere with an internet connection.
- Planlægning: Program daily and weekly on/off times for automated operation.
- Timer: Adjust the timer from 1 to 8 hours.
- Mode and Speed Selection: Easily switch between the 6 speeds and 4 operating modes.
3. Stemmekontrol
The bimar Wi-Fi Ceiling Fan is compatible with popular voice assistants like Amazon Alexa and Google Assistant. After connecting the fan to the Bimar Live Smart app, link your Bimar account to your voice assistant app (e.g., Alexa app or Google Home app).
Example stemmekommandoer:
- "Alexa, turn on the ceiling fan."
- "Hey Google, set ceiling fan speed to 3."
- "Alexa, turn off the ceiling fan in 1 hour."
4. Operating Modes and Speeds
- 6 Ventilation Speeds: Adjust the airflow intensity to your preference.
- Normal tilstand: Consistent airflow at the selected speed.
- Naturlig tilstand: Simulerer naturlig brise ved at variere ventilatorhastigheden.
- Sove mode: Operates at a lower, quieter speed for undisturbed rest.
- Breeze Mode: Provides a gentle, intermittent airflow.
5. Summer/Winter Function
The reversible blade function allows for year-round use:
- Sommertilstand (rotation mod uret): Skaber en nedadgående luftstrøm, hvilket genererer en kølende brise.
- Vintertilstand (rotation med uret): Creates an upward airflow, circulating warm air trapped near the ceiling, improving heating efficiency.

Image: A diagram illustrating the airflow patterns for summer (indirect ventilation, pushing air upwards) and winter (direct ventilation, pulling air downwards) modes of a ceiling fan.
Opretholdelse
Regelmæssig vedligeholdelse sikrer optimal ydeevne og levetid for din loftsventilator.
- Rensning: Before cleaning, ensure the fan is turned off and power is disconnected at the circuit breaker. Use a soft, damp en klud til at tørre knivene og motorhuset af. Brug ikke slibende rengøringsmidler eller opløsningsmidler.
- Bladinspektion: Periodically check the blades for any signs of damage or warping. Ensure all blade screws are tight.
- Motor smøring: The fan's DC motor is designed for maintenance-free operation and does not require lubrication.
- Stram fastgørelsesanordninger: Med tiden kan nogle fastgørelseselementer blive løse. Kontroller og spænd alle skruer og forbindelser årligt.

Billede: Et nærbillede view of the bimar ceiling fan's brushed metal motor housing and the attachment points for the light wood blades, highlighting areas for cleaning and inspection.
Fejlfinding
| Problem | Mulig årsag | Løsning |
|---|---|---|
| Ventilator starter ikke | Ingen strømforsyning; Lavt batteriniveau i fjernbetjeningen; Forkert ledningsføring. | Check circuit breaker and wall switch. Replace remote batteries. Verify wiring connections (consult electrician). |
| Blæseren slingrer | Løse knive eller monteringsdele; Ubalancerede knive. | Ensure all blade screws and mounting screws are tight. Use a balancing kit (not included) if necessary. |
| Fjernbetjening virker ikke | Low battery; Obstruction between remote and receiver; Remote not paired. | Replace remote batteries. Ensure clear line of sight. Refer to pairing instructions in the full manual. |
| Problemer med Wi-Fi-forbindelse | Incorrect Wi-Fi password; Router too far; 5GHz network selected. | Verify Wi-Fi password. Move router closer or use a Wi-Fi extender. Ensure you are connecting to a 2.4GHz network. Reset fan and re-attempt pairing. |
| Blæseren larmer | Loose screws; Blades hitting an obstruction; Motor issue. | Check and tighten all screws. Ensure nothing is obstructing the blades. If noise persists, contact customer support. |
Specifikationer
| Feature | Detalje |
|---|---|
| Mærke | bimar |
| Modelnummer | 1 |
| Produktdimensioner | 132 x 132 x 27.5 cm (diameter x diameter x højde) |
| Vægt | 6.2 kg |
| Antal blade | 3 |
| Materiale | Træ |
| Farve | Black (Note: Blades are light wood finish as shown in images) |
| Motortype | DC (Brushless, energy-saving) |
| Strømforbrug | 35W |
| Kontrolmetoder | Remote Control, Bimar Live Smart App, Voice Control (Amazon Alexa, Google Assistant) |
| Blæserhastigheder | 6 |
| Driftstilstande | Normal, Natural, Sleep, Breeze |
| Timer | 1 til 8 timer |
| Yderligere funktioner | Silent operation, Summer/Winter mode (reversible blades) |
| Strømkilde | Elektrisk |
| Installationstype | Loftmontering |

Image: The three light wood fan blades, detached and laid flat, showcasinderes design og tekstur.


Billede: To views of the bimar ceiling fan, illustrating different downrod lengths: one with a 25 cm downrod and another with a 13 cm downrod, affecting the overall height of the fan.
Garanti og support
For warranty information, technical support, or service inquiries, please refer to the warranty card included with your product or visit the official bimar webwebsted. Gem din købsbevis til garantikrav.
Fabrikant: Bimar S.r.l.
Kontakte: Besøg venligst the bimar store on Amazon or the official bimar webwebsted for kontaktoplysninger.


