1. Introduktion
This manual provides detailed instructions for the safe and effective use of your GOLDCHAMP GCUS-36D Capacitance Meter Digital Multimeter. This device is designed for measuring capacitance across a wide range, from 200pF to 20mF. It features a large LCD display with backlight, data hold function, and a convenient foldable stand for ease of use.
GOLDCHAMP GCUS-36D is a manual range capacitance meter suitable for various applications including home electrical repair, laboratory work, and electronics engineering tasks.
2. Pakkens indhold
Verify that all items are present and in good condition upon unpacking. The package should contain the following:
- 1 x GOLDCHAMP GCUS-36D Capacitance Meter Digital Multimeter
- 1 x par testledninger (rød og sort)
- 1 x 9V batteri
- 1 x lille skruetrækker (til batterirummet)
- 1 x brugermanual

Figure 2.1: Contents of the GOLDCHAMP GCUS-36D package, including the multimeter, test leads, 9V battery, and screwdriver.
3. Opsætning
3.1 Batteriinstallation
- Find batterirummet på bagsiden af multimeteret.
- Brug den medfølgende skruetrækker til at løsne skruen, der fastgør batteridækslet.
- Fjern batteridækslet.
- Connect the 9V battery to the battery clips, ensuring correct polarity.
- Place the battery inside the compartment and replace the cover, securing it with the screw.

Figur 3.1: Bagside view of the multimeter, illustrating the battery compartment and the integrated foldable stand.
3.2 Tilslutning af testledninger
- Insert the black test lead into the 'Cx-' input jack.
- Insert the red test lead into the 'Cx+' input jack.
- Sørg for, at forbindelserne er faste, før du fortsætter med målingerne.
4. Betjeningsvejledning
4.1 Multimeter Layout

Figure 4.1: Front panel of the multimeter, highlighting the LCD display, function switch, ZERO button, Data-Hold button, Backlight button, and input jacks.
4.2 Tænd/sluk
Rotate the Function Switch from 'OFF' to any desired measurement range to power on the device. To power off, rotate the Function Switch back to 'OFF'.
4.3 Kapacitansmåling
- Rotate the Function Switch to the desired capacitance range (e.g., 200pF, 20nF, 2uF, 200uF, 20mF).
- Press the 'ZERO' button to clear any residual capacitance from the test leads.
- Connect the test leads to the capacitor you wish to measure.
- Aflæs kapacitansværdien på LCD-displayet.

Figure 4.2: The multimeter actively measuring the capacitance of a component, demonstrating the test lead connection and display reading.
4.4 Dataholdefunktion
Tryk på 'HOLD'-knappen for at fryse den aktuelle aflæsning på displayet. Tryk igen for at ophæve hold-knappen og genoptage live-aflæsninger.
4.5 Baggrundsbelysningsfunktion
Press the 'Backlight' button to illuminate the LCD display for improved visibility in low-light conditions. Press it again to turn off the backlight.

Figure 4.3: The multimeter's display with the backlight activated, showing enhanced readability in a darker environment.
5. Tekniske specifikationer
| Feature | Specifikation |
|---|---|
| Mærke | GOLDCHAMP |
| Modelnummer | GCUS-36D |
| Måletype | Kapacitansmåler |
| kapacitans Range | 200pF/2000pF/20nF/200nF/2uF/20uF/200uF/2000uF/20mF |
| Accuracy (200pF-200uF) | ±0.5 % |
| Accuracy (2000uF) | ±2.0 % |
| Accuracy (20mF) | ±4.0 % |
| Vise | Large LCD, 1999 Counts |
| Strømkilde | 1 x 9V batteri (inkluderet) |
| Varens vægt | 200 gram |
| Pakkedimensioner | 16 x 11.61 x 4.7 cm |
| Særlige funktioner | ZERO setting, Backlight, Data-Hold, Foldable Stand |
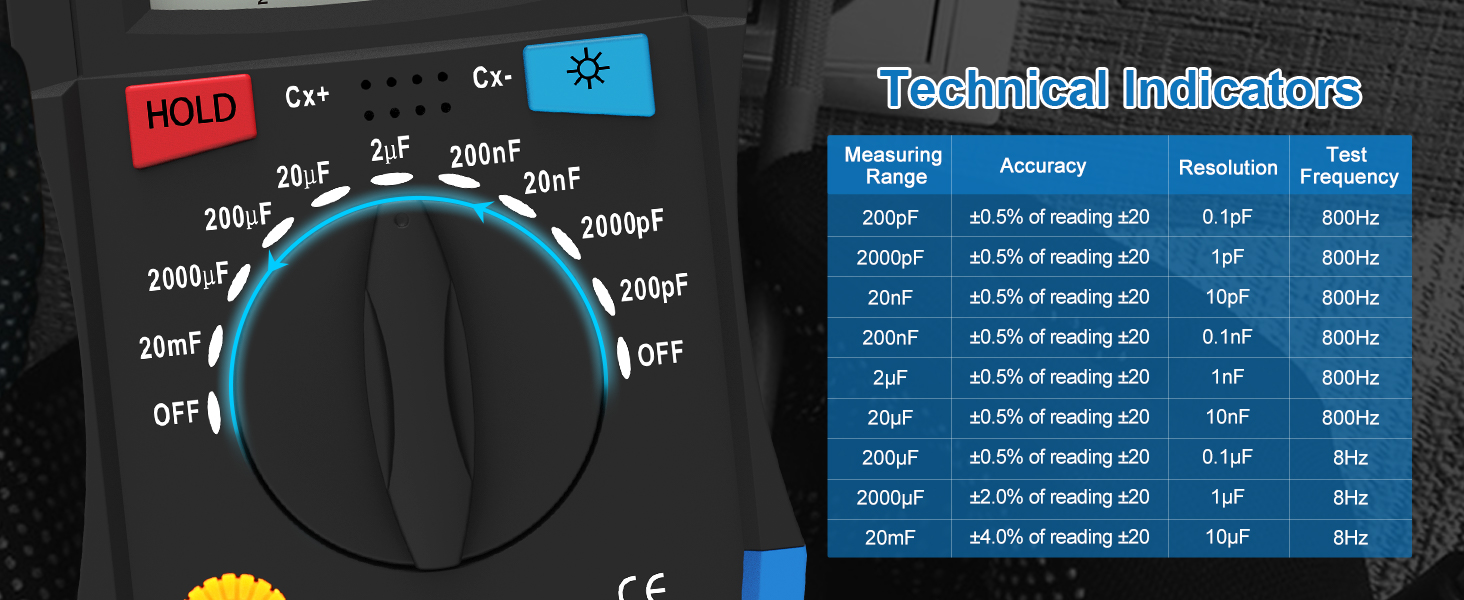
Figure 5.1: Detailed technical indicators for the GOLDCHAMP GCUS-36D, including measurement ranges, accuracy, resolution, and test frequency.
6. Vedligeholdelse
6.1 Udskiftning af batteri
When the battery low indicator appears on the display, replace the 9V battery promptly to ensure accurate readings. Follow the battery installation steps in Section 3.1.
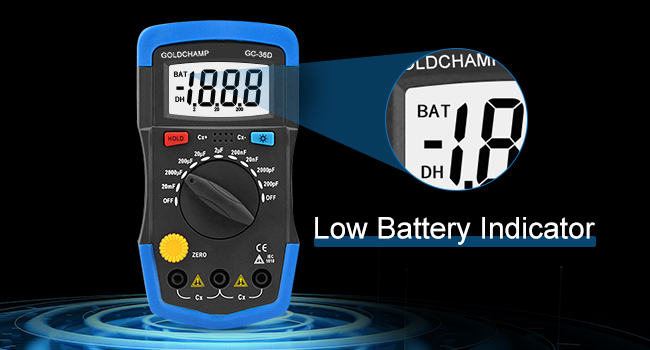
Figure 6.1: The LCD display indicating a low battery status, prompting replacement.
6.2 Rengøring
Tør enheden af med en tør, blød klud. Brug ikke slibende rengøringsmidler eller opløsningsmidler.
6.3 Opbevaring
If the multimeter is not used for an extended period, remove the battery to prevent leakage. Store the device in a cool, dry place away from direct sunlight.
7. Fejlfinding
- Intet display/svagt display: Check battery level and replace if necessary. Ensure the battery is installed correctly.
- Forkerte aflæsninger: Verify the Function Switch is set to the correct range for the measurement. Ensure test leads are properly connected and making good contact with the component. Press the 'ZERO' button before capacitance measurements.
- 'OL' or 'Overload' on Display: This indicates the measured value exceeds the selected range. Switch to a higher range setting.
8. Garanti og support
For warranty information or technical support, please refer to the contact details provided with your purchase or visit the official GOLDCHAMP webwebstedet. Behold din købskvittering som købsbevis.


