1. Introduktion
Welcome to the user manual for your new Cheerlux C50 Projector. This guide provides essential information on setting up, operating, maintaining, and troubleshooting your device. Please read this manual thoroughly before using the projector to ensure optimal performance and safety. Keep this manual for future reference.
2. Sikkerhedsinstruktioner
For at forhindre brand, elektrisk stød eller personskade skal du overholde følgende sikkerhedsforanstaltninger:
- Bloker ikke ventilationsåbningerne. Sørg for tilstrækkelig plads omkring projektoren for korrekt luftgennemstrømning.
- Do not expose the projector to rain or moisture. Avoid placing objects filled with liquids, such as vases, on the projector.
- Åbn ikke projektoren casing. Overlad al service til kvalificeret servicepersonale.
- Brug kun den strømadapter, der følger med projektoren.
- Undgå at se direkte ind i projektorlinsen, når lamp er tændt, da det skarpe lys kan beskadige dine øjne.
- Placer projektoren på en stabil, plan overflade for at forhindre den i at falde.
- Tag projektorens stik ud af stikkontakten under tordenvejr eller når den ikke bruges i længere perioder.
3. Pakkens indhold
Kontroller venligst, at alle varer er til stede og i god stand:
- Cheerlux C50 projektor
- Fjernbetjening
- Strømkabel
- HDMI kabel
- AV-kabel
- Brugermanual
4. Produktet er slutview
Familiarize yourself with the components and ports of your Cheerlux C50 Projector.

This image displays the Cheerlux C50 Projector from a front-top angle, highlighting its lens, focus ring, and control panel buttons on the top surface. The projector features a white and grey casing.
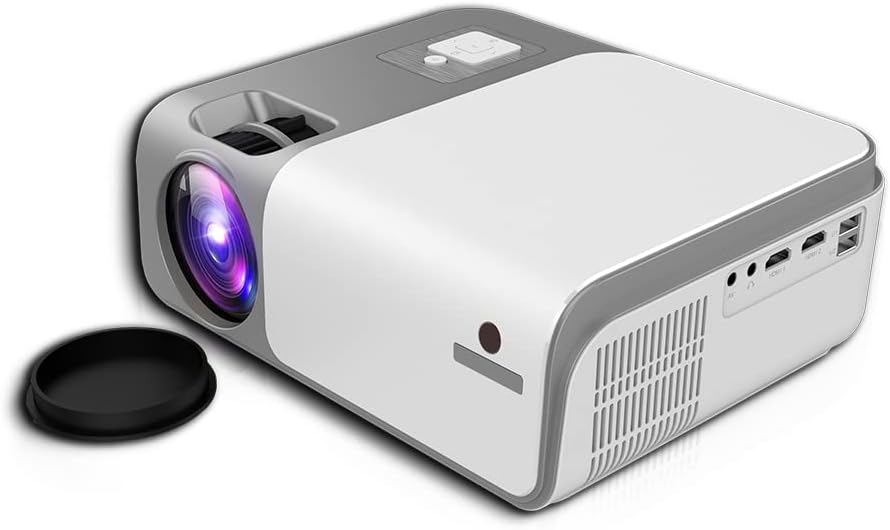
This image shows the rear and side of the Cheerlux C50 Projector, revealing various input/output ports such as HDMI, USB, and AV, along with ventilation grilles. A lens cap is visible next to the lens.
4.1. Frontpanel
- Projektionsobjektiv: Udsender billedet.
- Fokusring: Justerer billedets skarphed.
4.2. Toppanel
- Kontrolknapper: Power, Menu, Source, Navigation (Up/Down/Left/Right), OK.
4.3. Bagpanel
- Strømindgang: Tilsluttes strømkablet.
- HDMI-porte (x2): Connect to HDMI-enabled devices (laptops, gaming consoles, Blu-ray players).
- USB-porte (x2): Tilslut USB-drev til medieafspilning.
- AV-port: Tilslut til ældre enheder ved hjælp af et AV-kabel.
- Lydudgang (3.5 mm): Tilslut eksterne højttalere eller hovedtelefoner.
- IR-modtager: Til fjernbetjeningssignaler.
5. Opsætning
5.1. Strømtilslutning
- Tilslut strømkablet til projektorens strømindgang.
- Sæt den anden ende af strømkablet i en stikkontakt.
- Strømindikatorlampen på projektoren vil lyse.
5.2. Placering
Position the projector on a stable, flat surface. The ideal projection distance for the Cheerlux C50 is between 1.5 to 6 meters, depending on the desired screen size. Ensure the projector is centered with your projection screen or wall.
5.3. Fokus- og Keystone-korrektion
- Fokusjustering: Turn the focus ring on the front of the projector until the projected image appears sharp and clear.
- Keystone Correction (4P): If the projected image appears trapezoidal (wider at the top or bottom), use the 4P keystone correction function. This can typically be accessed via the projector's menu or dedicated buttons on the remote control. Adjust each of the four corners independently to achieve a perfectly rectangular image.
6. Betjening
6.1. Tænd/sluk
- Tænd: Press the power button on the projector or the remote control. The projector will start up, and the lamp vil lyse.
- Sluk: Tryk på tænd/sluk-knappen igen. Bekræft slukning, hvis du bliver bedt om det. Lad projektoren køle af, før du tager stikket ud.
6.2. Inputkilder
Connect your desired device to the projector using the appropriate cable (HDMI, AV, USB). Then, press the 'Source' button on the projector or remote control to select the corresponding input source.
- HDMI: For high-definition video and audio from laptops, game consoles, etc.
- USB: Til afspilning af medier files (photos, videos, music) directly from a USB flash drive.
- AV: For standard definition video and audio from older devices like DVD players.
6.3. Trådløs forbindelse (WiFi og Bluetooth)
The Cheerlux C50 Projector features built-in WiFi and Bluetooth for enhanced connectivity.
- WiFi-forbindelse: Navigate to the 'Settings' menu, select 'Network' or 'WiFi Settings'. Choose your desired WiFi network from the list and enter the password.
- Bluetooth-forbindelse: In the 'Settings' menu, select 'Bluetooth'. Turn on Bluetooth and pair with your Bluetooth-enabled speakers or headphones.
6.4. Skærmspejling
The projector supports wireless screen mirroring from compatible smartphones and tablets.

This image illustrates the Cheerlux C50 Projector wirelessly connected to a smartphone. The phone's screen, displaying a movie scene, is being mirrored to the projector, indicated by a Wi-Fi signal icon between the devices.
- Ensure both your projector and mobile device are connected to the same WiFi network.
- On the projector, select the 'Screen Mirroring' or 'Wireless Display' option from the main menu.
- On your mobile device, activate its screen mirroring feature (e.g., 'Smart View' for Samsung, 'Screen Mirroring' for Android, 'AirPlay' for iOS).
- Select the projector's name from the list of available devices on your phone.
- The mobile device's screen content will now be projected.
6.5. Menu navigation
Use the navigation buttons (Up, Down, Left, Right) and 'OK' button on the projector or remote control to browse through the on-screen menu. The 'Menu' button typically opens the main settings, and the 'Return' or 'Exit' button closes menus.
7. Vedligeholdelse
7.1. Rensning
- Linse: Brug en blød, fnugfri klud, der er specielt designet til optiske linser. Brug ikke slibende rengøringsmidler.
- Casing: Tør projektorens yderside af med en blød, tør klud. Tør let af genstridigt snavs.ampen klud med vand.
- Ventilationsåbninger: Periodically clean the vents with a soft brush or compressed air to prevent dust buildup, which can affect cooling.
7.2. Opbevaring
When not in use for extended periods, store the projector in a cool, dry place, away from direct sunlight and extreme temperatures. Cover the lens with its cap to protect it from dust and scratches.
8. Fejlfinding
Hvis du støder på problemer med din projektor, kan du se følgende almindelige problemer og løsninger:
| Problem | Mulig årsag | Løsning |
|---|---|---|
| Intet billede projiceret | Power cable loose, incorrect input source, device not connected. | Check power connection, select correct input source, ensure source device is on and connected. |
| Billedet er sløret | Focus not adjusted, projector too close/far. | Adjust the focus ring. Reposition the projector within the recommended distance. |
| Billedet er trapezformet | Projektoren er ikke vinkelret på skærmen. | Use the 4P keystone correction function in the menu. |
| Ingen lyd | Volume too low, external speakers not connected, source device muted. | Increase projector volume, check external speaker connection, unmute source device. |
| Fjernbetjening virker ikke | Batteries dead, obstruction, not pointing at IR receiver. | Replace batteries, remove obstructions, point remote directly at the projector's IR receiver. |
9. Specifikationer
Technical specifications for the Cheerlux C50 Projector:
| Feature | Specifikation |
|---|---|
| Mærkenavn | Generic (Cheerlux C50) |
| Forbindelsesteknologi | Wi-Fi, Bluetooth |
| Indfødt opløsning | 1920 x 1080 |
| Lysstyrke | 4000 Lumen |
| Formfaktor | Transportabel |
| Monteringstype | Bordplademontering |
| Controller type | Fjernbetjening |
| Maksimal kasteafstand | 6 meter |
| Wattage | 3 watt |
| Særlige funktioner | Built In Wi Fi, Portable, Wireless, 4P Keystone Correction |
10. Garanti og support
The Cheerlux C50 Projector comes with a standard manufacturer's warranty. Please refer to the warranty card included in your package for specific terms and conditions, including warranty period and coverage details. For technical support, service, or further inquiries, please contact your retailer or the manufacturer's customer service department.
Gem din købskvittering som købsbevis i tilfælde af garantikrav.


