1. Introduktion
Thank you for choosing the Marantz Model 40n Integrated Stereo Amplifier. Det her amplifier is designed to deliver exceptional audio performance with modern connectivity options, including HEOS Built-in for seamless music streaming. This manual provides essential information for setting up, operating, and maintaining your Model 40n to ensure optimal performance and longevity.
2. Vigtige sikkerhedsinstruktioner
Please read these safety instructions carefully before using your Marantz Model 40n. Keep this manual for future reference.
- Strømkilde: Tilslut kun enheden til en stikkontakt med vekselstrøm.tage angivet på bagpanelet.
- Ventilation: Ensure adequate ventilation. Do not block ventilation openings. Maintain a minimum distance of 10 cm (4 inches) from other objects.
- Vand og fugt: Do not expose the unit to rain, moisture, or excessive humidity. Do not place objects filled with liquids, such as vases, on the unit.
- Varme: Undgå at placere enheden i nærheden af varmekilder såsom radiatorer, varmeregistre, komfurer eller andre apparater, der producerer varme.
- Rensning: Tag stikket ud af stikkontakten før rengøring. Brug kun en tør klud.
- Service: Forsøg ikke selv at servicere dette produkt. Overlad al service til kvalificeret servicepersonale.
- Kabler: Beskyt netledninger mod at blive trådt på eller klemt, især ved stik, stikkontakter og det punkt, hvor de udgår fra apparatet.
3. Pakkens indhold
Bekræft at alle varer er til stede i pakken:
- Marantz Model 40n integreret stereo Amplivligere
- Fjernbetjeningsenhed
- Strømledning
- FM/AM Antennas (if applicable to region)
- Hurtig startvejledning
- Sikkerhedsinstruktioner
4. Produktet er slutview
4.1 Frontpanel

Frontpanelet giver adgang til vigtige kontroller og indikatorer:
- Tænd/sluk-knap (⑂): Tænder eller slukker for enheden.
- Inputvælger: Rotates to choose the desired audio input source.
- Source Direct: Bypasses tone controls for the purest audio signal.
- Bass/Treble/Balance Controls: Adjusts audio characteristics.
- Lydstyrkeknap: Styrer den overordnede udgangslydstyrke.
- Vise: Viser aktuelt input, lydstyrkeniveau og andre statusoplysninger.
- Hovedtelefonstik: Til privat lytning med hovedtelefoner.
4.2 Bagpanel
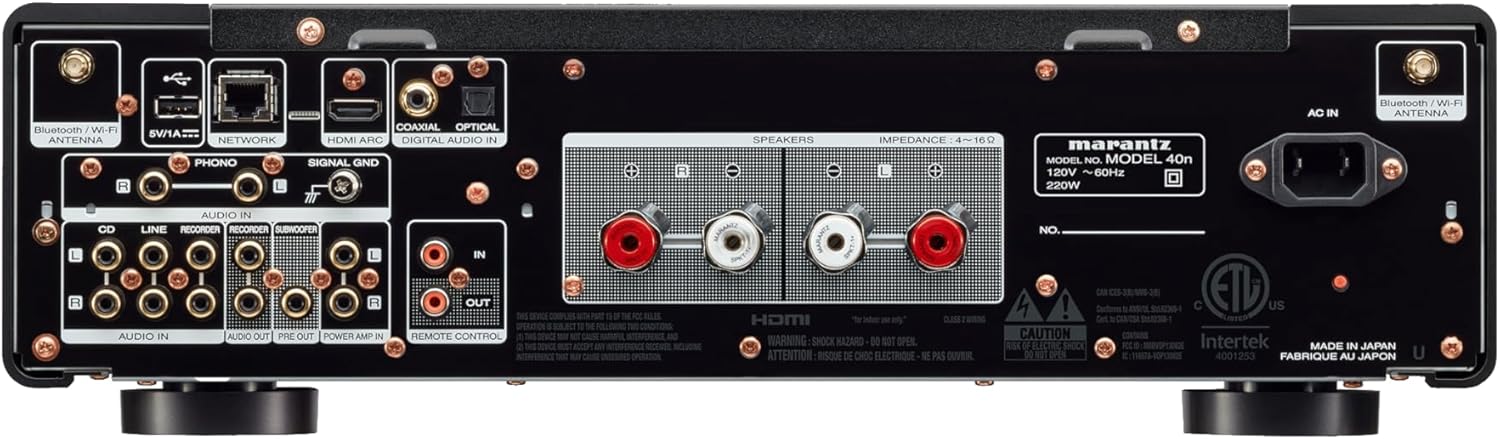
The rear panel houses all connectivity options:
- Højttalerterminaler: Connect your passive loudspeakers.
- Analog Audio Inputs (CD, LINE, RECORDER IN): For connecting external analog audio sources.
- PHONO Input (MM): For connecting a turntable with a moving magnet cartridge. Includes a ground terminal.
- Digital Audio Inputs (COAXIAL, OPTICAL): For connecting digital audio sources like CD players or TVs.
- HDMI ARC-indgang: For connecting to a TV to receive audio.
- NETWORK Port (Ethernet): Til kabelbaseret netværksforbindelse.
- USB-A-port: Til tilslutning af USB-lagerenheder.
- Bluetooth/Wi-Fi Antenna Terminals: Til trådløs forbindelse.
- FØR UD: Til tilslutning til ekstern strøm amplivligere.
- MAGT AMP I: Allows the Model 40n to function as a power amplivligere.
- SUBWOOFER UD: For connecting an active subwoofer.
- REMOTE CONTROL IN/OUT: For integration into a custom control system.
- AC IN: Tilslutning af strømkabel.
5. Opsætning
5.1 Placering
Place the Model 40n on a stable, level surface with adequate ventilation. Avoid direct sunlight, heat sources, and areas with high humidity or dust. Ensure there is sufficient space around the unit for proper airflow.
5.2 Tilslutning af højttalere
The Model 40n supports a speaker impedance range of 4-16 ohms. Use high-quality speaker cables for optimal sound.
- Turn off the Model 40n and unplug the power cord.
- Connect the positive (+) terminal (red) of the left speaker to the L+ terminal on the amplivligere.
- Connect the negative (-) terminal (black) of the left speaker to the L- terminal on the amplivligere.
- Repeat for the right speaker, connecting to the R+ and R- terminals.
- Ensure all connections are secure and there are no stray wire strands touching other terminals.

5.3 Tilslutning af lydkilder
Connect your audio components to the appropriate input terminals on the rear panel.
- CD-afspiller: Use RCA cables to connect the CD player's analog output to the CD indgangsterminaler.
- Other Analog Sources (e.g., Tuner, Cassette Deck): Brug RCA-kabler til at tilslutte til LINE or RECORDER IN terminaler.
- Pladespiller: Connect your turntable's RCA outputs to the FONO input terminals. If your turntable has a ground wire, connect it to the SIGNAL GND terminal. Ensure your turntable has a Moving Magnet (MM) cartridge, as the Model 40n's phono input is designed for MM.
- Digital Sources (e.g., TV, Blu-ray Player): Use an optical or coaxial digital cable to connect to the OPTISK or COAXIAL DIGITAL IN terminaler.
- TV (HDMI ARC): Connect an HDMI cable from your TV's HDMI ARC port to the HDMI ARC input on the Model 40n. This allows your TV to send audio to the amplivligere.
- USB-lager: Insert a USB drive into the USB-A port for playing audio files.
5.4 Netværksforbindelse
The Model 40n supports both wired and wireless network connections for streaming services and firmware updates.
- Kablet forbindelse: Connect an Ethernet cable from your router to the NETVÆRK havn.
- Trådløs forbindelse (Wi-Fi): Screw the supplied Wi-Fi/Bluetooth antennas onto the corresponding terminals. Follow the on-screen instructions or use the HEOS app for initial Wi-Fi setup.
5.5 Strømtilslutning
Once all audio and network connections are made, connect the supplied power cord to the AC IN terminal on the rear panel and then to a wall outlet.
6. Betjeningsvejledning
6.1 Grundlæggende betjening
- Tænd: Tryk på tænd/sluk-knappen på frontpanelet eller fjernbetjeningen.
- Vælg input: Rotate the Input Selector knob or use the remote control to choose your desired audio source (e.g., CD, PHONO, HDMI ARC, HEOS).
- Juster lydstyrken: Rotate the Volume knob or use the Volume +/- buttons on the remote control to set the listening level.
6.2 Tone Controls and Source Direct
- Bass/Treble/Balance: Use the corresponding knobs on the front panel to fine-tune the audio output to your preference.
- Source Direct: Engage the Source Direct switch to bypass the bass, treble, and balance circuits. This provides a purer, uncolored audio signal, ideal for audiophile listening.
6.3 Music Streaming with HEOS Built-in
The Model 40n features HEOS Built-in, allowing access to a wide range of streaming services and multi-room audio capabilities.


- Download HEOS App: Download the free HEOS app to your smartphone or tablet from the App Store or Google Play.
- Setup HEOS: Follow the in-app instructions to connect your Model 40n to your home network and set up your streaming accounts (e.g., Spotify, Apple Music, Tidal).
- Stream Music: Use the HEOS app to browse and play music from various online services, your local music library, or other HEOS-enabled devices.
6.4 AirPlay 2 and Bluetooth
- Air Play 2: From an Apple device, select the Model 40n as an AirPlay speaker to stream audio.
- Bluetooth: Enable Bluetooth on your mobile device, search for 'Marantz Model 40n', and pair.
6.5 Stemmekontrol
The Model 40n supports voice control via Amazon Alexa, Google Assistant, and Apple Siri when integrated with compatible devices.

- Aktivér færdighed/handling: Enable the Marantz HEOS skill/action in your Amazon Alexa or Google Home app.
- Tilknyt konto: Link your HEOS account within the respective voice assistant app.
- Brug kommandoer: You can now use voice commands to control playback, volume, and input selection. For Siri, use AirPlay 2 from your Apple device.
7. Vedligeholdelse
To ensure the longevity and optimal performance of your Model 40n, follow these maintenance guidelines:
- Rensning: Disconnect the power cord before cleaning. Use a soft, dry cloth to wipe the exterior surfaces. Do not use abrasive cleaners, solvents, or chemical sprays, as they may damage the finish.
- Ventilation: Regularly check that the ventilation openings are not blocked by dust or debris. Use a soft brush or vacuum cleaner with a brush attachment to gently clear any obstructions.
- Forbindelser: Periodically check all cable connections to ensure they are secure. Loose connections can lead to signal degradation or intermittent issues.
- Opbevaring: If storing the unit for an extended period, unplug it from the power outlet and cover it to protect against dust.
8. Fejlfinding
If you encounter issues with your Model 40n, refer to the following common problems and solutions:
| Problem | Mulig årsag | Løsning |
|---|---|---|
| Ingen strøm | Netledningen er frakoblet; stikkontakten er defekt | Sørg for, at netledningen er korrekt tilsluttet; prøv en anden stikkontakt. |
| Ingen lyd | Incorrect input selected; Speaker cables loose; Volume too low; Mute activated | Vælg korrekt input; Kontroller højttalertilslutninger; Øg lydstyrken; Deaktiver mute. |
| Dårlig lydkvalitet | Poor cable connections; Source Direct enabled; Speaker phase incorrect | Check all audio cable connections; Disable Source Direct to use tone controls; Verify speaker polarity (+ to + and - to -). |
| Cannot connect to network/HEOS | Wi-Fi antennas not connected; Incorrect Wi-Fi password; Router issue | Ensure antennas are attached; Re-enter Wi-Fi password in HEOS app; Restart your router and the Model 40n. |
| Fjernbetjening virker ikke | Batterierne er opbrugt; Blokering mellem fjernbetjening og enhed | Replace batteries; Remove any obstructions; Ensure remote is pointed at the unit's IR sensor. |
If the problem persists after trying these solutions, please contact Marantz customer support.
9. Specifikationer
Key technical specifications for the Marantz Model 40n Integrated Stereo Amplivligere:
- Mærke: Marantz
- Modelnummer: MODEL40N
- Antal kanaler: 2
- Udgangseffekt: 70 watts per channel (8 ohms, 20 Hz - 20 kHz, 0.07% THD)
- Interface Type: USB
- Materiale: SECC, Aluminum
- Produktdimensioner: 17 x 17.4 x 5.1 tommer (43.18 x 44.2 x 12.95 cm)
- Varens vægt: 36.8 pund (16.7 kg)
- UPC: 747192135959
- Forbindelse: HDMI ARC, Phono (MM), Analog RCA, Optical, Coaxial, USB-A, Ethernet, Wi-Fi, Bluetooth, HEOS Built-in
- Stemmestyring: Works with Amazon Alexa, Google Assistant, Apple Siri
- Dato først tilgængelig: 24. februar 2022
10. Garanti og support
Marantz-produkter er designet til pålidelighed og ydeevne. For garantioplysninger henvises til garantikortet, der følger med dit produkt, eller besøg den officielle Marantz-side. webwebsted.
For technical support, product registration, or service inquiries, please visit the Marantz support page:
You can also find frequently asked questions and additional resources on their webwebsted.


