Indledning
Thank you for choosing the Senicare Digital LED Alarm Clock. This manual provides detailed instructions for setting up, operating, and maintaining your new alarm clock. Please read this manual thoroughly before use to ensure proper functionality and to maximize your experience with its features, including dual alarms, a 7-color night light, a dimmable display, and a convenient USB charging port.
Sikkerhedsoplysninger
- Ensure the power adapter is compatible with your local power supply (100-240V AC).
- Udsæt ikke enheden for vand eller for høj luftfugtighed.
- Undgå at placere uret i direkte sollys eller i nærheden af varmekilder.
- Brug kun den medfølgende strømadapter.
- Opbevares utilgængeligt for små børn.
- Forsøg ikke selv at skille enheden ad eller reparere den. Kontakt kundesupport, hvis der opstår problemer.
- Insert batteries correctly, observing polarity (+/-).
Pakkens indhold
- Senicare Digital LED Alarm Clock (Model KT279)
- Strømadapter
- USB opladningskabel
- Brugervejledning (dette dokument)

Figure 1: Senicare Digital LED Alarm Clock and included accessories.
Produkt overview
Front View
The front of the clock features a large LED display for time, and indicators for PM, Alarm 1, and Alarm 2.
Top View (Kontroller)
The top panel houses the main control buttons and the integrated night light bar.
- ALT SET: Alarm 1 Set button.
- AL2 SET: Alarm 2 Set button.
- TID: Time setting button.
- FARVE: Night light color selection button.
- SNOOZE / LIGHT: Snooze function and night light on/off.
- HOUR +: Adjusts hour, increases alarm volume.
- MIN -: Adjusts minute, decreases alarm volume.
Side View (Ports & Dimmer)
The side of the clock includes the power input, USB charging port, and display dimmer slider.
- DC 5V strømport: Tilsluttes strømadapteren.
- USB Charging Port (5V-1A): Til opladning af eksterne enheder.
- DISPLAY DIMMER: Slider to adjust the brightness of the time display (0-100%).
Bund View (Batterirum)
The bottom of the clock contains the battery compartment for backup power.

Figur 2: Bagside view highlighting the USB charging port and power input.

Figure 3: Battery compartment for backup power.
Opsætning
1. Strømtilslutning
- Connect the provided power adapter to the DC 5V Power Port on the back of the clock.
- Plug the power adapter into a standard 100-240V AC wall outlet.
- LED-displayet lyser, hvilket indikerer at uret er tændt.
2. Batteribackup (valgfrit)
For power outage protection, install 2 x AAA batteries (not included) into the battery compartment on the bottom of the clock. This will preserve time and alarm settings during a power interruption, though the display will go black.

Figure 4: The clock retains settings during power outages with battery backup.
Betjeningsvejledning
1. Indstilling af tid
- Tryk og hold på TID knappen, indtil timecifrene begynder at blinke.
- Tryk på HOUR + knappen for at justere timen.
- Tryk på MIN - knappen for at justere minutter.
- Tryk på TID knappen igen for at bekræfte og afslutte tidsindstillingstilstanden.
2. Setting Dual Alarms (Alarm 1 & Alarm 2)
The clock features two independent alarms for different schedules.

Figur 5: Eksample of dual alarm functionality.
- Sådan indstiller du alarm 1: Tryk og hold på ALT SET button until the hour digits for Alarm 1 flash.
- Brug HOUR + og MIN - knapperne for at indstille det ønskede alarmtidspunkt.
- Trykke ALT SET again to confirm and activate Alarm 1. The Alarm 1 indicator will appear on the display.
- Sådan indstiller du alarm 2: Følg de samme trin ved hjælp af AL2 SET knap.
- To turn an alarm on or off, briefly press the corresponding ALT SET or AL2 SET button. The alarm indicator will appear/disappear.
3. Snooze-funktion
Når en alarm lyder, skal du trykke på den store SNOOZE / LYS button on top of the clock to activate the 9-minute snooze function. The alarm will sound again after 9 minutes.

Figure 6: The SNOOZE / LIGHT button for snooze functionality.
4. Justering af skærmens lysstyrke
The clock features a 0-100% full-range dimmer for the LED time display. Use the VIS DIMMER slider located on the side of the clock to adjust the brightness to your preference.

Figure 7: Adjusting display brightness with the dimmer slider.
5. Night Light Features
The integrated night light offers 7 different colors and adjustable brightness.

Figure 8: The 7-color night light feature.
- Ændring af farver: Tryk kort på FARVE button to cycle through the 7 available colors.
- Color Loop Mode: Tryk og hold på FARVE button for 2 seconds to enter a continuous color-changing loop.
- Turning Off Night Light: Tryk på SNOOZE / LYS button to turn the night light off.
- Adjusting Night Light Brightness: The night light brightness can also be adjusted from 0-100% using the VIS DIMMER slider, similar to the main display.
6. Justering af alarmlydstyrke
The alarm volume has 5 adjustable levels, ranging from 45dB to 85dB.
- While an alarm is sounding, or when setting an alarm, press the HOUR + knappen for at øge lydstyrken.
- Tryk på MIN - knappen for at sænke lydstyrken.

Figure 9: Volume adjustment using HOUR + and MIN - buttons.
7. USB -opladningsport
The clock includes a 5V-1A USB charging port on its side, allowing you to charge small electronic devices like smartphones or tablets while the clock is plugged into power.
Opretholdelse
- Rengør uret med en blød, tør klud. Brug ikke slibende rengøringsmidler eller opløsningsmidler.
- Keep the clock away from dust and moisture.
- If not in use for an extended period, remove the backup batteries to prevent leakage.
Fejlfinding
| Problem | Mulig årsag | Løsning |
|---|---|---|
| Urvisningen er slukket. | No power, or display dimmer set to 0%. | Check power connection. Adjust DISPLAY DIMMER slider. |
| Alarmen lyder ikke. | Alarm ikke indstillet, alarmlydstyrken er for lav, eller alarmen er slået fra. | Ensure alarm is set and activated (indicator visible). Increase alarm volume. |
| Tid/indstillinger mistet efter strømafbrydelsetage. | No backup batteries installed, or batteries are dead. | Install fresh 2 x AAA batteries for backup. |
| USB-opladning virker ikke. | Clock not powered by AC, or device requires more than 1A. | Ensure clock is plugged into AC power. Check device's charging requirements. |
Specifikationer
| Feature | Detalje |
|---|---|
| Model | KT279 |
| Display Type | LED |
| Strømkilde | Ledningsbaseret elektrisk (100-240V AC) |
| Batteri backup | 2 x AAA batterier (medfølger ikke) |
| USB-opladningsport | 5V-1A |
| Nattelys farver | 7 farver |
| Display lysdæmper | 0-100% justerbar |
| Alarmvolumen | 5 niveauer (45dB til 85dB) |
| Snooze-varighed | 9 minutter |
| Produktdimensioner | 5.91"W x 3.15"H (approx. 150mm x 80mm) |
| Varens vægt | 11.7 ounce |
| Materiale | Plast |
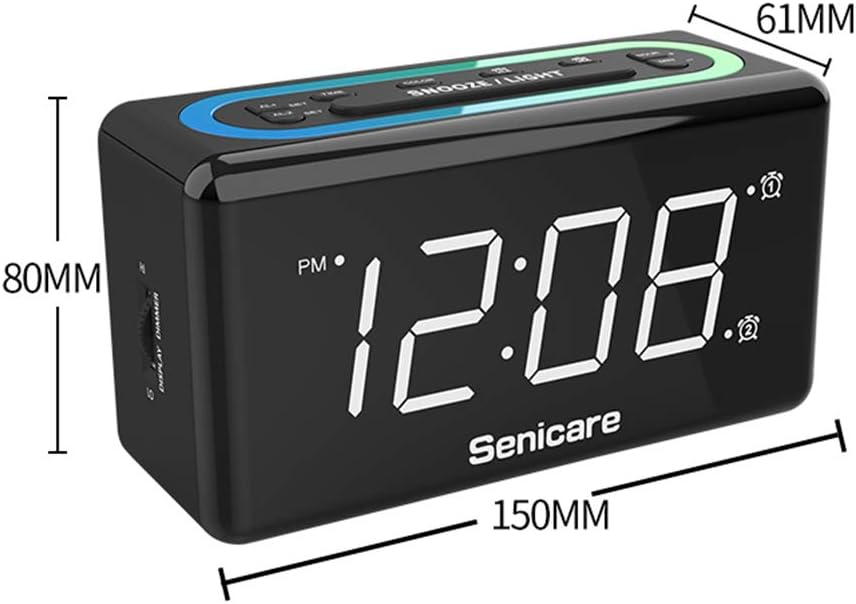
Figur 10: Produktdimensioner.
Garanti og support
The Senicare Digital LED Alarm Clock comes with a et års garanti. We also offer a 30-dages pengene-tilbage-garanti. For any questions or assistance, please contact our customer service team, available 24 timer a day. Your satisfaction is our priority.