Indledning
This manual provides instructions for the safe and efficient operation of your KitchenAid Professional 600 Series Stand Mixer, model KP26M9PCER. This appliance is designed for mixing, kneading, and beating ingredients in various culinary applications.
The mixer features a durable DC motor, a 5.7-liter (6-quart) stainless steel bowl, and 10 speed settings for precise control. Its bowl-lift design allows for easy attachment and removal of the mixing bowl.

Image: The KitchenAid Professional 600 Series Stand Mixer in Empire Red, featuring its robust design and stainless steel bowl.
Vigtige sikkerhedsinstruktioner
Ved brug af elektriske apparater skal grundlæggende sikkerhedsforanstaltninger altid følges, herunder følgende:
- Læs alle instruktioner, før du bruger mixeren.
- To protect against risk of electrical shock, do not immerse the mixer base in water or other liquid.
- Tæt opsyn er nødvendigt, når et apparat bruges af eller i nærheden af børn.
- Træk stikket ud af stikkontakten, når det ikke er i brug, før du sætter dele på eller af, og før rengøring.
- Undgå kontakt med bevægelige dele. Hold hænder, hår og tøj, samt spatler og andre redskaber, væk fra piskeris under drift for at mindske risikoen for personskade og/eller beskadigelse af mixeren.
- Brug ikke noget apparat med en beskadiget ledning eller stik, eller efter at apparatet ikke fungerer korrekt eller er blevet tabt eller beskadiget på nogen måde.
- Brug af tilbehør, der ikke anbefales eller sælges af KitchenAid, kan forårsage brand, elektrisk stød eller skade.
- Brug ikke apparatet udendørs.
- Lad ikke ledningen hænge ud over kanten af bord eller bord.
- Lad ikke ledningen komme i kontakt med varme overflader, inklusive ovnen.
Pakkens indhold
Your KitchenAid Professional 600 Series Stand Mixer package includes the following items:
- Stand Mixer Base (Empire Red)
- 5.7-liter (6-quart) Stainless Steel Bowl
- Polished Metal Flat Beater
- PowerKnead Spiral Dough Hook
- Balloon Whisk (Wire Whip)
- Bowl Whisk with Flexible Edge (if included in specific model variant)
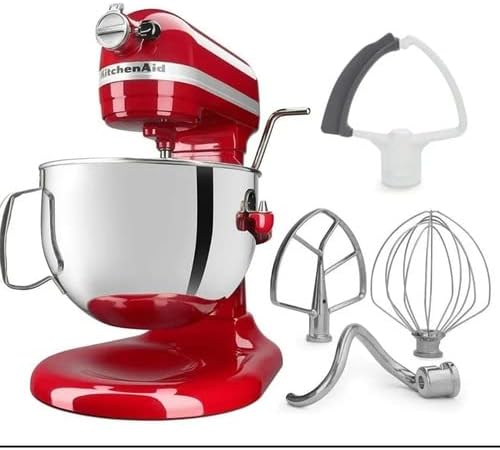
Image: The KitchenAid stand mixer shown with its standard attachments, including the flat beater, dough hook, wire whip, and a flex edge beater.

Billede: Et nærbillede view of the three primary attachments: the spiral dough hook, the flat beater, and the wire whip.
Opsætning
- Placering: Placer mixeren på en tør, flad og stabil overflade. Sørg for, at der er tilstrækkelig plads omkring mixeren til drift og ventilation.
- Fastgørelse af skålen:
- Lift the bowl lift handle to the down position.
- Place the bowl supports over the locating pins on the mixer base.
- Tryk ned på bagsiden af skålen, indtil skålstiften klikker ind i fjederlåsen.
- Lower the bowl lift handle to the up position to secure the bowl.
- Montering af tilbehør:
- Sørg for, at mixeren er taget ud af stikkontakten, og at hastighedskontrollen er indstillet til "OFF".
- Slide the accessory onto the beater shaft and push upward as far as possible.
- Rotate the accessory to the right, hooking the accessory over the pin on the shaft.
- Strømtilslutning: Plug the mixer into a grounded 120 Volt, 60 Hz electrical outlet.

Image: The KitchenAid stand mixer with its bowl in the lifted position, demonstrating the bowl-lift mechanism.
Betjeningsvejledning
- Tilføjelse af ingredienser: With the mixer unplugged and the bowl in the down position, add your ingredients to the mixing bowl.
- Securing the Bowl: Lift the bowl lift handle to the up position to secure the bowl for mixing.
- Valg af hastighed: Turn the speed control lever to the desired speed setting (1-10). Start at a lower speed and gradually increase as needed to prevent splashing.
- Blanding: Allow the mixer to operate until ingredients are thoroughly combined or processed as required by your recipe.
- Stop af mixeren: Turn the speed control lever to "OFF" to stop the mixer.
- Removing Bowl and Accessory:
- Træk stikket til mixeren ud.
- Lower the bowl lift handle to the down position.
- Remove the accessory by pushing it upward and rotating it to the left, then pulling it off the shaft.
- Remove the mixing bowl by lifting it off the locating pins.

Billede: En side view of the mixer highlighting the speed control dial and the bowl lift handle for operational adjustments.

Billede: Et nærbillede view inside the mixing bowl, showing sugar and butter being creamed by the flat beater attachment.
Attachments and Their Usage
The KitchenAid Professional 600 Series Stand Mixer comes with several attachments, each designed for specific tasks:
- Flad piskeris: Ideal for normal to heavy mixtures such as cakes, cookies, pastries, quick breads, mashed potatoes, and pie crusts.
- Spiral dejkrog: Used for mixing and kneading yeast doughs such as bread, pizza dough, and pasta dough.
- Balloon Whisk (Wire Whip): Incorporates air into ingredients. Best for mixtures that need air, such as eggs, egg whites, heavy cream, boiled frostings, and mayonnaise.
- Flex Edge Beater (Optional/Included in some models): Features a flexible edge that scrapes the sides of the bowl while mixing, reducing the need to stop and scrape manually. Suitable for most mixtures that use the flat beater.
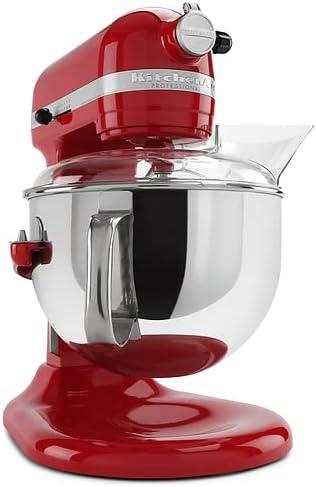
Image: The stand mixer equipped with a clear pouring shield, which helps prevent splashes and allows for easy addition of ingredients during mixing.
Rengøring og vedligeholdelse
Proper cleaning and maintenance will ensure the longevity and optimal performance of your mixer.
- Tag altid stikket ud af mixeren før rengøring.
- Blandebatteribase: Tør mixerbunden af med enamp klud. Brug ikke slibende rengøringsmidler, og nedsænk ikke mixeren i vand.
- Skål i rustfrit stål: The stainless steel bowl is dishwasher-safe. Alternatively, wash with warm, soapy water and rinse thoroughly.
- Tilbehør (flad piskeris, dejkrog, piskeris):
- The polished metal flat beater and spiral dough hook are generally dishwasher-safe (top rack recommended) or can be hand-washed.
- The wire whip should be hand-washed in warm, soapy water and dried immediately to prevent tarnishing.
- Refer to the specific care instructions for any optional attachments you may own.
- Strømledning: Inspect the power cord regularly for any signs of damage. If damaged, contact KitchenAid service for replacement.
Fejlfinding
If your mixer experiences issues, consult the following common troubleshooting steps:
| Problem | Mulig årsag | Løsning |
|---|---|---|
| Mixeren starter ikke. | Not plugged in; power outlet not functioning; speed control not set to "OFF" before plugging in. | Ensure mixer is securely plugged into a working outlet. Turn speed control to "OFF" then back to desired speed. |
| Tilbehøret rammer bunden af skålen eller når ikke ingredienserne. | Afstanden mellem piskeris og skål skal justeres. | Refer to the KitchenAid service manual or contact customer support for beater-to-bowl clearance adjustment instructions. This is typically a screw adjustment on the mixer head. |
| Blanderen stopper under drift. | Overload protection activated; thermal overload. | Turn the speed control to "OFF" and unplug the mixer. Let it cool for 10-15 minutes. Reduce the load if possible, then plug in and restart. |
| Usædvanlig støj eller lugt. | Normal operation for heavy loads; potential mechanical issue. | A slight humming or gear noise is normal, especially with heavy doughs. If the noise is excessive or accompanied by a burning smell, discontinue use and contact KitchenAid service. |
For issues not covered here, please contact KitchenAid Customer Service.
Specifikationer
| Model: | KP26M9PCER |
| Mærke: | KitchenAid |
| Kapacitet: | 5.7 liters (6 Quarts) |
| Voltage: | 120 volt |
| Frekvens: | 60 Hz |
| Antal hastigheder: | 10 |
| Materiale: | Stainless Steel (Bowl), Metal (Motor/Housing) |
| Varens vægt: | 6 kg (ca. 13.2 lbs) |
| Pakkedimensioner: | 49 x 43 x 34 cm (ca. 19.3 x 16.9 x 13.4 tommer) |
Garanti og support
KitchenAid-produkter er fremstillet efter høje kvalitetsstandarder. For detaljerede garantioplysninger henvises til garantikortet, der følger med dit produkt, eller besøg den officielle KitchenAid-side. webwebsted.
For customer support, service, or to purchase additional attachments, please visit the KitchenAid-butik or contact KitchenAid Customer Service directly.


