1. Introduktion
This manual provides detailed instructions for the setup, operation, maintenance, and troubleshooting of your Beelink SER3 Mini PC. The Beelink SER3 is a compact and efficient mini computer powered by an AMD Ryzen 3 3200U processor, designed for various tasks including office work, 4K video playback, and light content creation. Please read this manual thoroughly before using your device to ensure optimal performance and longevity.
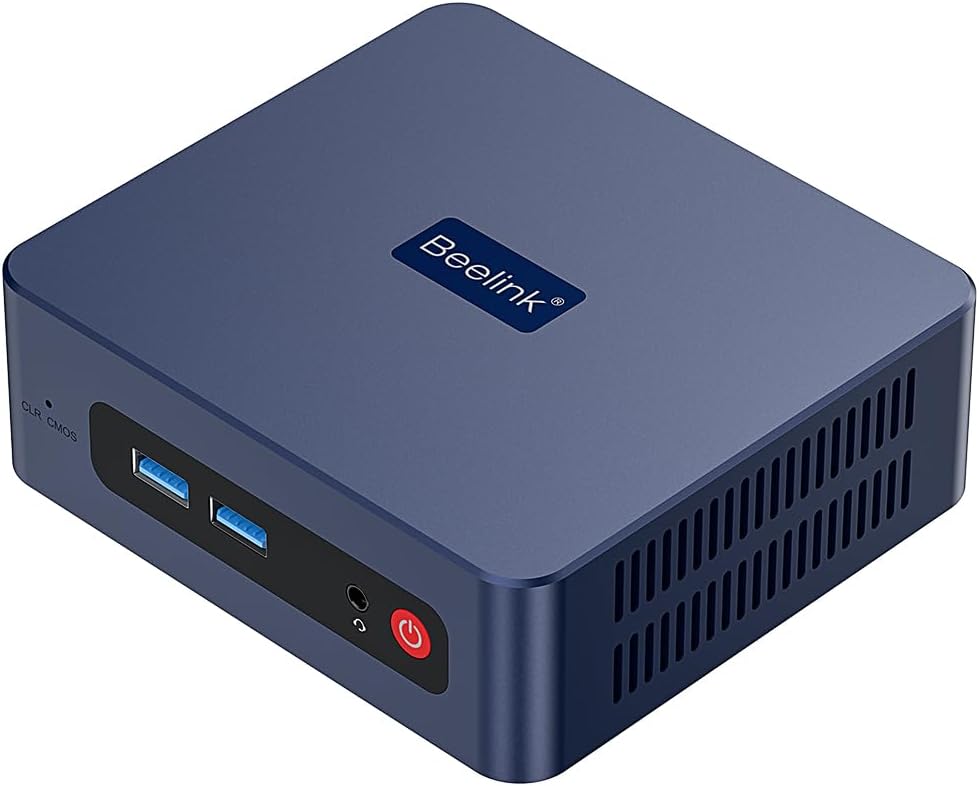
Billede 1.1: Forside view of the Beelink SER3 Mini PC, showcasing dens kompakte design og porte foran.
2. Pakkens indhold
Bekræft, at alle nedenstående varer er inkluderet i din pakke. Hvis der mangler eller er beskadigede varer, bedes du kontakte kundesupport.
- Beelink SER3 Mini PC
- Strømadapter
- HDMI Cables (typically 100cm)
- Wall-Mounted Bracket with Screws
- Brugermanual

Image 2.1: Illustration of the accessories included with the Beelink SER3 Mini PC, such as the user manual, wall-mounted bracket, HDMI cables, and power adapter.
3. Produktet er slutview og havne
Familiarize yourself with the various ports and components of your Beelink SER3 Mini PC.
Billede 3.1: Detaljeret view of the front and rear connectivity ports on the Beelink SER3 Mini PC.
Frontpanel:
- CLR CMOS Button: Used to clear CMOS settings.
- USB 3.2-porte (2x): Til tilslutning af USB-enheder.
- Audio Jack (HP&MIC): Til hovedtelefoner og mikrofon.
- Power knap: For at tænde/slukke enheden.
Bagside:
- LAN (RJ45 1000M): Gigabit Ethernet-port til kablet netværksforbindelse.
- USB 3.2-porte (2x): Ekstra USB-porte til eksterne enheder.
- HDMI-porte (2x): For connecting displays, supporting up to 4K 60Hz output.
- DC-stik: Til tilslutning af strømadapteren.
4. Opsætningsvejledning
4.1 Tilslutning af eksterne enheder
- Tilslut skærm: Use an HDMI cable to connect your monitor(s) to the HDMI port(s) on the rear panel of the Mini PC. The device supports dual display output.
- Tilslut tastatur og mus: Plug your USB keyboard and mouse into any of the available USB 3.2 ports.
- Tilslut netværk (valgfrit): For a wired connection, connect an Ethernet cable from your router or modem to the LAN port on the rear panel. For wireless, ensure your WiFi network is available during initial setup.
- Tilslut strøm: Plug the power adapter into the DC Jack on the rear panel, then plug the adapter into a power outlet.
4.2 Indledende tænding
- Press the Power Button on the front panel. The power LED will illuminate.
- The Mini PC will boot into Windows 11 Pro. Follow the on-screen instructions to complete the initial Windows setup, including language, region, network connection, and user account creation.
4.3 Vægmontering (valgfrit)
The Beelink SER3 Mini PC can be mounted to the back of a monitor or to a wall using the included bracket.
- Attach the wall-mounted bracket to the Mini PC with the provided screws.
- Secure the bracket to the back of your display (if it has VESA mounting holes) or to a wall using appropriate screws.

Image 4.1: Visual guide for installing the Beelink SER3 Mini PC using the wall-mounted bracket.
5. Betjeningsvejledning
5.1 Strømstyring
- Tænd: Tryk én gang på tænd/sluk-knappen.
- Luk ned: I Windows skal du gå til Start > Strøm > Luk ned.
- Genstart: I Windows skal du gå til Start > Strøm > Genstart.
- Sove: I Windows skal du gå til Start > Strøm > Slumretilstand.
5.2 Netværksforbindelse
- Kablet (LAN): Connect an Ethernet cable to the RJ45 port. The system will automatically detect the connection.
- Trådløs (WiFi 5): Access network settings in Windows to connect to available WiFi networks. The device supports 2.4GHz and 5GHz bands.
5.3 Bluetooth-forbindelse
The Beelink SER3 supports Bluetooth 5.0 for connecting wireless peripherals.
- Sørg for, at din Bluetooth-enhed er i parringstilstand.
- In Windows, go to Settings > Bluetooth & devices > Add device > Bluetooth.
- Select your device from the list and follow the pairing instructions.
5.4 Opsætning af dobbelt skærm
The Mini PC supports connecting two monitors simultaneously via its dual HDMI ports, enabling extended desktop or mirrored display modes for enhanced productivity.

Billede 5.1: Eks.ample of a dual-screen display configuration, demonstrating the Beelink SER3 Mini PC's capability to support multiple monitors for efficient workflow.
To configure dual displays in Windows:
- Højreklik på skrivebordet og vælg "Skærmindstillinger".
- Under "Multiple displays", choose your preferred display option (e.g., Extend these displays, Duplicate these displays).
- Adjust resolution and orientation as needed.
6. Lagerplads og hukommelsesudvidelse
The Beelink SER3 Mini PC offers options for storage and memory upgrades.
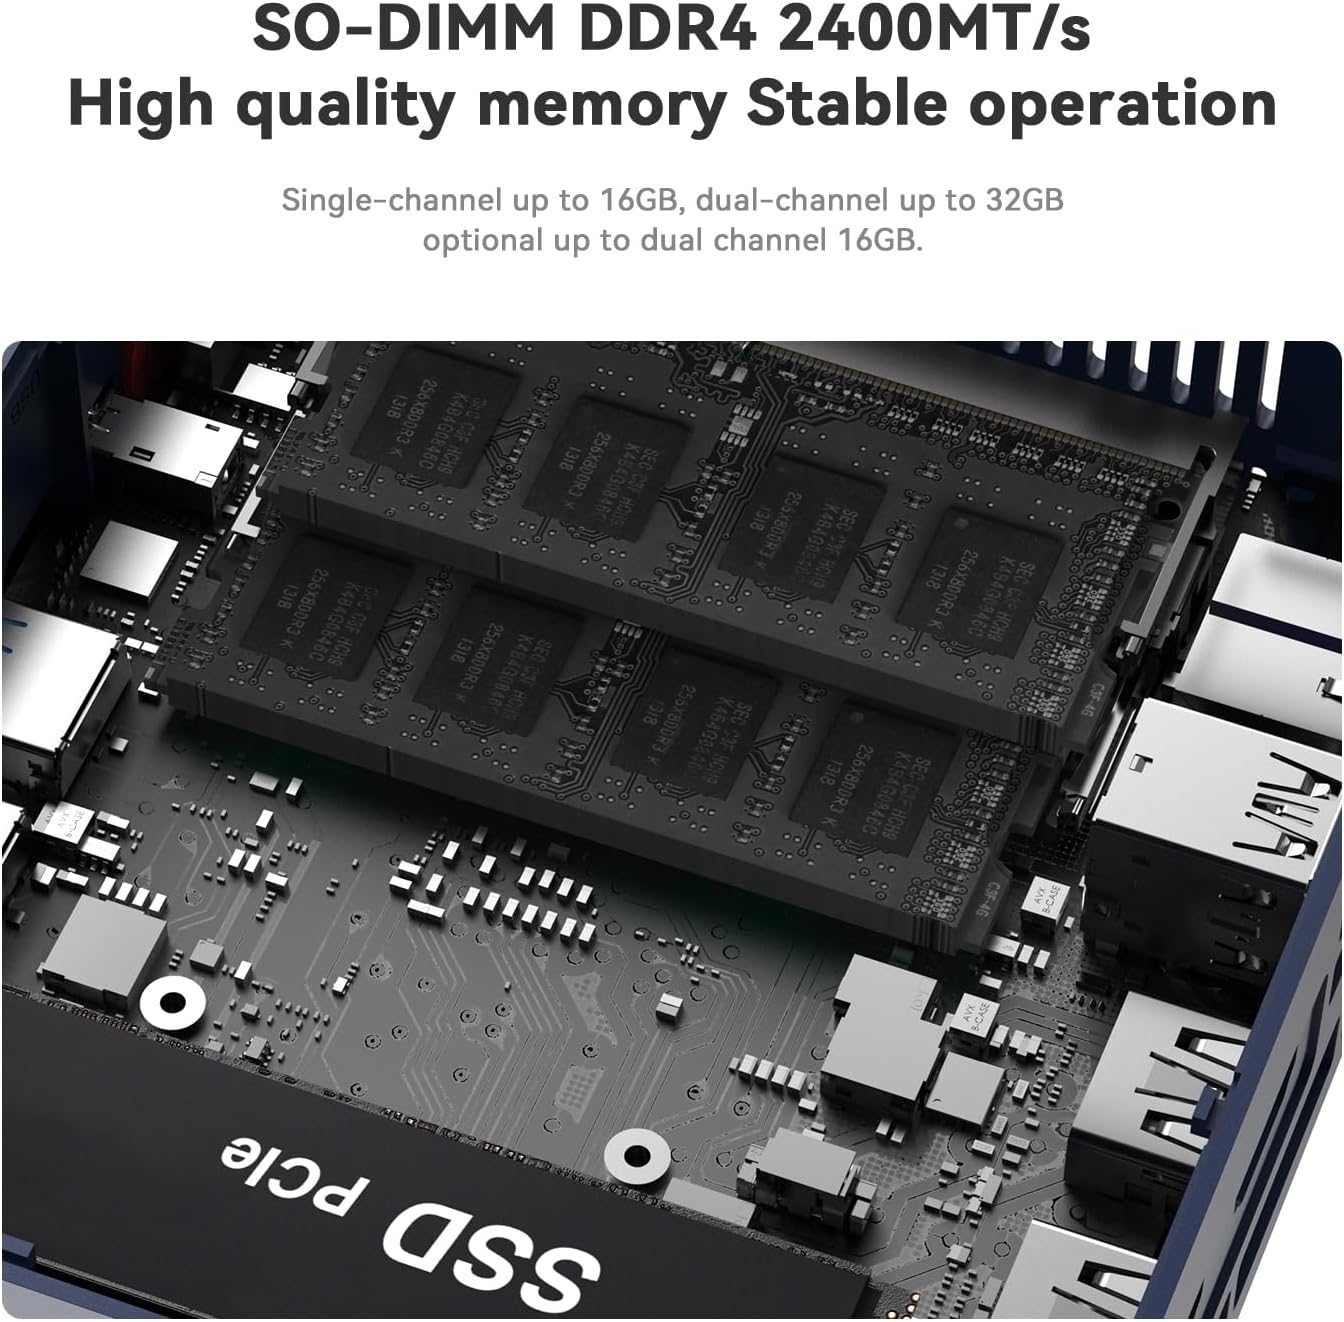
6.1 Hukommelse (RAM)
The device comes with 16GB DDR4 RAM (2x8GB) and supports dual-channel operation. It can be expanded up to 32GB (2x16GB) using SO-DIMM DDR4 2400MT/s modules.

Billede 6.1: View of the SO-DIMM DDR4 memory slots, illustrating the dual-channel capability for RAM upgrades.
6.2 Lagringsdrev
The Mini PC includes a 500GB M.2 PCIe 3.0 X4 (2280) SSD and features an additional slot for a 2.5-inch SATA HDD/SSD for further storage expansion (up to 2TB).

Image 6.2: Diagram showing the M.2 NVMe SSD slot and the 2.5-inch SATA HDD slot for storage expansion.
For detailed instructions on installing or upgrading RAM or storage, please refer to the official Beelink support resources or consult a qualified technician.
7. Vedligeholdelse
7.1 Rengøring
- Rengør regelmæssigt ydersiden af Mini PC'en med en blød, tør klud.
- Use compressed air to gently clear dust from the ventilation grilles to ensure proper airflow and cooling.
- Do not use liquid cleaners or solvents directly on the device.
7.2 Kølesystem
The Beelink SER3 features a cooling system with a large fan and dual heat conduction tubes to maintain optimal operating temperatures. Ensure that the ventilation openings are not obstructed.

Billede 7.1: Intern view of the cooling system, highlighting the fan and dual heat pipes designed for efficient heat dissipation.
8. Fejlfinding
This section addresses common issues you might encounter with your Beelink SER3 Mini PC.
8.1 Ingen strøm
- Sørg for, at strømadapteren er korrekt tilsluttet både mini-pc'en og en fungerende stikkontakt.
- Kontroller, at stikkontakten fungerer ved at tilslutte en anden enhed.
- Prøv en anden stikkontakt, hvis en tilgængelig.
8.2 Ingen skærmudgang
- Check that the HDMI cable(s) are securely connected to both the Mini PC and the monitor(s).
- Sørg for, at skærmen er tændt og indstillet til den korrekte inputkilde (HDMI 1, HDMI 2 osv.).
- Try connecting to a different monitor or using a different HDMI cable.
8.3 Problemer med netværksforbindelse
- wired: Kontroller Ethernet-kabelforbindelsen. Bekræft, at din router/modem fungerer korrekt.
- Trådløs: Ensure WiFi is enabled in Windows settings. Check if other devices can connect to your WiFi network. Restart your router/modem.
8.4 Problemer med systemets ydeevne
- Luk unødvendige programmer, der kører i baggrunden.
- Sørg for, at Windows og drivere er opdaterede.
- Check for sufficient free storage space on the primary drive.
- Monitor system temperatures to ensure proper cooling.
9. Produktspecifikationer
Detailed technical specifications for the Beelink SER3 Mini PC.

Image 9.1: A comprehensive table detailing the product specifications of the Beelink SER3 Mini PC.
| Feature | Specifikation |
|---|---|
| Processor | AMD Ryzen 3 3200U (2 Core/4 Threads, 2.6GHz up to 3.2GHz) |
| Grafik | AMD Radeon Graphics (3 cores, 1200 MHz) |
| VÆDDER | 16GB DDR4 (2x8GB SO-DIMM 2400MT/s), expandable up to 32GB |
| Opbevaring | 500GB M.2 PCIe 3.0 X4 (2280) SSD, 1x 2.5-inch SATA HDD/SSD slot |
| Operativsystem | Windows 11 Pro |
| Video output | 2x HDMI (Max 4K 60Hz) |
| USB-porte | 4x USB 3.2 (10Gbps), 1x Type-C |
| Netværk | WiFi 5 (802.11ac), Bluetooth 5.0, 1x 1000M Gigabit Ethernet (RJ45) |
| Lyd | 3.5mm Audio Jack (HP&MIC) |
| Dimensioner | 124 x 113 x 42 mm (ca. 4.88 x 4.45 x 1.65 tommer) |
| Vægt | Ca. 2.09 pund |
| Strømindgang | 19V-3.42A |
10. Garanti og support
10.1 Garantioplysninger
The Beelink SER3 Mini PC comes with a 1-year worry-free warranty. All units undergo strict inspection before shipping.
10.2 Teknisk support
Beelink offers lifetime technical support and 24-hour customer service. If you encounter any issues or have questions regarding your Mini PC, please do not hesitate to contact Beelink customer support. Refer to the contact information provided on the official Beelink webwebstedet eller i din produktemballage.
For additional resources and driver downloads, visit the official Beelink webwebsted: www.bee-link.com


