1. Introduktion
This manual provides detailed instructions for the installation, operation, and maintenance of the JIARUIXIN JR1922RXS-D2 12V Remote Control and Receiver Kit. This kit is designed as a replacement part for children's electric ride-on cars. Please read this manual thoroughly before attempting any installation or operation to ensure proper function and safety.
2. Produktet er slutview
The JR1922RXS-D2 kit includes a 12V control box and a 2.4G Bluetooth remote control. These components work together to provide remote operation capabilities for compatible children's electric ride-on vehicles.

Image: The JIARUIXIN JR1922RXS-D2 12V control box and its accompanying 2.4G Bluetooth remote control.
3. Kompatibilitetskontrol
To ensure this control box and remote kit is compatible with your child's electric ride-on car, it is essential to verify the model number and physical appearance of your existing control box. This kit is specifically designed for models compatible with JR1922RXS-D2.
3.1 Identifying Your Existing Control Box
Open the compartment of your broken electric ride-on car where the control box is located. Carefully examine the label and physical connectors of your current control box.

Billede: Et nærbillede view of the JR1922RXS-D2 control box, showing the model number and specifications on its label.
3.2 Connector Type Verification
This JR1922RXS-D2 control box features a black 7-pin socket. Confirm that your existing control box also uses a black 7-pin socket for connection. Incompatibility may arise with other JR1922RXS variants such as JR1922RXS-AD or JR1922RXS-3W, or the white 7-pin socket receiver (ASIN: B08GFSHY6V).
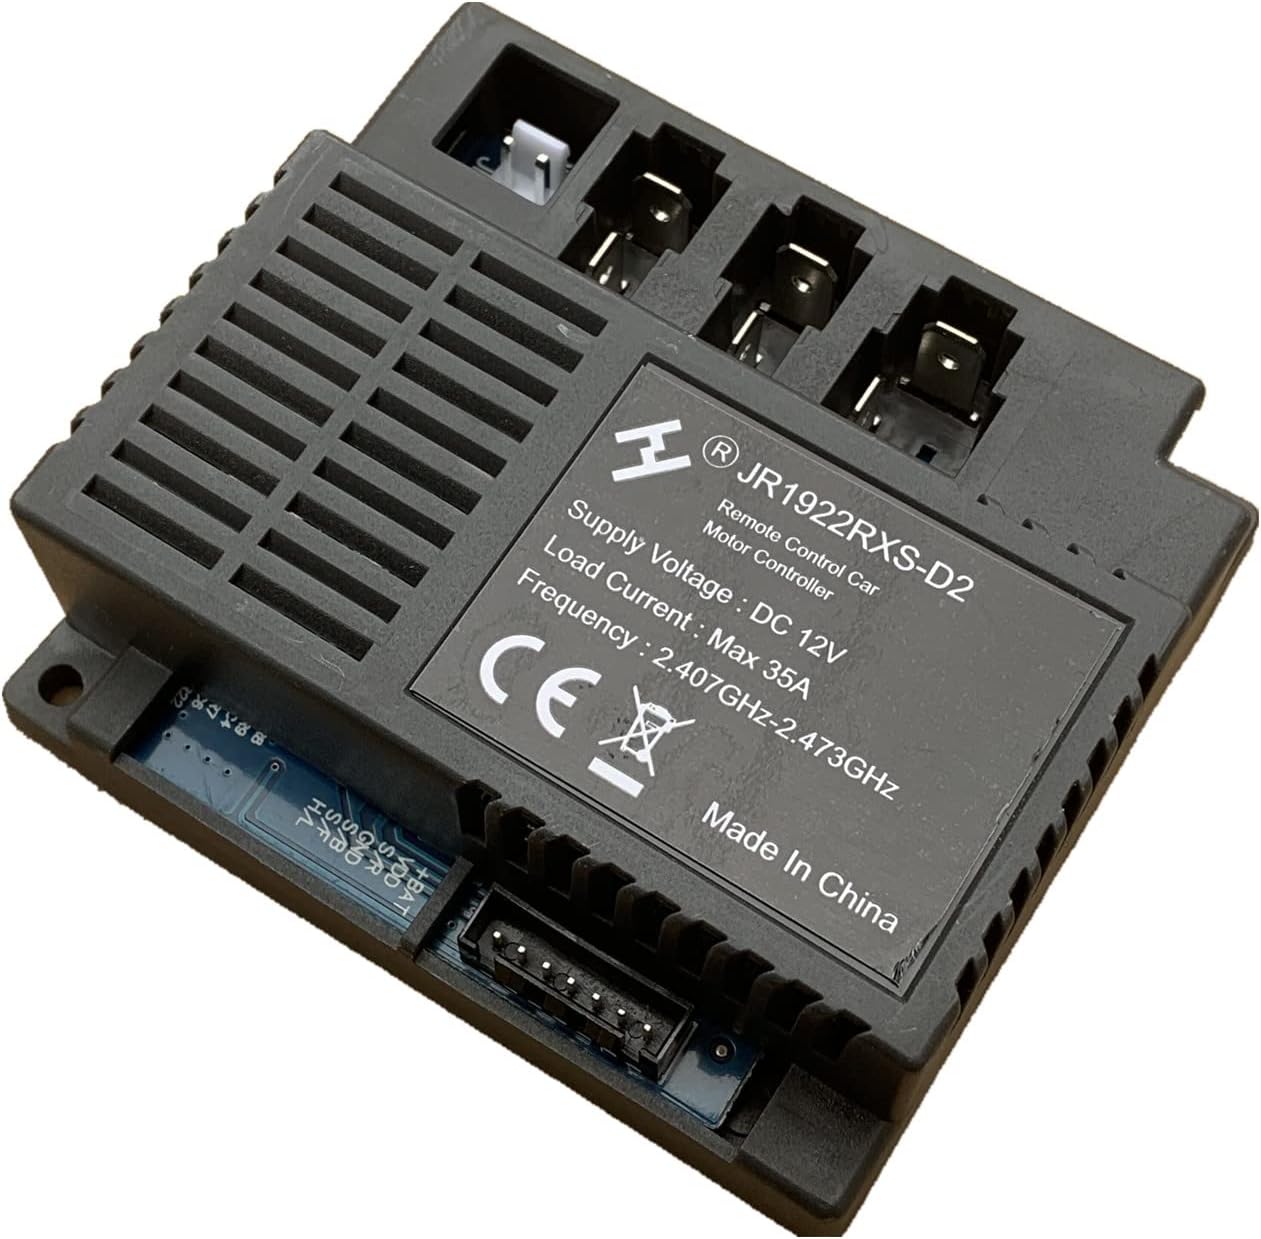
Image: The JR1922RXS-D2 control box, with an arrow pointing to the black 7-pin socket, crucial for compatibility verification.
Important: If the appearance or connector type of your existing control box does not match the JR1922RXS-D2, this replacement part may not be compatible with your vehicle.
4. Pakkens indhold
The JIARUIXIN JR1922RXS-D2 kit includes the following items:
- 1 x JR1922RXS-D2 Control Box (12V)
- 1 x 2.4G Bluetooth Remote Control
5. Opsætning
5.1 Installation af batteri i fjernbetjening
The remote control requires two AAA (1.5V) batteries. To install:
- Find batterirummet på bagsiden af fjernbetjeningen.
- Brug en skruetrækker til at løsne skruen, der fastgør batteridækslet.
- Isæt to AAA-batterier, og sørg for at polariteten (+/-) vender korrekt.
- Sæt batteridækslet på igen, og stram skruen.

Image: Diagram illustrating the battery compartment of the remote control and the process for inserting two AAA (1.5V) batteries.
5.2 Pairing the Remote Control with the Car
After installing the new control box and batteries in the remote, you must resync the remote control with the ride-on car. This process should also be performed every time the remote control batteries are changed.
- Ensure the ride-on car is powered off.
- Turn on the ride-on car.
- Within a few seconds of turning on the car, press and hold the 'P' button on the remote control until the indicator light on the remote stops flashing and remains solid.
- Release the 'P' button. The remote control is now paired with the car.
- Test the remote control functions (forward, backward, steering) to confirm successful pairing.
6. Betjening
Once the remote control is paired, you can operate the ride-on car using the buttons on the remote. Familiarize yourself with the button layout:

Billede: Forsiden view of the JR1922RXS-D2 remote control, showing the various control buttons for operating the ride-on car.
- Frem/tilbage: Use the directional arrows to move the car forward or backward.
- Venstre/højre: Use the steering arrows to control the direction of the car.
- Hastighed: The 'S' button typically controls speed settings (e.g., low, medium, high).
- Bremse: The 'P' button often functions as a brake or emergency stop.
7. Vedligeholdelse
To ensure the longevity and proper functioning of your JR1922RXS-D2 kit, follow these maintenance guidelines:
- Rensning: Wipe the control box and remote control with a dry, soft cloth. Avoid using harsh chemicals or abrasive cleaners.
- Opbevaring: Store the components in a dry place, away from direct sunlight and extreme temperatures.
- Udskiftning af batteri: Replace the remote control batteries when the indicator light becomes dim or the remote's response is sluggish. Always use new AAA batteries and ensure correct polarity. Remember to resync the remote after battery replacement.
- Undgå vand: Keep both the control box and remote control away from water and moisture to prevent damage.
8. Fejlfinding
If you encounter issues with your JR1922RXS-D2 kit, refer to the following common problems and solutions:
| Problem | Mulig årsag | Løsning |
|---|---|---|
| Fjernbetjeningen reagerer ikke | Batteries are dead or incorrectly installed. Remote is not paired. | Replace batteries with new AAA batteries, ensuring correct polarity. Perform the pairing procedure (Section 5.2). |
| Car does not move or respond erratically | Loose connection to the control box. Control box incompatibility. | Check all connections to the control box to ensure they are secure. Re-verify compatibility with your car's original control box (Section 3). |
| Remote indicator light flashes continuously | Remote is not paired or has lost connection. | Perform the pairing procedure again (Section 5.2). |
9. Specifikationer
| Feature | Detalje |
|---|---|
| Modelnummer | JR1922RXS-D2 |
| Voltage | 12V |
| Kontrolmetode | 2.4G Bluetooth |
| Belastningsstrøm | Max 35A |
| Frekvens | 2.407GHz-2.473GHz |
| Control Box Connector | Black 7-pin socket |
| Batterier til fjernbetjening | 2 x AAA (1.5V) (not included) |
| Produktdimensioner | 4.2 x 3.2 x 3.2 inches (Control Box) |
| Varens vægt | 7 ounce |
| Producent anbefalet alder | 16 years and up (for installation/handling) |
10. Support og garanti
For technical assistance or inquiries regarding your JIARUIXIN JR1922RXS-D2 kit, please contact the seller or manufacturer through the platform where the product was purchased. Information regarding specific warranty terms may be available from the point of purchase.


