1. Introduktion
This manual provides detailed instructions for the installation, operation, and maintenance of your President Johnny III USA 40 Channel CB Radio. Please read this manual thoroughly before using the product to ensure proper function and safety. This device is designed for reliable communication within the Citizens Band radio service.
2. Produktet er slutview
2.1 Nøglefunktioner
- 40 channels AM
- Channel rotary switch
- Weather Alert function
- Eksternt højttalerstik
- Volume adjustment and ON/OFF control
- Manual squelch and Automatic Squelch Control (ASC)
- Multi-functions LCD display
- S-meter for signal strength indication
- Vox function (Hands-free operation)
- ANL filter (Automatic Noise Limiter) and HI-CUT filter
- RF Gain kontrol
- Scan funktion
- Prioriteret kanalhukommelse
- F function key for advanced settings
- Beep Function for key press confirmation
- Roger Beep for end-of-transmission signal
- Key locking feature
- Front microphone plug for easy access
2.2 Komponenter
The President Johnny III USA CB Radio includes the main transceiver unit, a microphone with a coiled cord, and a mounting bracket. The front panel features various controls and an LCD display for operational feedback.
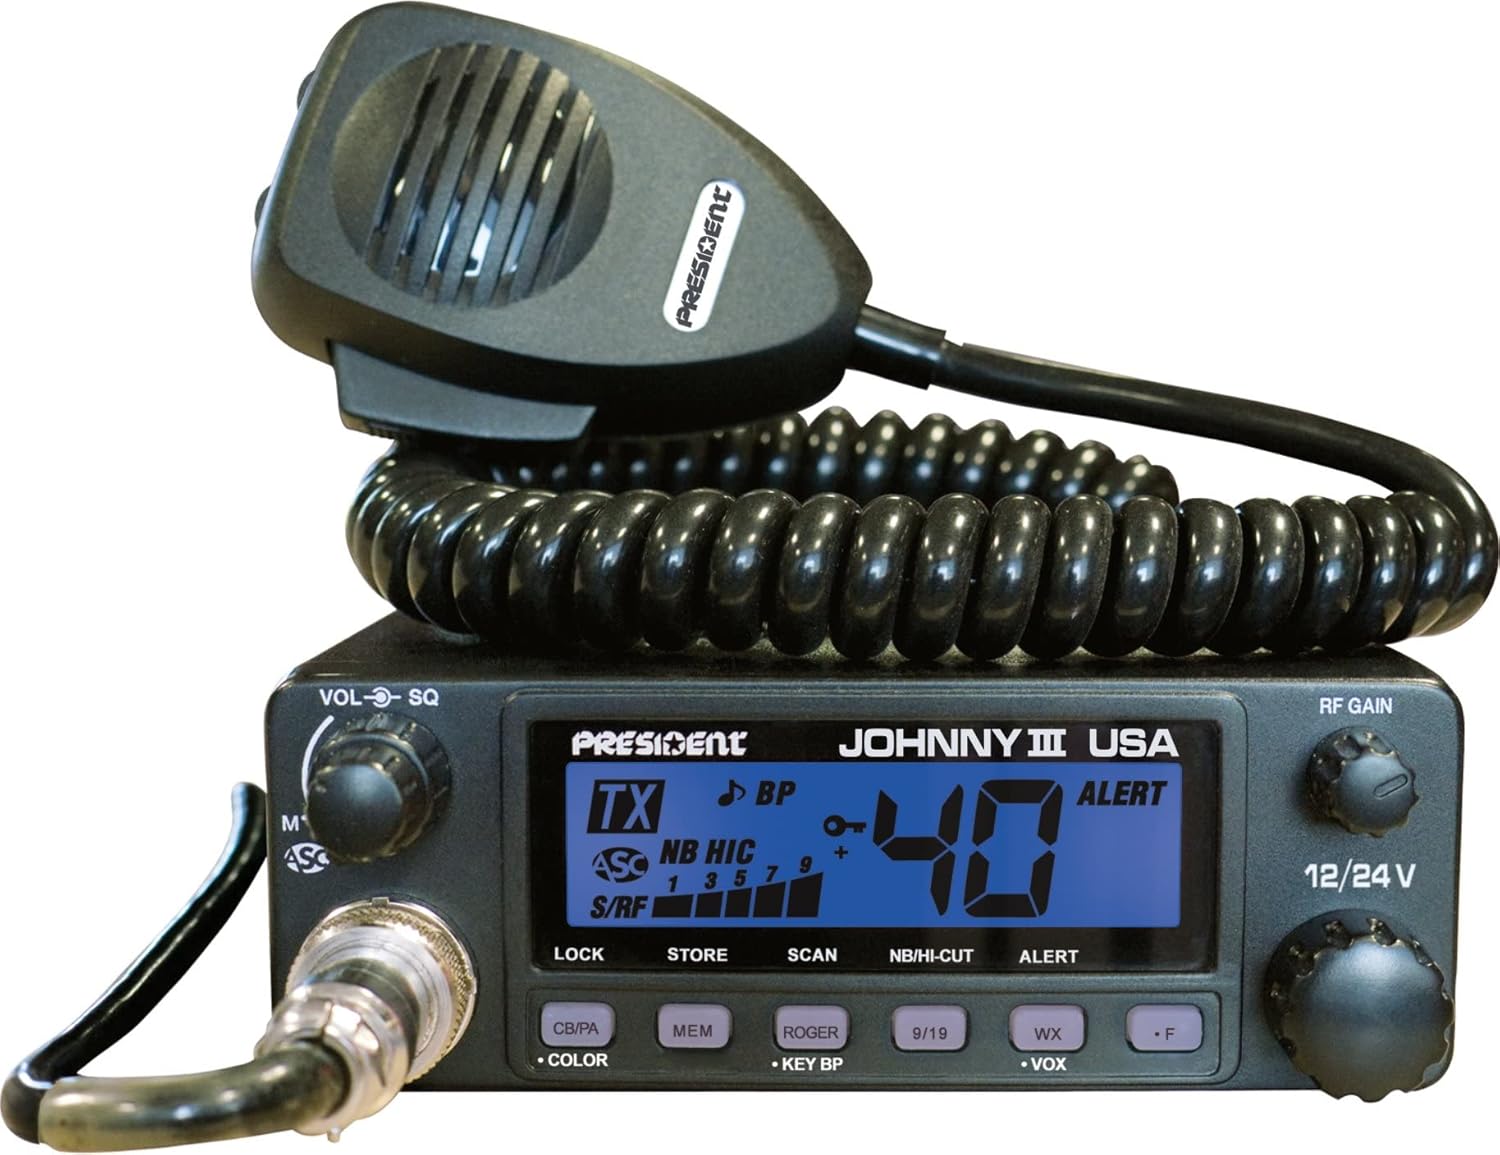
Figure 1: President Johnny III USA CB Radio with attached microphone. The unit features a clear LCD display, channel selector, volume/squelch knobs, and various function buttons on the front panel.

Figure 2: Packaging for the President Johnny III USA CB Radio, highlighting key features such as ASC (Automatic Squelch Control) and 12/24V compatibility.
3. Opsætning
3.1 Montering af radioen
Select a secure and accessible location for mounting the radio, ensuring it does not obstruct driving or vehicle controls. Use the provided mounting bracket and hardware to firmly attach the unit. Ensure adequate ventilation around the unit.
3.2 Strømtilslutning
The Johnny III USA is compatible with both 12V and 24V DC power systems. Connect the red wire to the positive (+) terminal of your vehicle's battery or a suitable fused power source, and the black wire to the negative (-) terminal or chassis ground. Ensure the connection is secure and properly fused to prevent electrical damage.
3.3 Antenneforbindelse
Connect a properly tuned CB antenna to the antenna jack on the rear of the radio. A well-matched antenna system is crucial for optimal performance and to prevent damage to the radio's output stage. Consult an expert for antenna tuning if you are unsure.
3.4 Mikrofonforbindelse
Plug the microphone connector into the dedicated microphone jack located on the front panel of the radio. Ensure it clicks securely into place.
4. Betjeningsvejledning
4.1 Power ON/OFF and Volume
Rotate the VOL-SQ knob clockwise to turn the radio ON and adjust the listening volume. Rotate counter-clockwise until it clicks to turn the radio OFF.
4.2 Kanalvalg
Use the CHANNEL rotary switch to select one of the 40 available AM channels. The selected channel number will be displayed on the LCD.
4.3 Squelch Control (SQ / ASC)
- Manual Squelch (SQ): Rotate the VOL-SQ knob counter-clockwise past the click (ASC position) to engage manual squelch. Continue rotating clockwise until background noise is eliminated.
- Automatic Squelch Control (ASC): Rotate the VOL-SQ knob fully counter-clockwise until it clicks into the ASC position. This feature automatically adjusts the squelch level for optimal reception, reducing background noise without manual adjustment.
4.4 RF Gain
The RF GAIN knob adjusts the receiver's sensitivity. Rotate clockwise for maximum sensitivity to receive weaker signals, or counter-clockwise to reduce sensitivity and minimize interference from strong nearby signals.
4.5 ANL and HI-CUT Filters
Press the NB/HI-CUT button to activate or deactivate the Automatic Noise Limiter (ANL) and HI-CUT filters. These filters help reduce impulse noise (ANL) and high-frequency background noise (HI-CUT) for clearer reception.
4.6 Scanningsfunktion
Press the SCAN button to initiate channel scanning. The radio will continuously scan through all 40 channels and stop on an active channel. Press SCAN again to stop scanning.
4.7 VOX Function (Hands-Free)
Press the VOX button to activate the Voice Operated eXchange function. This allows you to transmit by speaking into the microphone without pressing the PTT (Push-To-Talk) button. Adjust VOX sensitivity as needed via the F function menu.
4.8 Vejralarm
Press the ALERT button to activate the Weather Alert function. The radio will monitor designated weather channels and alert you to severe weather warnings.
4.9 Beep Function and Roger Beep
- Bip funktion: Press the BEEP button to toggle the key press confirmation tone ON or OFF.
- Roger Beep: Press the ROGER BEEP button to activate or deactivate the Roger Beep. When active, a short tone will be transmitted at the end of your transmission, signaling to other users that you have finished speaking.
4.10 Key Locking
Press the LOCK button to lock the radio's keys, preventing accidental changes to settings. Press again to unlock.
5. Vedligeholdelse
5.1 Rengøring
Tør radioens yderside af med en blød kludamp cloth. Do not use abrasive cleaners or solvents. Keep the microphone and connectors free of dust and debris.
5.2 Antenna Tuning
Regularly check your antenna's SWR (Standing Wave Ratio) to ensure optimal performance and prevent damage to the radio. An SWR reading above 2.0:1 indicates a poorly tuned antenna, which can lead to reduced transmission range and potential radio damage.
5.3 Udskiftning af sikringer
If the radio does not power on, check the inline fuse on the power cable. Replace it with a fuse of the same type and rating if it is blown.
6. Fejlfinding
| Problem | Mulig årsag | Løsning |
|---|---|---|
| Radioen tændes ikke | No power connection; Blown fuse; Incorrect voltage | Check power cable connections; Replace fuse; Verify 12V or 24V supply. |
| No transmission or poor range | Antenna not connected; Poor SWR; Faulty microphone | Ensure antenna is connected; Check SWR and tune antenna; Test with another microphone if available. |
| Poor reception or excessive noise | Squelch set too high; Interference; Antenna issue | Adjust squelch (manual or ASC); Activate ANL/HI-CUT filters; Check antenna connection and SWR. |
| Tasterne reagerer ikke | Key lock is active | Press the LOCK button to deactivate key lock. |
7. Specifikationer
| Feature | Detalje |
|---|---|
| Mærke | Formand |
| Model | Johnny III USA |
| Antal kanaler | 40 |
| Tuner-teknologi | AM |
| Voltage | 12V eller 24V |
| Display Type | LCD |
| Farve | Sort |
| Varens vægt | 2.55 pund (ca. 1.16 kg) |
| Pakkedimensioner | 12.7 x 6.2 x 3.1 tommer (ca. 32.26 x 15.75 x 7.87 cm) |
| ASIN | B09PZBZTS7 |
| UPC | 656942598275 |
8. Garanti og support
This product comes with a 90-day limited warranty. For warranty claims or technical support, please contact President Electronics directly. You may find additional information and support resources on their official webwebsted:
http://www.president-electronics.us/The-CB-Radios/Ham-Radio/The-AM-transceivers/JOHNNY-III-ASC


