1. Introduktion
This user manual provides detailed instructions for the installation, operation, and maintenance of your ESCAM WNK710 3MP Wireless WiFi IP Camera. This smart home indoor camera is designed for monitoring various indoor environments such as nurseries, pet areas, garages, or yards, offering features like 3MP high-definition video, two-way audio, motion detection, and night vision capabilities. Please read this manual thoroughly before using the product to ensure proper and safe operation.

Figure 1: ESCAM WNK710 3MP Wireless WiFi IP Camera, front view.
2. Sikkerhedsoplysninger
- Use only the power adapter provided with the camera. Using unauthorized power sources may damage the device and void the warranty.
- Do not expose the camera to extreme temperatures, humidity, or direct sunlight. This product is designed for indoor use.
- Avoid placing the camera near strong magnetic fields or sources of interference.
- Forsøg ikke at skille kameraet ad eller ændre det. Overlad al service til kvalificeret personale.
- Keep the camera and its accessories out of reach of children and pets.
- Sørg for, at kameraet er sikkert monteret for at forhindre utilsigtede fald.
3. Hvad er der i æsken
Kontroller, at alle komponenter er til stede i pakken, før du fortsætter installationen.
- ESCAM WNK710 WiFi IP Camera (x1)
- 12V 2A Power Adapter (x1)
- Screw Pack (x1)
- Hurtig startguide (x1)
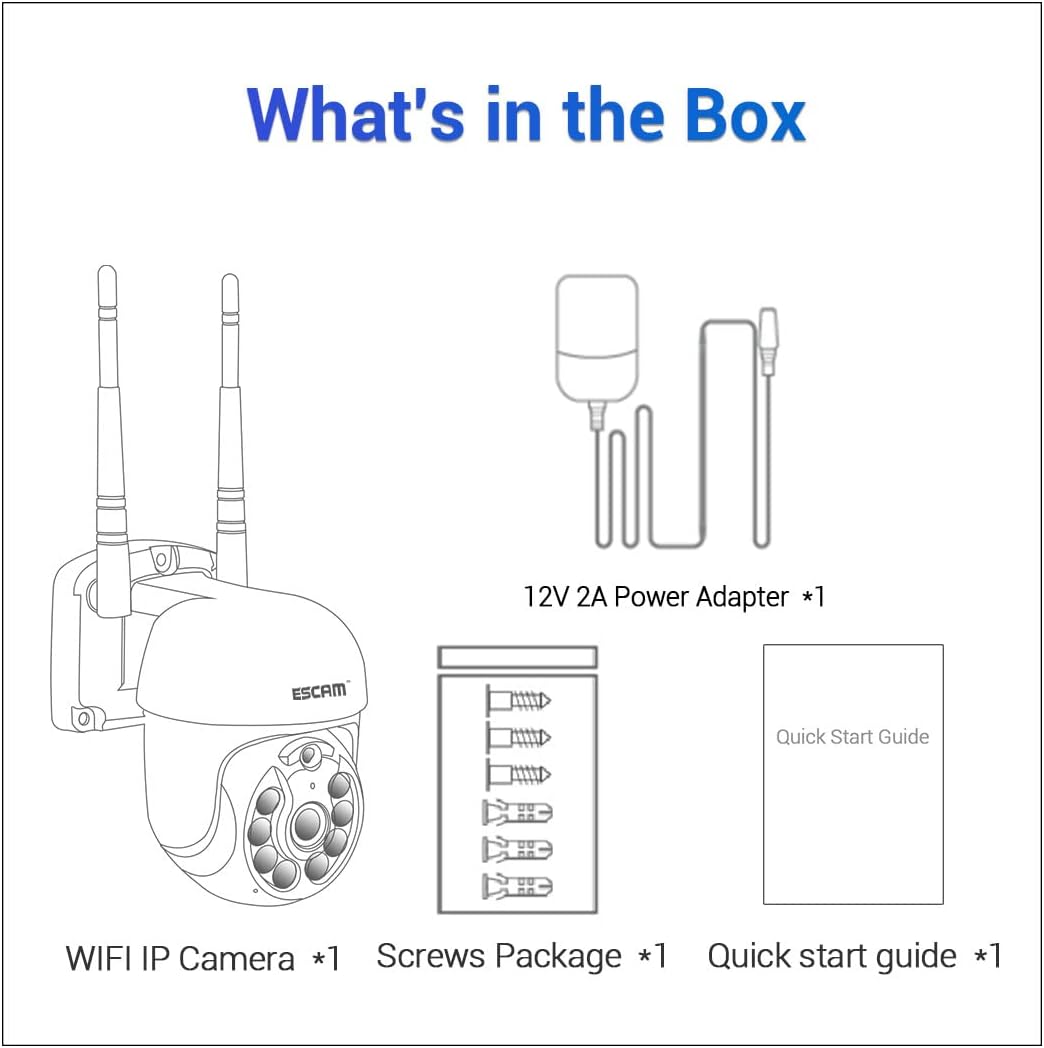
Figure 2: Package contents including the camera, power adapter, screws, and quick start guide.
4. Produktet er slutview
Familiarize yourself with the various parts and interfaces of the ESCAM WNK710 camera.
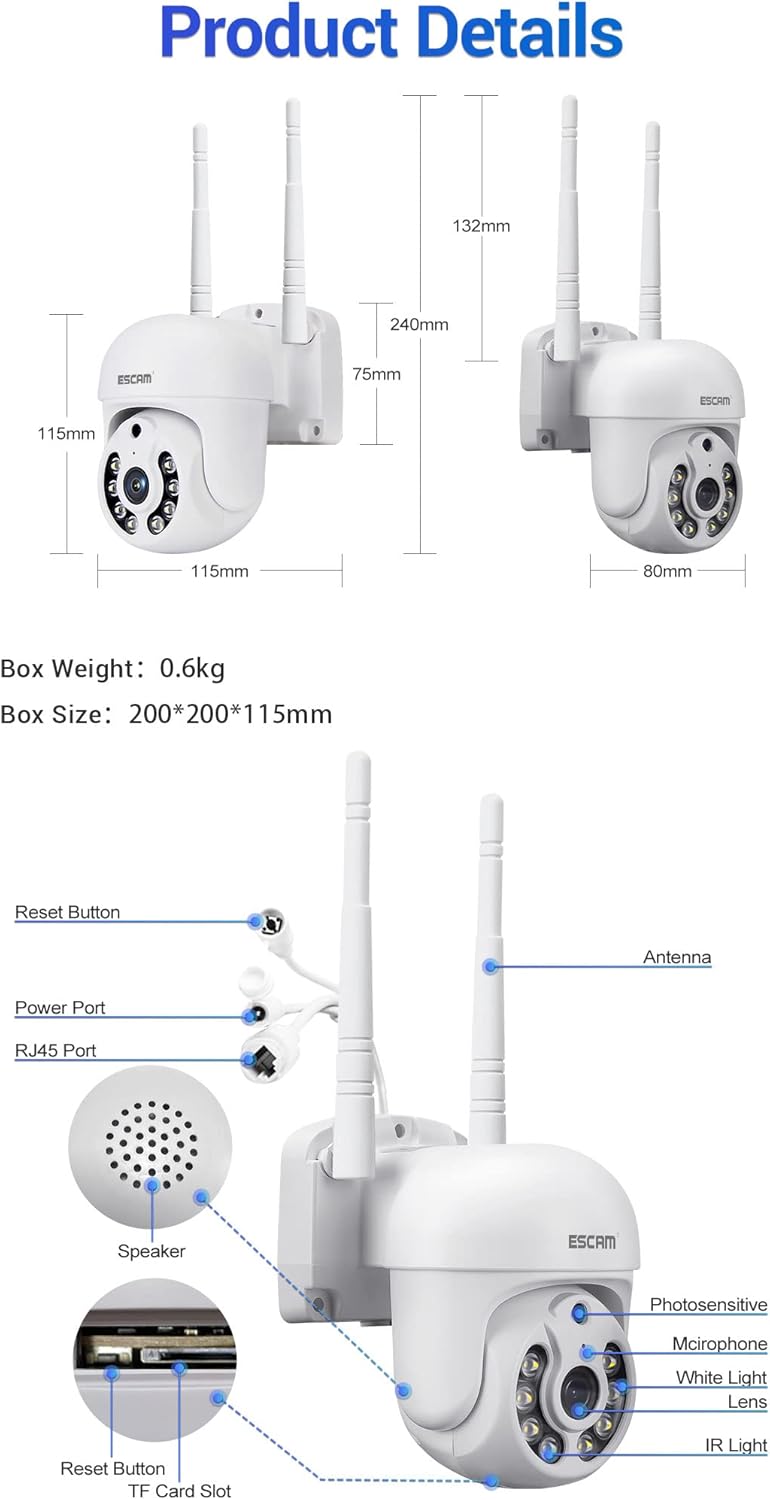
Figur 3: Detaljeret view of the camera showing dimensions, reset button, power port, RJ45 port, speaker, photosensitive sensor, microphone, white light LEDs, lens, IR light LEDs, and TF card slot.
- Linse: Optager video footage.
- IR Light LEDs: Provide infrared illumination for night vision.
- Hvide lysdioder: Provide white light illumination for full-color night vision and deterrence.
- Photosensitive Sensor: Detects ambient light levels to switch between day and night modes.
- Mikrofon: Captures audio for two-way communication and recording.
- Højttaler: Outputs audio for two-way communication.
- Antenne: For wireless (WiFi) connectivity.
- Strømport: Connects to the 12V 2A power adapter.
- RJ45-port: Til kabelbaseret Ethernet-forbindelse.
- Nulstil knap: Bruges til at nulstille kameraet til fabriksindstillingerne.
- TF-kortslot: Understøtter op til 128 GB Micro SD-kort til lokal lagring.
5. Opsætning
5.1 Fysisk installation
The camera can be wall-mounted or placed on a flat surface. For wall mounting, use the provided screw pack.
- Vælg en passende placering til kameraet, og sørg for, at den er klar view of the area you wish to monitor and is within range of your WiFi network (if using wireless).
- Marker borepunkterne på væggen ved hjælp af kameraets base som skabelon.
- Drill holes and insert wall anchors (if necessary).
- Secure the camera to the wall using the provided screws.
5.2 Strømtilslutning
Connect the provided 12V 2A power adapter to the camera's power port and then plug it into a power outlet. The camera will power on and initiate its self-test sequence.
5.3 Netværksforbindelse
The ESCAM WNK710 supports both WiFi and wired Ethernet connections.

Figure 4: Connection methods for the camera, including direct AP connection to a phone and WiFi connection via a router.
5.3.1 WiFi-forbindelse
- Download EseeCloud app from your mobile device's app store (iOS App Store or Google Play Store).
- Registrer en konto og log ind.
- Tap the "+" icon in the app to add a new device.
- Select "WiFi Camera" and follow the on-screen instructions to connect the camera to your home WiFi network. This typically involves scanning a QR code on the camera or entering your WiFi credentials.
- Once connected, the camera's status indicator will change, and you will see the camera added to your device list in the app.
5.3.2 Wired Ethernet Connection
For a stable connection, you can use the RJ45 Ethernet port.
- Connect one end of an Ethernet cable to the camera's RJ45 port.
- Tilslut den anden ende af Ethernet-kablet til en ledig LAN-port på din router eller netværksswitch.
- The camera will automatically obtain an IP address via DHCP.
- Åbn EseeCloud app, tap "+" to add a device, and select "Wired Camera" or "Søg efter devices on LAN" to discover and add the camera.
6. Betjeningsvejledning
6.1 Live View
After successfully adding the camera to the EseeCloud app, tap on the camera's name in the device list to access the live video feed. You can view foo i realtidtage fra dit kamera når som helst og hvor som helst.
6.2 Panorering/hældningskontrol
The ESCAM WNK710 features pan and tilt functionality, allowing you to remotely adjust the camera's viewvinkel.
- I live view interface of the EseeCloud app, use the directional controls (usually an on-screen joystick or arrows) to pan the camera horizontally (350°) and tilt it vertically (90°).
6.3 Tovejslyd
The camera is equipped with a built-in microphone and speaker for two-way audio communication.
- To speak through the camera, tap the microphone icon in the live view interface of the app. Hold the button to speak, and release to listen.
- Ensure your phone's microphone is enabled for the EseeCloud app.
6.4 Bevægelsesdetektion og advarsler
Kameraet kan registrere bevægelse og sende advarsler til din mobilenhed.
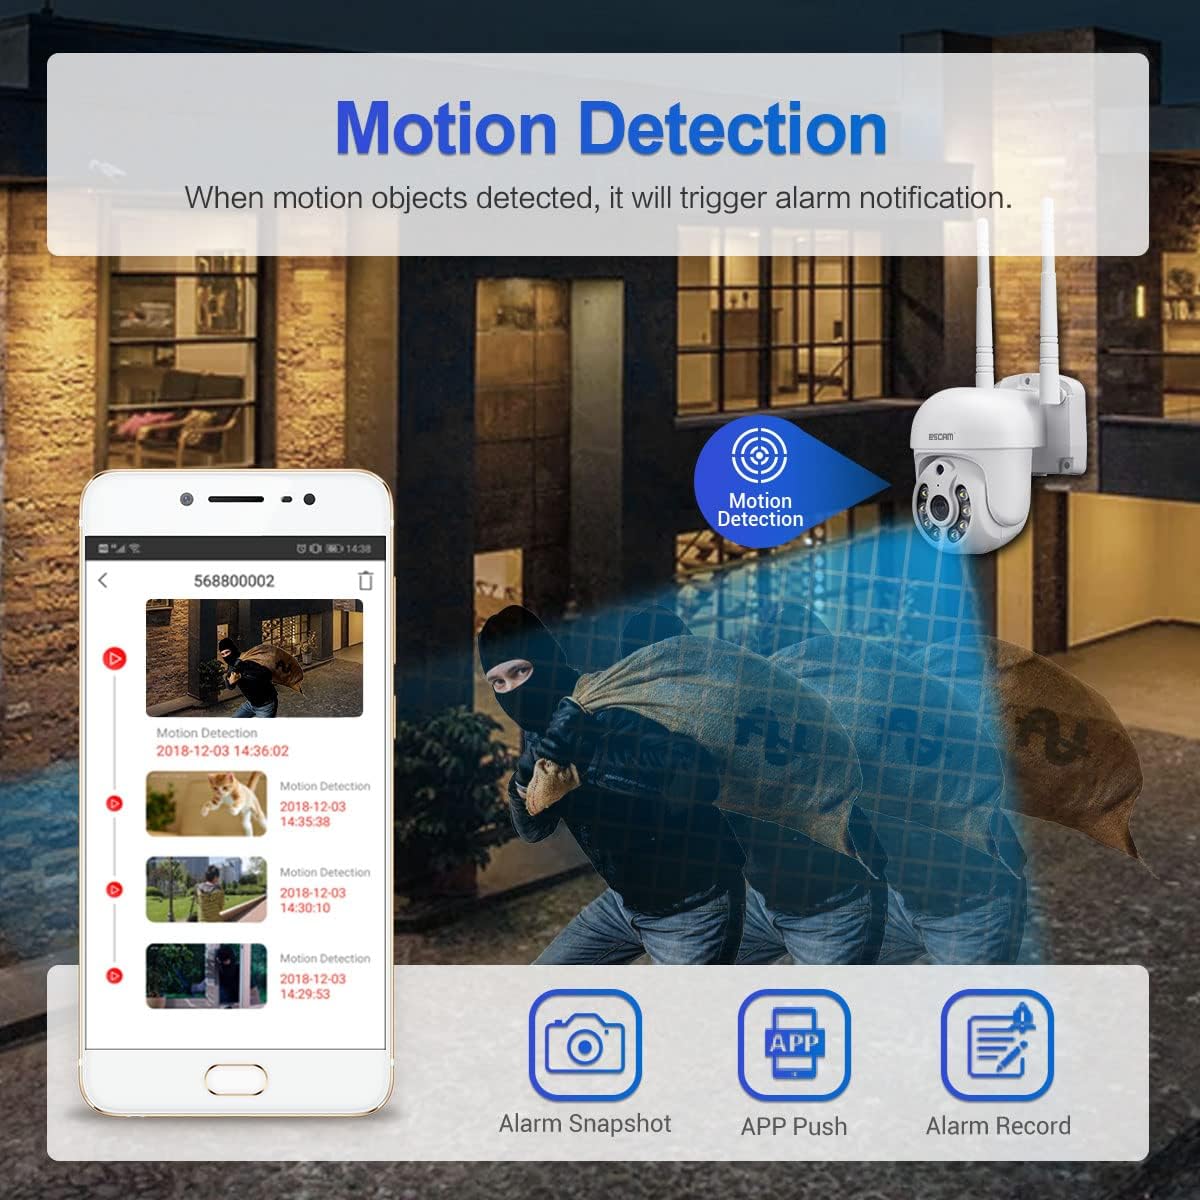
Figure 5: Illustration of motion detection triggering an alarm notification on a mobile phone, with options for alarm snapshot, app push, and alarm record.
- Navigate to the camera settings in the EseeCloud app.
- Aktiver "Bevægelsesdetektion" og juster følsomhedsniveauerne efter behov.
- You can also set up specific detection zones and schedules.
- When motion is detected, the camera will trigger an alarm notification, send a push alert to your phone, and can record video clips.
- The camera features intelligent humanoid detection to reduce false positives.
6.5 Nattesynstilstande
The ESCAM WNK710 offers three intelligent night vision modes for clear monitoring in low-light conditions.
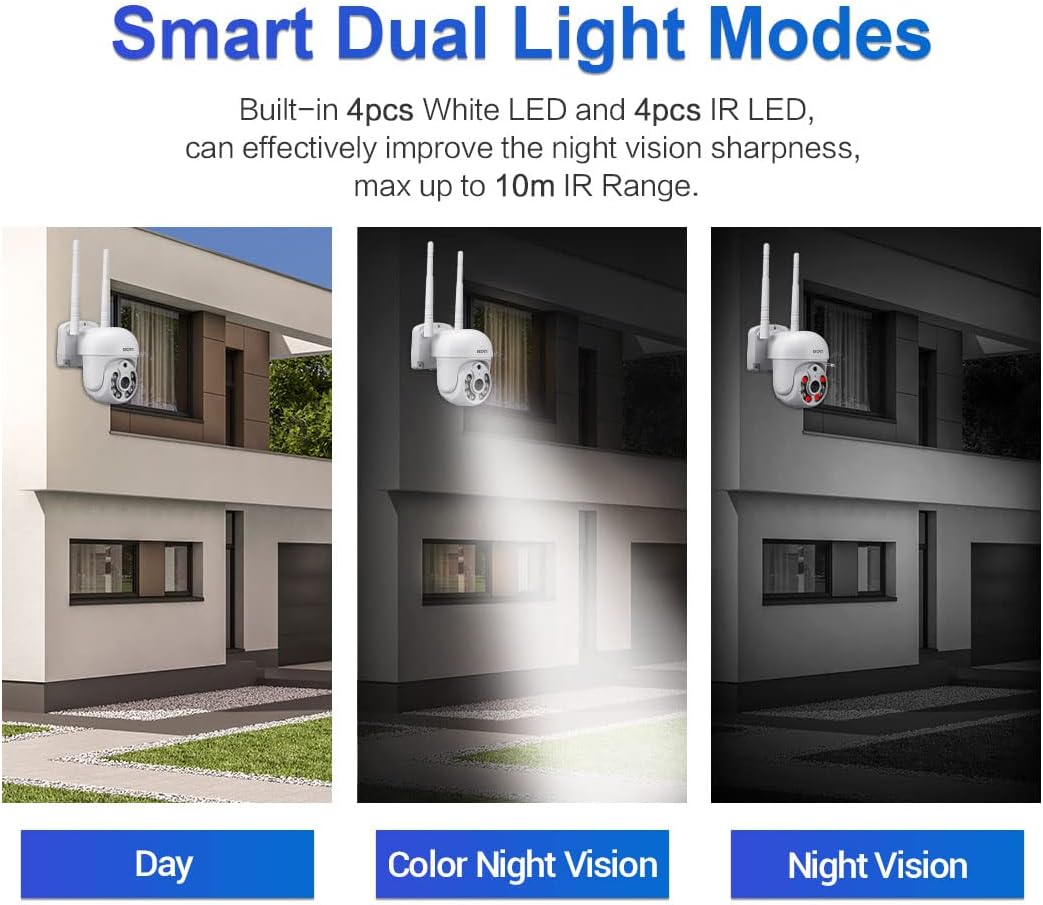
Figure 6: Comparison of Day mode, Color Night Vision mode (using white LEDs), and Night Vision mode (using IR LEDs).
- Infrared Mode (Black/White Night Vision): Uses IR LEDs for clear black and white images in complete darkness, up to 10m range.
- Full-Color Mode (Color Night Vision): Activates the built-in white light LEDs to provide full-color video even in low light. This mode can also act as a deterrent.
- Smart Mode: The camera automatically switches between IR and white light based on detected motion or specific settings, providing full-color video when activity is detected.
- You can select your preferred night vision mode in the EseeCloud app settings.
6.6 Optagelse og afspilning
The camera supports continuous recording, motion-triggered recording, and scheduled recording to a Micro SD card (up to 128GB, not included) or cloud storage (subscription may be required).
- Micro SD-kort installation: Insert a Micro SD card into the TF card slot on the camera. Ensure the camera is powered off before inserting or removing the card.
- Afspilning: In the EseeCloud app, navigate to the playback section to view optaget footage. You can filter by date and time.
7. Vedligeholdelse
- Rensning: Brug en blød, tør klud til at rengøre kameralinsen og huset. Brug ikke flydende rengøringsmidler eller slibende materialer.
- Firmwareopdateringer: Regularly check for firmware updates through the EseeCloud app. Updates can improve performance, add new features, and enhance security. Follow the app's instructions carefully during updates.
- SD-kortadministration: If using an SD card, periodically check its status in the app. Format the card occasionally to maintain optimal recording performance.
8. Fejlfinding
| Problem | Mulig årsag/løsning |
|---|---|
| Camera offline in app. |
|
| Kan ikke oprette forbindelse til WiFi. |
|
| No sound from camera or app. |
|
| Motion detection alerts not received. |
|
| SD-kort optager ikke. |
|
9. Specifikationer
| Feature | Detalje |
|---|---|
| Model | WNK710 |
| Pixel | 3 Million Pixels (2304*1296) |
| Sensor | 1/2.7” CMOS-sensor |
| Videobehandling | H.264/H.265 video encoding, support dual stream |
| Billedhastighed | 15 fps |
| Dag- og nattilstand | IR-CUT infrared filter, supports infrared / full color / smart modes |
| Lydbehandling | G.711 codec standard, support audio and video synchronization |
| Audio Port | 1 input (MIC/pickup), 1 output (speaker) |
| Kablet netværk | 1 RJ45 Ethernet interface, 10/100M adaptive |
| Trådløst netværk | 802.11b/g/n (2.4GHz WiFi) |
| Opbevaring | Support 128G Micro SD card (not included) |
| Nattesyn | 4 infrared LEDs + 4 white light LEDs |
| Panorer/vip | 350° panorering / 90° hældning |
| Strømforsyning | 12V 2A (Power adapter included) |
| Dimensioner (L x B x H) | 7.87 x 7.87 x 4.72 tommer (200 x 200 x 115 mm) |
| Varens vægt | 1.76 pund (0.8 kg) |
| Indendørs/Udendørs brug | Indendørs |
10. Garanti og support
For technical support, troubleshooting assistance, or warranty inquiries, please contact visiPower customer service. Refer to the contact information provided in the Quick Start Guide or on the official visiPower webwebsted.
Please note that protection plans are available for purchase separately to extend coverage beyond the standard manufacturer's warranty. These plans are offered by third-party providers and details can be found where the product was purchased.
