1. Introduktion
This manual provides comprehensive instructions for the installation, operation, and maintenance of your COUGAR Archon 2 RGB Mid Tower Case. Please read this manual carefully before beginning installation to ensure proper setup and to maximize the performance and longevity of your product.

Figur 1.1: Vinklet view of the COUGAR Archon 2 RGB Mid Tower Case, showcasing the tempered glass side panel and front RGB fans.
2. Produktfunktioner
The COUGAR Archon 2 RGB Mid Tower Case is designed for PC enthusiasts seeking a balance of aesthetics, airflow, and functionality. Key features include:
- Elegant Design with Tempered Glass: A sleek black finish combined with a tempered glass side panel allows for a clear view of internal components and RGB lighting.
- Optimeret luftstrøm: Supports multiple fan configurations and includes three pre-installed 120mm ARGB fans at the front for efficient cooling.
- Omfattende kompatibilitet: Accommodates Mini ITX, Micro ATX, and ATX motherboards.
- Ample Storage Options: Provides bays for both 3.5" HDDs and 2.5" SSDs.
- Praktisk front-I/O: Features USB 3.0 and USB 2.0 ports for easy peripheral connectivity.
- RGB-lysstyring: Integrated ARGB fans offer customizable lighting effects.

Figur 2.1: Forside view of the COUGAR Archon 2 RGB case, highlighting the three pre-installed ARGB fans.
3. Opsætningsvejledning
Follow these steps to properly install your components into the COUGAR Archon 2 RGB case.
3.1. Tjekliste før installation
- Ensure you have all necessary components: motherboard, CPU, RAM, GPU, power supply, storage drives, and appropriate tools (screwdriver, zip ties).
- Arbejd på en ren, statisk-fri overflade. Overvej at bruge en antistatisk håndledsrem.
3.2. Åbning af sagen
- Carefully remove the tempered glass side panel by unscrewing the thumbscrews located at the rear of the case. Set the panel aside on a soft, flat surface to prevent scratches.
- Remove the opposite metal side panel by unscrewing its thumbscrews and sliding it backward.
3.3. Installation af bundkort
- Installer I/O-skjoldet (hvis det ikke er forudmonteret på dit bundkort) i den bageste åbning af kabinettet.
- Align your motherboard with the standoffs inside the case. Ensure all standoffs match the screw holes on your motherboard.
- Fastgør bundkortet med de medfølgende skruer. Spænd ikke for hårdt.
3.4. Installation af strømforsyningsenhed (PSU)
- Find monteringsområdet til strømforsyningen nederst på bagsiden af kabinettet.
- Slide your PSU into the designated bay from the rear of the case, ensuring the fan faces downwards for optimal cooling (if the case has a bottom vent).
- Fastgør strømforsyningen med skruer fra bagsiden af kabinettet.
3.5. Installation af lagerdrev
The Archon 2 RGB supports both 3.5" HDDs and 2.5" SSDs.
- For 3.5" HDDs: Locate the drive cage usually beneath the PSU shroud. Slide the HDD into the drive bay and secure it with screws.
- For 2.5" SSDs: Mount SSDs to the designated mounting points on the back of the motherboard tray or within the drive cage, securing them with screws.
3.6. Installation af udvidelseskort (GPU)
- Fjern de nødvendige PCIe-slotdæksler fra bagsiden af kabinettet.
- Insert your graphics card or other expansion cards into the appropriate PCIe slot on the motherboard.
- Secure the card with screws to the case.
3.7. Cable Management and Front Panel Connections
Route all power and data cables neatly behind the motherboard tray. Connect the front panel I/O cables (USB, audio, power switch, reset switch, LED indicators) to their respective headers on the motherboard according to your motherboard manual.

Figure 3.1: Dimensions of the COUGAR Archon 2 RGB case, useful for planning component fit and space.
4. Betjeningsvejledning
4.1. Tænder
Once all components are installed and cables are connected, replace both side panels. Connect your monitor, keyboard, mouse, and power cable to the PSU. Press the power button on the top panel of the case to start your system.
4.2. RGB-lysstyring
The pre-installed ARGB fans are typically controlled via a dedicated button on the case's front I/O panel or through your motherboard's RGB software (if connected to an ARGB header). Refer to your motherboard manual for software-based control options.
5. Vedligeholdelse
Regelmæssig vedligeholdelse er med til at sikre optimal ydeevne og levetid for dine pc-komponenter.
- Støvrensning: Rengør støvfiltre (hvis de er til stede) og interne komponenter regelmæssigt med trykluft. Sørg for, at systemet er slukket og at stikket er taget ud, før rengøring.
- Kabelstyring: Ensure cables are neatly routed to avoid obstructing airflow.
- Ventilator inspektion: Check fans for dust buildup or obstructions that could impede their operation.
6. Fejlfinding
Hvis du støder på problemer, kan du se følgende almindelige fejlfindingstrin:
- Systemet tænder ikke:
- Kontroller alle strømforbindelser, inklusive strømforsyningen til stikkontakten, strømforsyningen til bundkortet (24-bens og CPU 8-bens) og frontpanelets tænd/sluk-knap.
- Sørg for, at strømforsyningskontakten er i 'ON'-positionen.
- Ventilatorer drejer ikke / RGB virker ikke:
- Verify fan power cables are securely connected to the motherboard or fan controller.
- Check ARGB headers for proper connection to the motherboard or RGB controller.
- Ensure RGB software or case button is correctly configured.
- Ingen skærmoutput:
- Confirm the monitor cable is connected to the graphics card (not the motherboard integrated graphics, unless no dedicated GPU is present).
- Sæt grafikkortet og RAM-modulerne i igen.
7. Specifikationer
Detailed specifications for the COUGAR Archon 2 RGB Mid Tower Case:
| Feature | Detalje |
|---|---|
| Modelnavn | ARCHON 2 RGB |
| Sagstype | Mid Tower |
| Bundkort kompatibilitet | Mini ITX, Micro ATX, ATX |
| Dimensioner (LxBxH) | 14.96 x 8.27 x 18.5 tommer (380 x 210 x 470 mm) |
| Varens vægt | 11.37 pund (5.17 kg) |
| Materiale | Metal, hærdet glas |
| Farve | Sort |
| Forudinstallerede ventilatorer | 3 x 120mm ARGB fans (Front) |
| Ventilatorstøtte (foran) | 3 x 120 mm eller 2 x 140 mm |
| I/O-porte | 1 x USB 2.0, 2 x USB 3.0, lyd ind/ud |
| Strømforsyningsmonteringstype | Bundmontering |
| Afkølingsmetode | Luft |
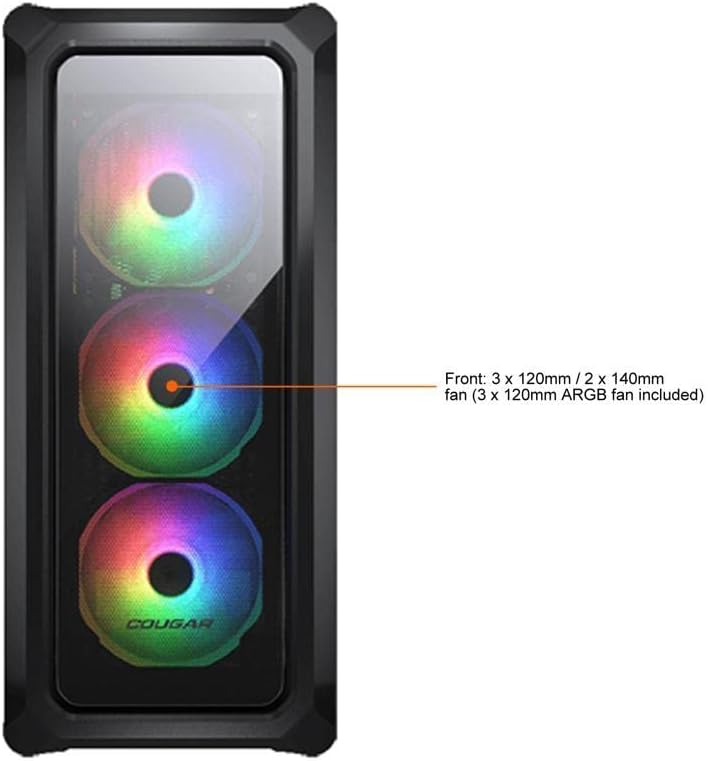
Figure 7.1: Front panel fan configuration and size options for the COUGAR Archon 2 RGB case.
8. Garanti og support
For garantioplysninger og teknisk support henvises til den officielle COUGAR-side. webwebstedet eller kontakt deres kundeserviceafdeling. Gem din købsbevis til garantikrav.
COUGAR Official Webwebsted: cougargaming.com


