Indledning
This manual provides instructions for the setup, operation, and maintenance of your RCA RCDC45 Alarm Clock Caddy Charging Station. Please read this manual thoroughly before using the device to ensure proper functionality and safety. This device combines an alarm clock with a convenient storage caddy and USB charging capabilities.
Vigtige sikkerhedsoplysninger
- Ensure the device is connected to an AC power outlet with the correct voltage.
- Dette produkt er kun designet til indendørs brug.
- Udsæt ikke enheden for vand, fugt eller ekstreme temperaturer.
- Forsøg ikke at skille enheden ad eller ændre den. Overlad al service til kvalificeret personale.
- Hold enheden væk fra varmekilder såsom radiatorer, varmeapparater, komfurer eller andre apparater (herunder ampløftere), der producerer varme.
Pakkens indhold
- RCA RCDC45 Alarm Clock Caddy Charging Station
- AC strømadapter
- CR2032-batteri (til backup)
Produktegenskaber
- 1-inch tall / 3.25-inch diagonal red LED display with 4-level brightness control.
- Integrated small device and item organizer with a soft, non-scratch interior floor.
- USB charging port (5V/2A) for compatible devices.
- Alarm clock with 3 separate alarms.
- Displays indoor temperature in either Fahrenheit (°F) or Celsius (°C).
- Battery backup option (CR2032 battery included) to retain time settings during power outages.
Produkt overview
Familiarize yourself with the various components of your alarm clock caddy.

Figur 1: Forside View. This image displays the front of the RCA RCDC45 Alarm Clock Caddy, featuring its prominent red LED digital display showing the time 6:18. The device is black with a smooth finish.

Figur 2: Bagside View and Controls. The back of the unit features the USB charging port on the left, followed by three control buttons: NED, UP, og SÆT. These buttons are used for adjusting time, alarms, and other settings.

Figure 3: Storage Caddy in Use. This image illustrates the integrated storage caddy, shown holding a remote control, a pair of eyeglasses, and two pens. The caddy provides a convenient space for organizing small items.

Figure 4: Labeled Features. This diagram highlights the key features of the device, including the large dimmable display, the storage space, the USB charging port, and indicates its dual alarm capability.
Opsætning
- Tilslut vekselstrøm: Plug the provided AC power adapter into the DC IN jack on the back of the alarm clock, then plug the adapter into a standard wall outlet. The display will light up.
- Install Backup Battery: Open the battery compartment on the bottom of the unit. Insert the CR2032 battery (included) with the correct polarity (+/-). This battery retains time settings during a power outage, though the display will not be active and USB charging will not function without AC power.
Betjeningsvejledning
Indstilling af tid
- Tryk og hold på SÆT button on the back of the unit for approximately 3 seconds until the hour digits begin to flash.
- Brug UP or NED buttons to adjust the hour. Pay attention to the AM/PM indicator if present.
- Tryk på SÆT Tryk på knappen igen for at bekræfte timetallet og gå videre til minutindstillingen. Minuttifrene blinker.
- Brug UP or NED knapper for at justere minutterne.
- Tryk på SÆT button one more time to confirm the minutes and exit time setting mode.
Setting Alarms (Alarm 1, Alarm 2, Alarm 3)
This device supports up to three independent alarms.
- Tryk gentagne gange på SÆT button (do not hold) until 'AL1' (Alarm 1) appears on the display and the hour digits flash.
- Brug UP or NED knapperne for at indstille den ønskede alarmtime.
- Trykke SÆT to confirm the hour and move to the minute setting.
- Brug UP or NED knapperne til at indstille de ønskede alarmminutter.
- Trykke SÆT to confirm the minutes. The display will show 'OFF' or 'ON'. Use UP or NED to toggle the alarm ON or OFF.
- Trykke SÆT to save Alarm 1 settings.
- Repeat steps 1-6 for 'AL2' (Alarm 2) and 'AL3' (Alarm 3) by pressing SÆT until the respective alarm indicator appears.
- To stop a sounding alarm, press any button. The alarm will reset for the next day.
Justering af displayets lysstyrke
The display has 4 levels of brightness.
- While the clock is displaying the time, repeatedly press the NED button to cycle through the 4 brightness levels (High, Medium, Low, Off). Select your preferred brightness.
Temperature Display (°F/°C)
The device displays the indoor temperature.
- For at skifte mellem Fahrenheit (°F) og Celsius (°C), tryk på UP button while the clock is displaying the time.
USB opladning
The integrated USB port allows you to charge compatible devices.
- Locate the USB charging port on the back of the unit.
- Connect your device's USB charging cable to the port.
- Connect the other end of the cable to your device. Charging will begin automatically.
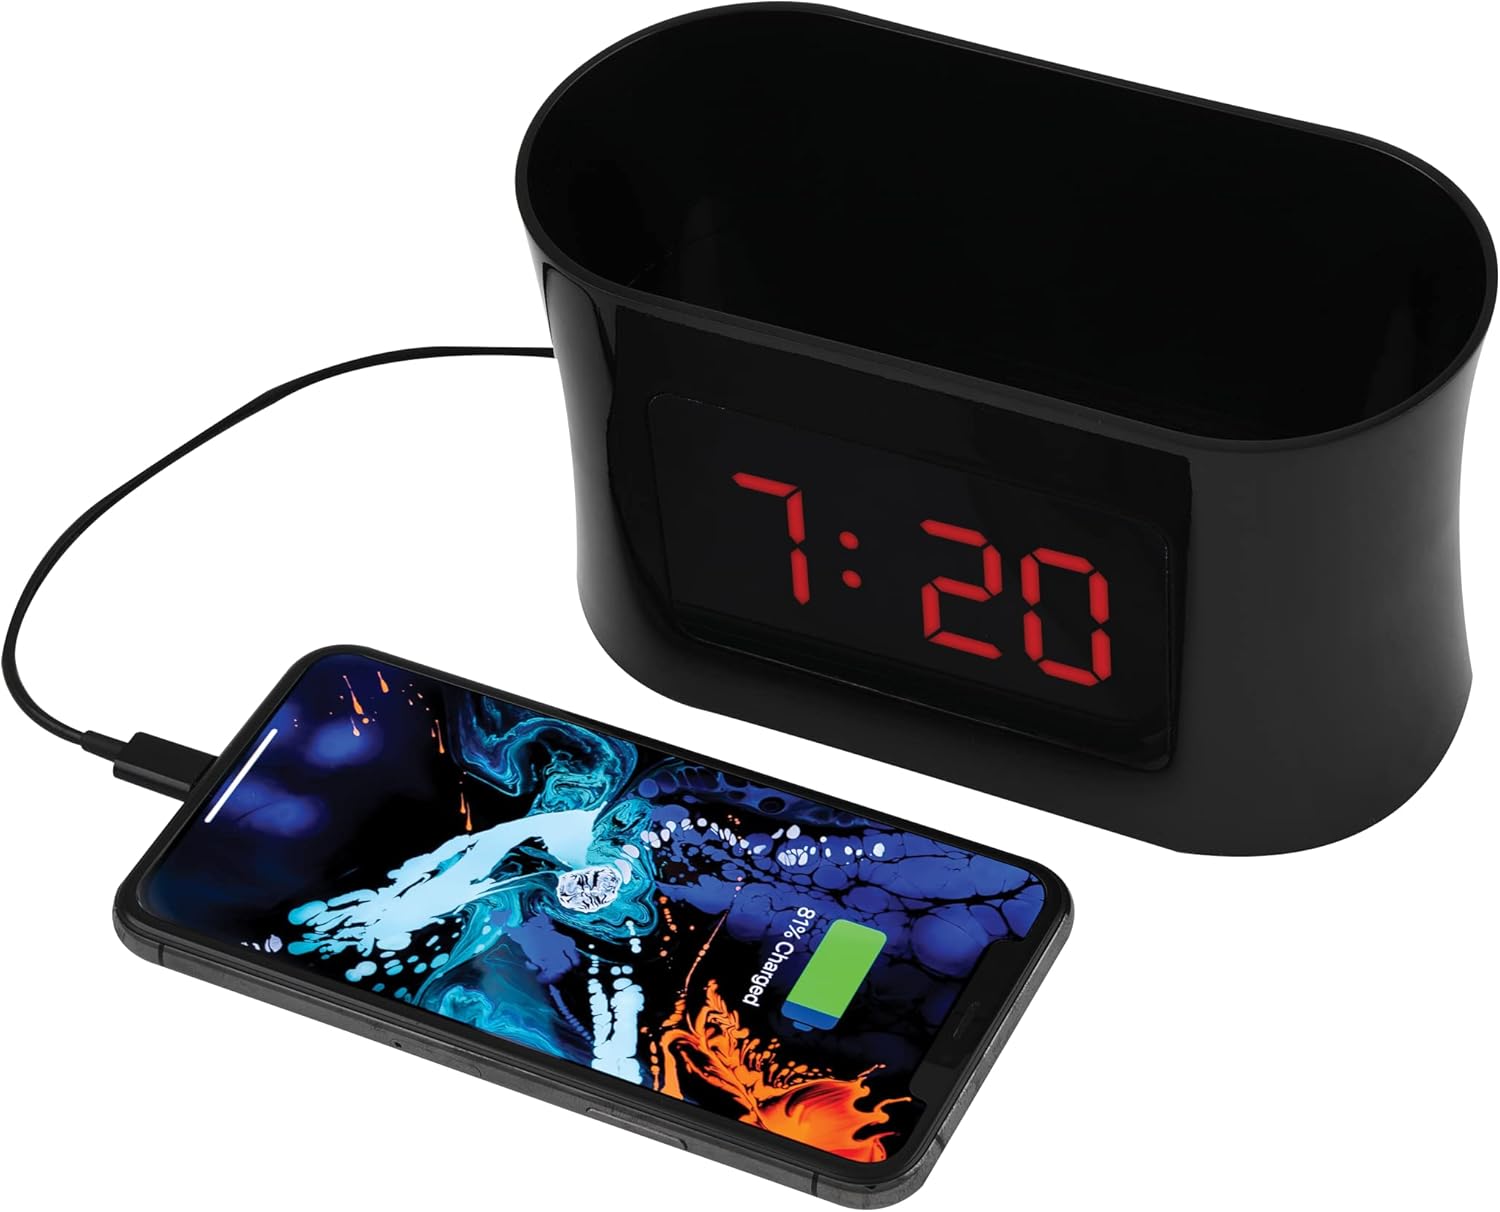
Figur 5: USB-opladning. This image shows a smartphone connected to the USB port of the alarm clock caddy, illustrating its charging capability.
Using the Storage Caddy
The top compartment serves as a convenient organizer for small items.
- Place items such as remote controls, eyeglasses, pens, or other small personal devices into the caddy.
- The interior floor is designed with a soft, non-scratch material to protect your belongings.
Opretholdelse
Pleje og rengøring
- Tag enheden ud af stikkontakten før rengøring.
- Tør de udvendige overflader af med en blød, tør klud.
- Brug ikke slibende rengøringsmidler, voks eller opløsningsmidler, da de kan beskadige finishen.
- Ensure no liquids enter the device's openings.
Fejlfinding
Refer to the table below for solutions to common issues.
| Problem | Løsning |
|---|---|
| Display is blank during a power outage. | The battery backup retains time settings but does not power the display or USB charging port. These functions resume when AC power is restored. |
| Difficulty setting time or alarms. | Sørg for at trykke og holde nede SÆT button for 3 seconds to enter time setting mode, or pressing it repeatedly to cycle through alarm settings. Use UP/NED buttons to adjust values. Refer to the 'Operating Instructions' section for detailed steps. |
| USB-opladning virker ikke. | Verify the AC power adapter is securely plugged into both the clock and a working wall outlet. Ensure your device's charging cable is fully inserted into both the clock's USB port and your device. Confirm your device is compatible with 5V/2A charging. |
| Temperature display is incorrect or not showing. | Ensure the device is in a stable indoor environment. If the issue persists, try unplugging and re-plugging the AC adapter to reset the unit. |
Specifikationer
| Feature | Detalje |
|---|---|
| Mærke | RCA |
| Model | RCDC45 |
| Display Type | Digital LED (rød) |
| Skærmstørrelse | 1-inch tall / 3.25-inch diagonal |
| Lysstyrkekontrol | 4 niveauer |
| USB-opladningsport | 5V/2A |
| Alarmer | 3 separate alarms |
| Temperatur display | Indoor (°F/°C) |
| Strømkilde | Strømforsyning |
| Batteri backup | CR2032 (inkluderet) |
| Farve | Sort |
| Fabrikant | Voxx International, Inc |

Figur 6: Produktmål. This image provides the approximate dimensions of the alarm clock caddy, indicating a length of 15.9 cm and a height of 9 cm.
Garanti og support
This RCA product is covered by a limited manufacturer's warranty. For specific warranty terms and conditions, please refer to the documentation included with your purchase or contact RCA customer support.
For technical assistance or customer service inquiries, please visit the official RCA website or contact their support line. Contact details are typically found on the product packaging or the manufacturer's webwebsted.


