1. Introduktion
The XTAR VC4 Plus is an advanced four-bay universal battery charger designed for a wide range of rechargeable batteries. It features a smart LCD display, QC3.0 fast charging input, and multiple operating modes including charging, grading, and storing. This manual provides detailed instructions for safe and efficient use of your VC4 Plus charger.

Image 1.1: The XTAR VC4 Plus charger, including the main unit, USB-C cable, and power adapter.
2. Sikkerhedsoplysninger
Læs og forstå alle sikkerhedsinstruktioner, før du bruger opladeren. Manglende overholdelse af disse instruktioner kan resultere i elektrisk stød, brand eller alvorlig personskade.
- Use the charger only for rechargeable batteries specified in this manual.
- Oplad ikke ikke-genopladelige batterier.
- Opladeren må ikke skilles ad, ændres eller kortsluttes.
- Hold opladeren væk fra vand, fugt og høje temperaturer.
- Sørg for korrekt ventilation under opladning.
- Supervise charging and remove batteries once fully charged.
- Opbevares utilgængeligt for børn.
- The charger is equipped with multiple protection features including over-current, over-voltage, over-charge, short-circuit, and over-heat protection.

Image 2.1: The XTAR VC4 Plus incorporates multiple safety protection mechanisms.
3. Pakkens indhold
Bekræft at alle varer er til stede i pakken:
- XTAR VC4 Plus Battery Charger
- USB Type-C-kabel
- QC3.0 strømadapter
- Brugermanual
- Opbevaringspose

Image 3.1: Contents of the XTAR VC4 Plus package.
4. Produktet er slutview
Familiarize yourself with the components of the XTAR VC4 Plus charger:
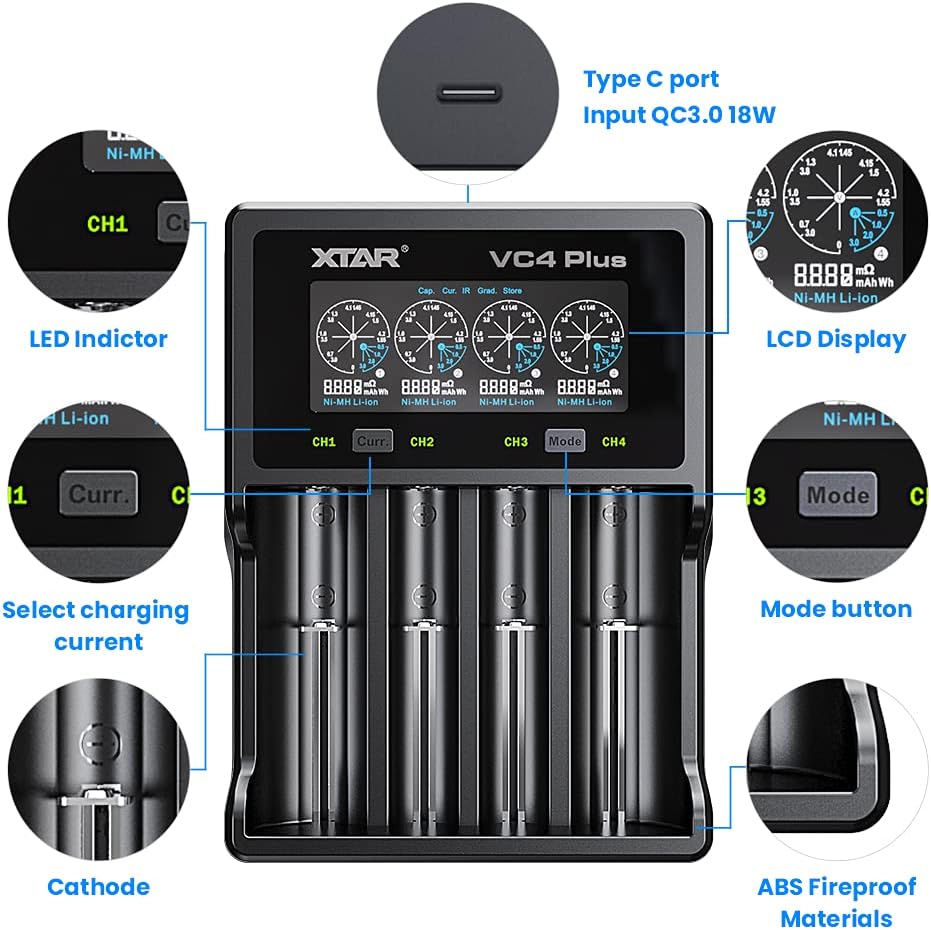
Image 4.1: Key components and features of the XTAR VC4 Plus charger.
- Charging Bays (CH1-CH4): Four independent slots for batteries.
- LCD-skærm: Shows real-time charging status, battery information, and selected mode.
- 'Curr' Button: Selects the charging current for the active channel.
- 'Mode' Button: Cycles through different operating modes (Charging, Grading, Storing).
- Type-C Input Port: For connecting the power adapter. Supports QC3.0 for faster input.
- LED-indikatorer: Provide quick visual status for each channel.
5. Opsætning
- Tilslut strøm: Insert the USB Type-C cable into the charger's Type-C input port and connect the other end to the QC3.0 power adapter. Plug the power adapter into a suitable wall outlet. The LCD display will illuminate.
- Første visning: Upon power-on, the charger will perform a self-test, and the LCD will show initial information.
6. Betjeningsvejledning
6.1 Kompatible batterityper
The XTAR VC4 Plus supports a wide range of 3.6V/3.7V Li-ion/IMR/INR/ICR batteries and 1.2V Ni-MH/Ni-CD batteries. It can charge different types simultaneously.
- Li-ion/IMR/INR/ICR (3.6V/3.7V): 10440, 14500, 14650, 16340, 17335, 17500, 17670, 18350, 18490, 18500, 18650, 18700, 20700, 21700, 22650, 25500, 26650.
- Ni-MH/Ni-CD (1.2V): AAAA, AAA, AA, A, SC, C, D.
- Note: The charger can accommodate 4 protected 20700/21700 batteries simultaneously.

Image 6.1.1: The charger's compatibility with various Lithium-ion and Ni-MH/Ni-CD battery sizes.
6.2 Isætning af batterier
Carefully insert one or more rechargeable batteries into the charging bays, ensuring the correct polarity (+ and - ends match the markings in the bay). The charger will automatically detect the battery type and begin charging in the default mode.
6.3 Forståelse af LCD-skærmen
The LCD provides detailed information for each channel:

Image 6.3.1: Explanation of the XTAR VC4 Plus LCD display elements.
- Batteritype: Displays 'Li-ion' or 'Ni-MH'.
- Internal Resistance (mΩ): Indicates the battery's internal resistance.
- Charged Capacity (mAh/Wh): Shows the amount of charge delivered to the battery.
- Voltage (V): Nuværende voltage af batteriet.
- Nuværende (A): Current charging ampslette.
6.4 Selecting Charging Current
The charger automatically selects an appropriate charging current. To manually adjust the current for a specific channel:
- Indsæt batteriet.
- Press the 'Curr' button (CH1/CH2 or CH3/CH4) corresponding to the desired channel.
- Repeatedly press the 'Curr' button to cycle through available current options (e.g., 0.5A, 1.0A, 2.0A, 3.0A). The selection will apply to the active channel.

Image 6.4.1: Press the 'Curr' button to adjust the charging current.
6.5 Operating Modes (Charging, Grading, Storing)
The VC4 Plus offers three main operating modes. To switch between modes:
- Indsæt batteriet.
- Press the 'Mode' button (CH3/CH4) to cycle through the modes for the active channel.
- For some modes, a long press of the 'Mode' button may be required to confirm selection or initiate a process.

Billede 6.5.1: Overview of the three operating modes: Charging, Grading, and Storing.
6.5.1 Opladningstilstand
This is the default mode for recharging batteries. The charger will automatically detect the battery type and apply an appropriate charging current. The LCD will display real-time charging progress.

Image 6.5.1.1: The charger display indicating Charging Mode.
6.5.2 Grading Mode
Grading mode is used to determine the actual capacity of a battery. The charger will fully charge the battery, then discharge it to a safe level while measuring the discharged capacity, and finally recharge it. This process provides an accurate capacity reading.

Image 6.5.2.1: The charger display indicating Grading Mode.
6.5.3 Storing Mode
Storing mode is designed to prepare batteries for long-term storage by charging or discharging them to an optimal voltage level (typically around 3.7V for Li-ion). This helps to prolong battery lifespan and maintain performance.

Image 6.5.3.1: The charger display indicating Storing Mode.
7. Specifikationer
| Feature | Specifikation |
|---|---|
| Modelnummer | VC4 PLUS |
| Input bindtage | 240 volt (vekselstrømsadapter) |
| Indgangsstrøm | QC3.0 max 3A |
| Charging Bays | 4 independent bays |
| Compatible Li-ion Batteries | 3.6V/3.7V IMR/INR/ICR: 10440, 14500, 14650, 16340, 17335, 17500, 17670, 18350, 18490, 18500, 18650, 18700, 20700, 21700, 22650, 25500, 26650 |
| Compatible Ni-MH/Ni-CD Batteries | 1.2V: AAAA, AAA, AA, A, SC, C, D |
| Vise | Smart LCD |
| Pakkedimensioner | 8.58 x 5 x 1.61 tommer |
| Varens vægt | 14.9 ounce |
| Fabrikant | XTAR |
8. Vedligeholdelse
- Rensning: Frakobl opladeren fra strømmen før rengøring. Brug en blød, tør klud til at tørre overfladen af opladeren af. Brug ikke slibende rengøringsmidler eller opløsningsmidler.
- Opbevaring: Når den ikke er i brug, skal du opbevare opladeren på et køligt, tørt sted væk fra direkte sollys og ekstreme temperaturer.
- Batterikontakter: Periodically check the battery contacts for any debris or corrosion. Clean gently if necessary.
9. Fejlfinding
- Opladeren tænder ikke:
- Ensure the USB Type-C cable is securely connected to both the charger and the power adapter.
- Verify that the power adapter is properly plugged into a working wall outlet.
- Try using a different USB Type-C cable or power adapter if available.
- Batteri oplades ikke:
- Kontroller, at batteriet er isat med korrekt polaritet.
- Ensure the battery is a compatible rechargeable type.
- Clean the battery contacts and charger contacts if they appear dirty.
- The battery might be over-discharged or damaged. Try a different battery.
- LCD display error:
- Tag batteriet ud og sæt det i igen.
- Disconnect and reconnect the power to reset the charger.
- Langsom opladning:
- Ensure you are using the provided QC3.0 power adapter for optimal charging speed.
- Check the selected charging current for the channel and adjust if necessary (refer to Section 6.4).
10. Garanti og support
XTAR products are manufactured to high-quality standards. For warranty information or technical support, please refer to the warranty card included in your package or visit the official XTAR webwebsted. Gem venligst din købsbevis til garantikrav.


