1. Introduktion
Welcome to your iHome Compact Alarm Clock. This manual provides comprehensive instructions for setting up, operating, and maintaining your device. For optimal performance, please read this manual thoroughly.
Nøglefunktioner
- Large 1.4-inch backlit LCD display for clear visibility.
- Compact design, ideal for nightstands or desks.
- Built-in USB port for charging mobile devices.
- Displays temperature and humidity (Fahrenheit/Celsius).
- Loud and distinctive alarm sound.
2. Pakkens indhold
Hvad er der i æsken
- iHome Compact Alarm Clock
- AC strømadapter
- Brugervejledning (dette dokument)
3. Produktet er slutview
Kontrol og visning
Familiarize yourself with the buttons and display elements of your iHome Compact Alarm Clock.
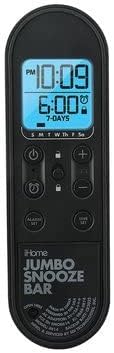
Billedbeskrivelse: This image displays the control panel of the iHome Compact Alarm Clock. It features a large digital display showing the current time (e.g., 10:09 PM) and the alarm time (e.g., 6:00 AM, 7-DAYS). Below the display are various control buttons: a Power button (circle with vertical line), a Lock button (padlock icon), Plus (+) and Minus (-) buttons for adjustments, an Alarm Set button (bell icon), and a Time Set button (clock icon). The bottom part of the panel has 'iHome JUMBO SNOOZE BAR' printed on it, indicating a large area for the snooze function.
Vis elementer
- Aktuel tid: Displays the hour and minute.
- PM-indikator: Lights up when the time is PM.
- Alarmtid: Shows the set alarm time.
- Alarmindikator: A bell icon indicates the alarm is active.
- Dagindikatorer: S M T W Th F Sa for active alarm days.
- Temperatur/fugtighed: Displays current environmental readings.
Kontrolknapper
- ⏻ (Power Button): Tænder eller slukker for enheden.
- 🔒 (Lock Button): Locks/unlocks controls to prevent accidental changes.
- + / - Knapper: Adjusts time, alarm, or settings.
- ⏰ (Alarm Set Button): Går i alarmindstillingstilstand.
- ⏱ (Time Set Button): Går i tidsindstillingstilstand.
- JUMBO SNOOZE BAR: Aktiverer snooze-funktionen, når alarmen lyder.
4. Opsætning
Strømforsyning til dit ur
- Connect the AC power adapter to the DC jack on the back of the clock.
- Sæt adapteren i en almindelig stikkontakt.
- The display will light up, indicating the clock is powered.
Indledende tidsindstilling
- Tryk og hold på ⏱ (Time Set) knappen, indtil tidsvisningen blinker.
- Brug + or - knapperne til at justere timetallet. Vær opmærksom på PM-indikatoren.
- Tryk på ⏱ (Time Set) button again to confirm the hour and move to minutes.
- Brug + or - knapper for at justere minutterne.
- Tryk på ⏱ (Time Set) button one last time to save the time and exit setting mode.
5. Betjeningsvejledning
Indstilling af alarm
- Tryk og hold på ⏰ (Alarm Set) knappen, indtil alarmtidsdisplayet blinker.
- Brug + or - knapperne til at justere alarmens time. Observer PM-indikatoren.
- Tryk på ⏰ (Alarm Set) button again to confirm the hour and move to minutes.
- Brug + or - knapper til at justere alarmens minutter.
- Tryk på ⏰ (Alarm Set) button again to select the alarm days (e.g., 7-DAYS, weekdays, weekends). Use + or - for at gennemgå mulighederne.
- Tryk på ⏰ (Alarm Set) button one last time to save the alarm settings and exit. The alarm icon will appear on the display.
Snooze funktion
Når alarmen lyder, skal du trykke på JUMBO SNOOZE BAR to temporarily silence the alarm. The alarm will sound again after a few minutes (default snooze duration).
Deaktivering af alarmen
For at slukke alarmen helt, tryk på ⏰ (Alarm Set) button once when the alarm is not sounding. The alarm icon will disappear from the display.
Brug af USB-opladningsporten
Connect your USB charging cable (not included) to the USB port located on the back or side of the clock. Plug the other end into your device (e.g., smartphone, tablet) to begin charging. The clock must be powered on for the USB port to function.
Visning af temperatur og fugtighed
The clock automatically displays the current room temperature and humidity. The unit of temperature (Fahrenheit or Celsius) can typically be switched by a dedicated button or a combination of buttons (refer to specific model instructions if not immediately apparent).
6. Vedligeholdelse
Rensning
To clean your clock, use a soft, dry cloth. Do not use liquid cleaners or abrasive materials, as they may damage the finish or electronic components.
Batteri backup
While the clock is primarily powered by AC, some models may include a battery compartment for backup power during outages. If your model supports this, insert the recommended batteries (e.g., 2 x AAA, not included) into the compartment, observing polarity. This will preserve time settings during a power interruption.
7. Fejlfinding
Fælles problemer og løsninger
| Problem | Løsning |
|---|---|
| Urdisplayet er tomt. | Ensure the AC power adapter is securely connected to the clock and a working wall outlet. Check if the power button is pressed. |
| Alarmen lyder ikke. | Verify the alarm is set and the alarm icon is visible on the display. Check the alarm volume setting if available. |
| USB-porten oplader ikke enheder. | Ensure the clock is powered on. Try a different USB cable or device to rule out cable/device issues. |
| Knapperne reagerer ikke. | Check if the Lock button (padlock icon) is active. Press it to unlock the controls. |
8. Specifikationer
Produktspecifikationer
| Feature | Detalje |
|---|---|
| Mærke | iHome |
| Model | Kompakt vækkeur |
| Display Type | Digital, baggrundsbelyst LCD |
| Strømkilde | Corded Electric (Battery Powered for backup, if applicable) |
| Særlige funktioner | Alarm, USB Charging Port, Temperature/Humidity Display |
| Produktdimensioner | 3.5 cm B x 3.5 cm H |
| Materiale | Acrylonitril-butadienstyren |
| UPC | 656942513698 |
| ASIN | B09MMFCP5R |
9. Garanti og support
Garantioplysninger
This iHome Compact Alarm Clock comes with a 90-day limited warranty. Please retain your proof of purchase for warranty claims.
Kundesupport
For technical assistance or further inquiries, please visit the official iHome webwebsted eller kontakt deres kundesupport.


