1. Introduktion
This manual provides detailed instructions for the safe and effective operation of your POCOCO DJ Disco Stage Party Light. This versatile lighting unit features a combination of laser and LED effects, sound activation, and multiple operating modes, suitable for various indoor and outdoor entertainment settings. It is powered by a built-in rechargeable battery or via USB.

Figure 1.1: POCOCO Disco Light highlighting its battery and USB power capabilities, along with key features such as 60 patterns, remote control, sound control, built-in battery, USB charging, and timer function.
2. Sikkerhedsoplysninger
Læs alle sikkerhedsadvarsler og instruktioner omhyggeligt, inden du bruger dette produkt. Manglende overholdelse af disse instruktioner kan resultere i elektrisk stød, brand eller alvorlig personskade.
- This product contains a laser. DO NOT LOOK DIRECTLY INTO THE LASER APERTURE. Direct exposure to the laser beam may cause eye damage.
- Keep the device away from water, moisture, and high humidity.
- Do not operate the device if it has been damaged or dropped.
- Sørg for tilstrækkelig ventilation. Bloker ikke ventilationsåbningerne.
- Use only the provided USB cable and a compatible 5V power adapter for charging.
- Holde utilgængeligt for børn. Dette er ikke et legetøj.
- Forsøg ikke at skille enheden ad eller ændre den. Overlad al service til kvalificeret personale.
- Undgå at udsætte enheden for ekstreme temperaturer eller direkte sollys i længere perioder.
3. Pakkens indhold
Bekræft, at alle nedenstående varer er inkluderet i din pakke:
- POCOCO DJ Disco Stage Party Light (DQ-R50)
- Fjernbetjening
- USB opladningskabel
- Monteringsbeslag
- Monteringsskruer (2)
- Brugervejledning (dette dokument)

Figure 3.1: The POCOCO Disco Light unit and its accompanying remote control.
4. Produktet er slutview
Familiarize yourself with the components of your POCOCO Disco Stage Party Light and its remote control.
4.1 Enhedskomponenter

Figure 4.1: Labeled diagram of the POCOCO Disco Light, indicating the LED light, remote sensor, play mode indicator, red laser light, green laser light, cooling fan, sound active sensor, DC 5V power input, and power switch.
- LED lys: Projects various patterns and colors.
- Remote Sensor (IR): Modtager signaler fra fjernbetjeningen.
- Play Mode Indicator: Viser den aktuelle driftstilstand.
- Rødt laserlys: Projects red laser patterns.
- Green Laser Light: Projects green laser patterns.
- Køleventilator: Afleder varme under drift.
- Sound Active Sensor (MIC): Detects ambient sound for sound-activated mode.
- Strømindgang (DC 5V): Tilsluttes USB-opladerkablet.
- Tænd/sluk-knap (tænd/sluk): Tænder eller slukker for enheden.
4.2 Fjernbetjeningsfunktioner
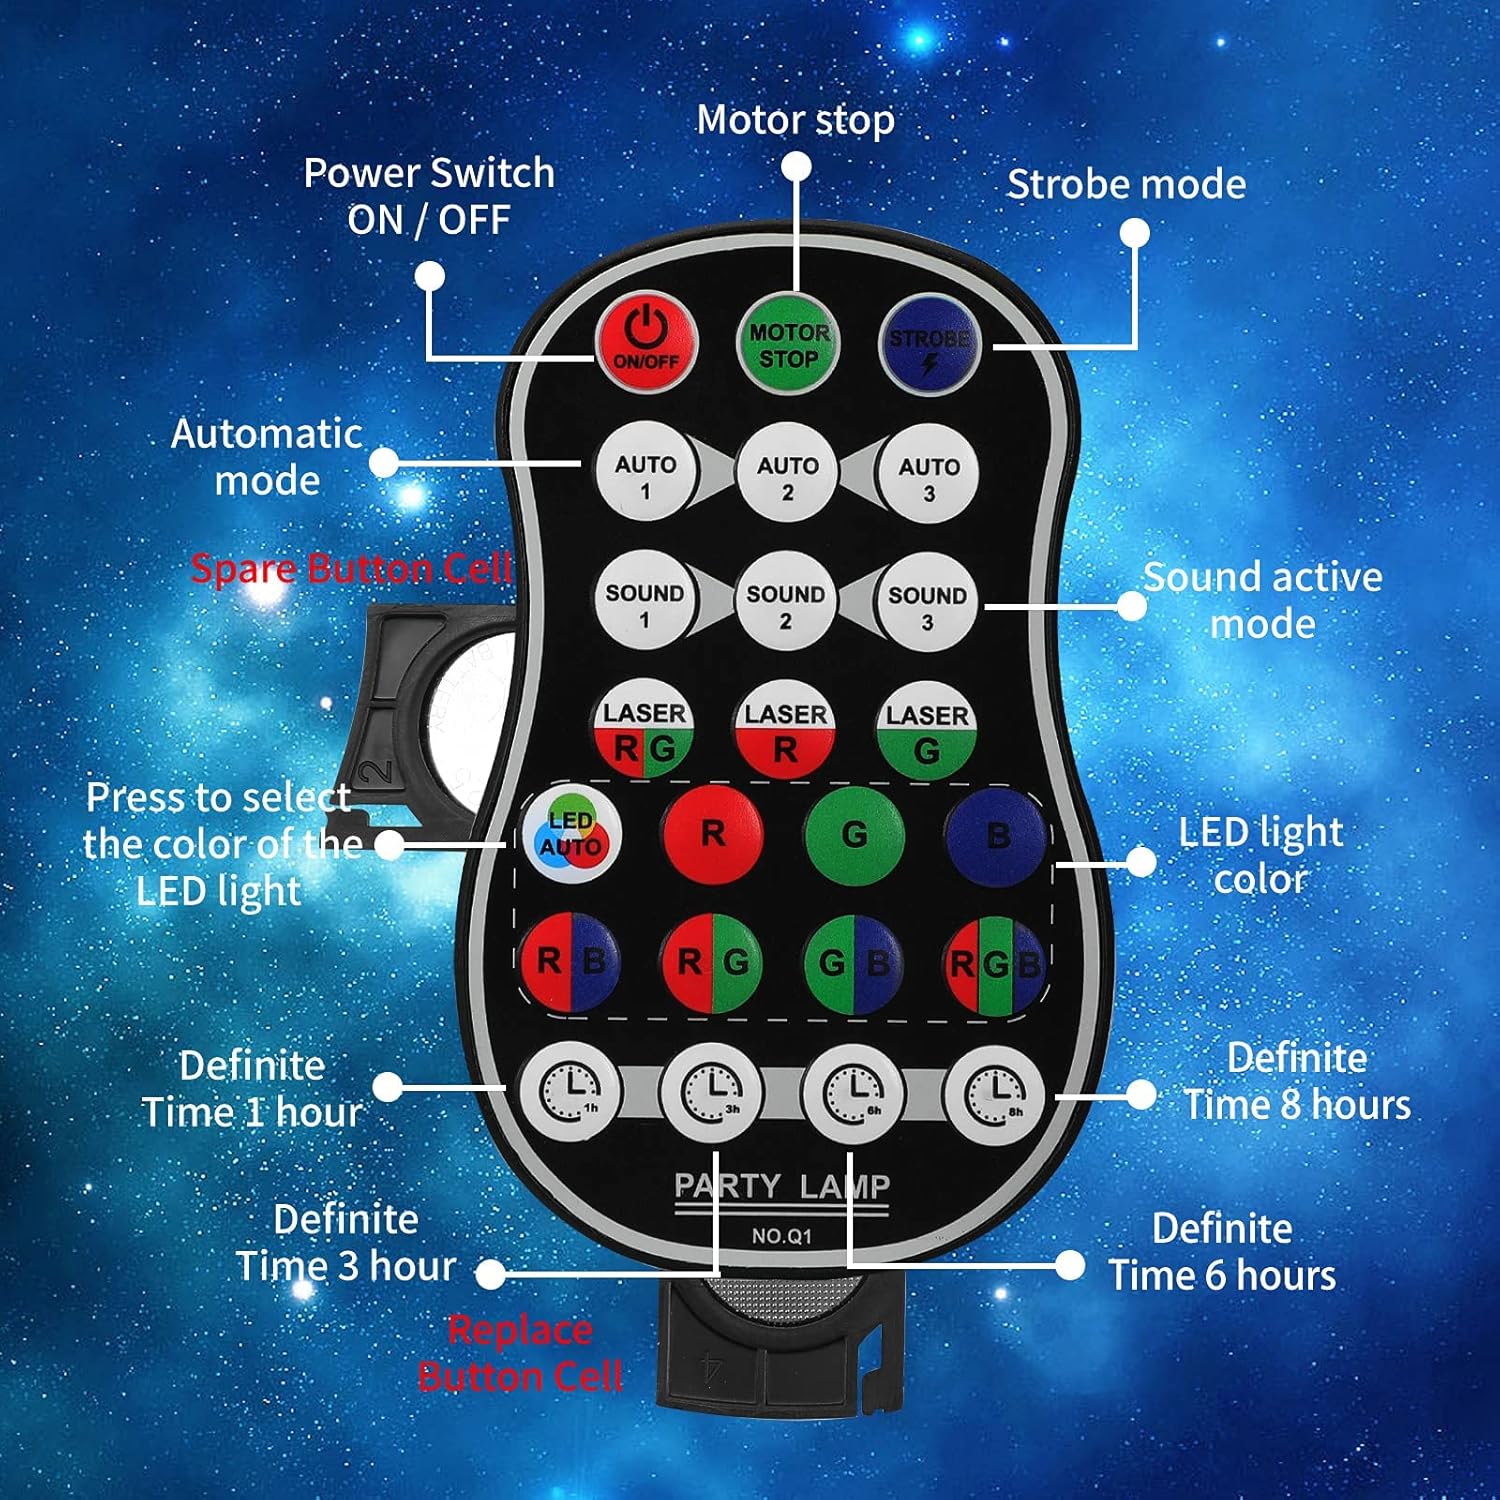
Figure 4.2: Labeled diagram of the remote control, showing buttons for Power ON/OFF, Motor Stop, Strobe Mode, Automatic Modes (Auto 1, 2, 3), Sound Active Modes (Sound 1, 2, 3), Laser Color Selection (RG, R, G), LED Light Color Selection (LED Auto, R, G, B, RB, RG, GB, RGB), and Definite Time settings (1h, 3h, 6h, 8h).
- TIL/FRA: Afbryderen.
- MOTOR STOP: Stops the motor movement of patterns.
- STROBE: Activates strobe effect.
- AUTO 1/2/3: Selects different automatic light color and pattern change modes.
- LYD 1/2/3: Activates sound-controlled modes with varying sensitivities.
- LASER RG/R/G: Selects laser color combinations (Red & Green, Red only, Green only).
- LED AUTO/R/G/B/RB/RG/GB/RGB: Selects LED light colors or automatic color cycling.
- 1h/3h/6h/8h: Sets a timer for automatic shutdown after the selected duration.
5. Opsætning
5.1 Opladning af enheden
The device comes with a built-in 3000 mAh battery, providing up to 5 hours of operation on a full charge.
- Connect the small end of the provided USB charging cable to the DC 5V power input port on the back of the light.
- Connect the standard USB end of the cable to a USB power adapter (not included), a computer USB port, or a power bank.
- Opladningsindikatorlampen lyser under opladning og slukker, når den er fuldt opladet.
5.2 Monteringsmuligheder
The POCOCO Disco Light is designed for flexible placement, including on a table, on the ground, or mounted on a ceiling or wall.
- Table/Ground Placement: Simply place the unit on a flat, stable surface. Adjust the angle of the light using the integrated bracket.
- Loft/vægmontering: Use the provided mounting bracket and screws. Secure the bracket to the desired surface, then attach the light unit to the bracket. The bracket allows for 180-degree manual rotation to adjust the projection angle.
6. Betjeningsvejledning
After setup, use the remote control to operate the light.
- Tænd/sluk: Tryk på ON/OFF button on the remote control or use the physical switch on the device.
- Vælg driftstilstand:
- Automatisk tilstand: Trykke AUTO 1, AUTO 2, eller AUTO 3 for automatic color and pattern changes, creating a relaxed atmosphere.
- Strobetilstand: Tryk på STROBE button for rapid flashing effects.
- Lydkontroltilstand: Trykke LYD 1, LYD 2, eller LYD 3. The lights will change colors and patterns according to the rhythm of surrounding music or sounds.
- Adjust Laser Colors: Brug LASER RG, LASER R, eller LASER G buttons to select desired laser colors.
- Adjust LED Colors: Brug LED AUTO, R, G, B, RB, RG, GB, eller RGB buttons to select specific LED colors or automatic cycling.
- Stop Motor Movement: Tryk på MOTOR STOP button to pause the pattern movement while keeping the lights on.
- Indstil timer: Trykke 1h, 3h, 6h, eller 8h to set the light to automatically turn off after the specified time.
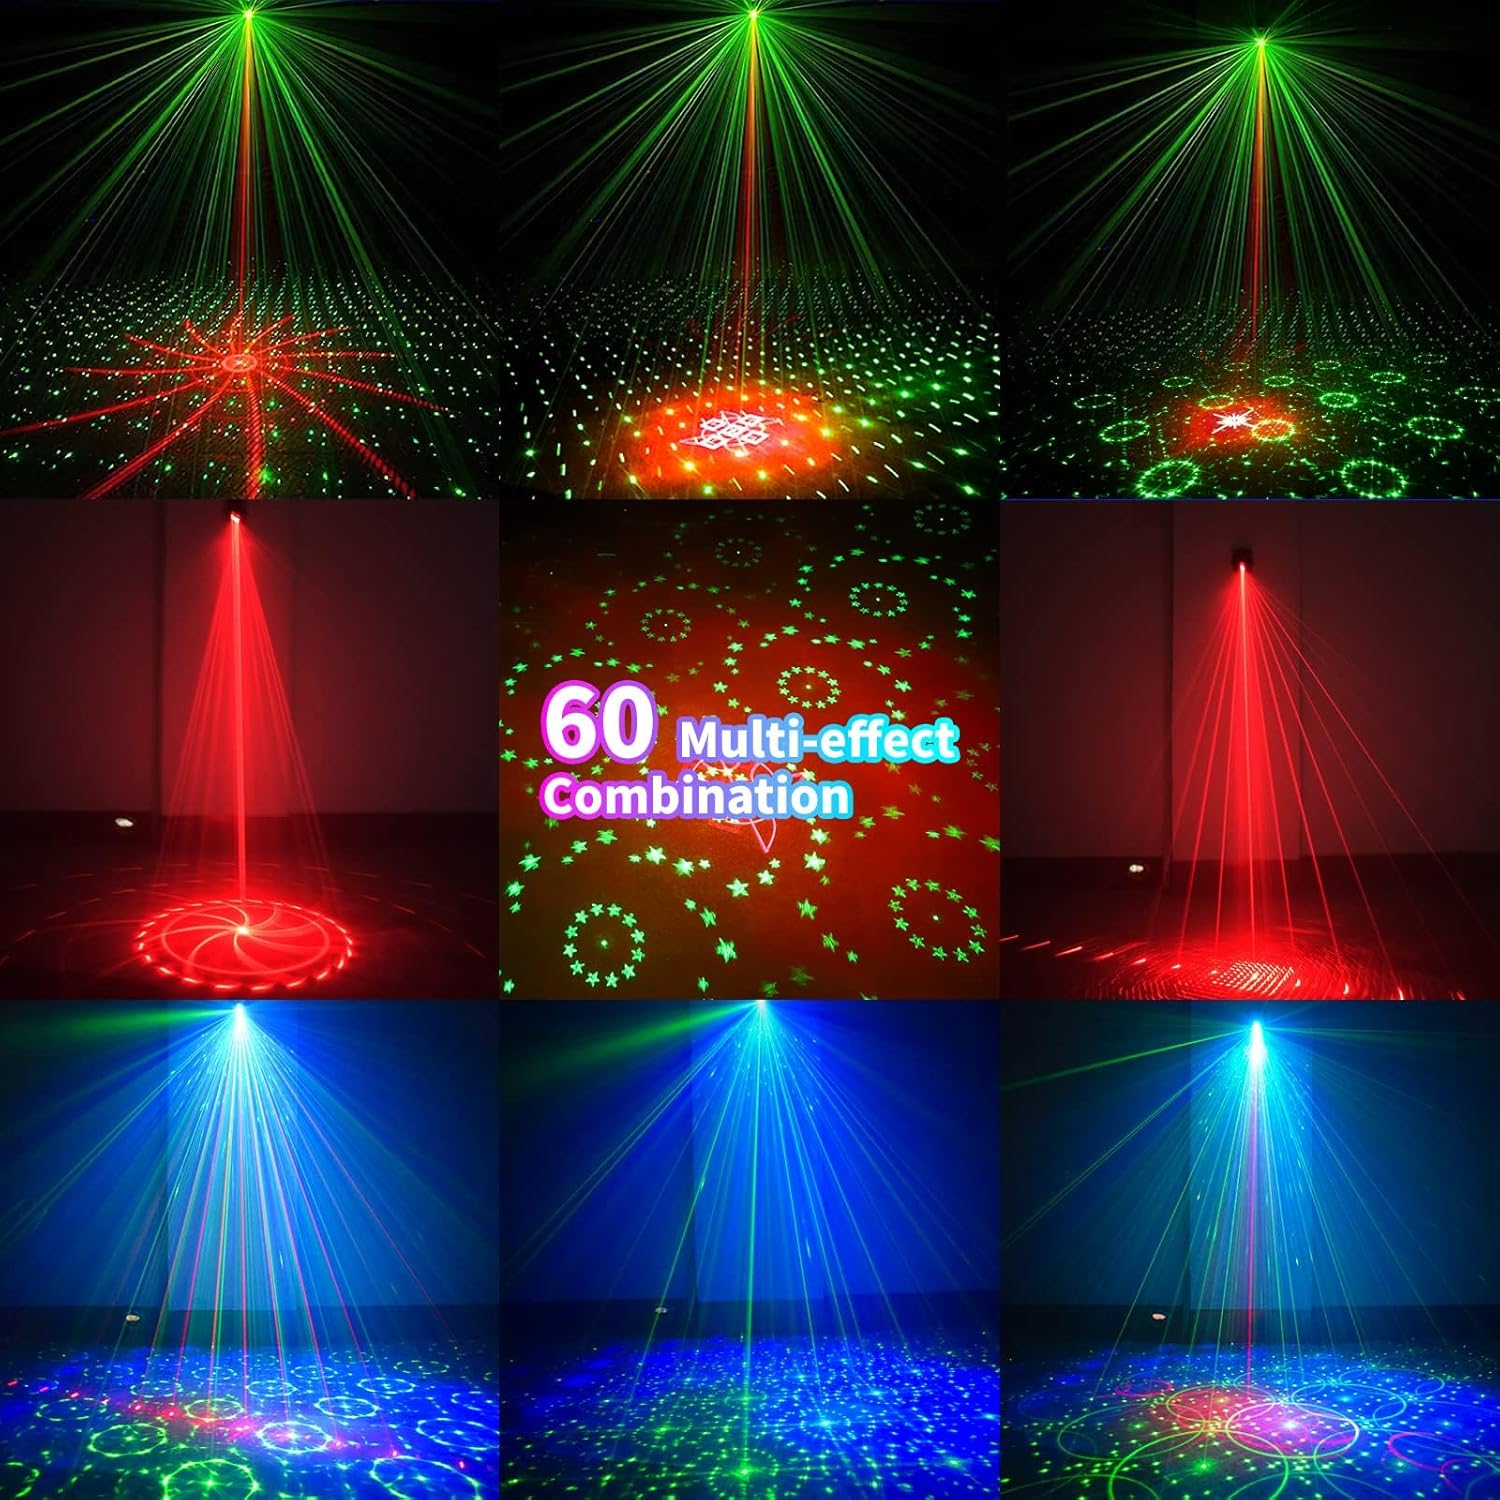
Figur 6.1: Eksamples of the 60 multi-effect combinations produced by the POCOCO Disco Light, showcasing various laser and LED patterns in different colors.
7. Vedligeholdelse
Korrekt vedligeholdelse sikrer din enheds levetid og optimale ydeevne.
- Rensning: Use a soft, dry cloth to clean the exterior of the device. Do not use abrasive cleaners or solvents. Ensure the laser aperture and LED lens are free of dust and smudges for clear projection.
- Opbevaring: Når enheden ikke er i brug i længere perioder, skal den opbevares køligt og tørt, væk fra direkte sollys og ekstreme temperaturer.
- Batteripleje: To maintain battery health, charge the device fully before long-term storage and recharge it every 3-6 months if not in regular use.
8. Fejlfinding
If you encounter issues with your POCOCO Disco Light, refer to the following common problems and solutions:
| Problem | Mulig årsag | Løsning |
|---|---|---|
| Enheden tændes ikke. | Batteriet er afladet. Afbryderen er slukket. Fjernbetjeningens batteri er dødt. | Oplad enheden med USB-kablet. Ensure the physical power switch is in the ON position. Udskift batteriet i fjernbetjeningen. |
| No laser or LED projection. | Lens is obstructed. Forkert tilstand valgt. | Clean the lens and aperture. Ensure a projection mode (Auto, Sound, Strobe) is active. |
| Sound control not working. | Microphone is obstructed. Ambient sound is too low. Forkert lydtilstand valgt. | Ensure the microphone opening is clear. Increase the volume of the music or sound source. Try different SOUND modes (SOUND 1, 2, 3). |
| Fjernbetjeningen reagerer ikke. | Fjernbetjeningens batteri er dødt. Obstruction between remote and sensor. Fjernbetjeningen er for langt fra enheden. | Udskift fjernbetjeningens batteri. Ensure a clear line of sight to the IR sensor on the device. Gå tættere på enheden. |
| Patterns are static (not moving). | MOTOR STOP button pressed. | Press the MOTOR STOP button again to resume movement. |
If the problem persists after trying these solutions, please contact POCOCO customer support.
9. Specifikationer
| Feature | Specifikation |
|---|---|
| Modelnummer | DQ-R50 |
| Dimensioner (L x B x H) | 2.91" x 2.79" x 2.83" (7.39 cm x 7.09 cm x 7.19 cm) |
| Varens vægt | 13.1 ounce (371 gram) |
| Strømkilde | Battery Powered (Built-in Lithium Ion) / USB Powered |
| Batterikapacitet | 3000 mAh |
| Operation Voltage | 5 volt |
| Lyskildetype | Light Emitting Diode (LED) / Laser |
| Materiale | Aluminiumslegering |
| Kontrolmetode | Remote Control / Sound Activated |
| Farve | Sort |
| UPC | 704078007977 |
10. Garanti og support
For warranty information and customer support, please refer to the documentation provided at the time of purchase or contact the seller directly. You can also visit the official POCOCO store for more information:


