Indledning
This manual provides essential instructions for the safe and effective operation, setup, maintenance, and troubleshooting of your ESAB EMP 210 Multi-Process Welder. Please read this manual thoroughly before using the equipment to ensure proper function and safety.

Figur 1: The ESAB EMP 210 Multi-Process Welder shown with its complete set of accessories, including MIG gun, TIG torch, electrode holder, ground clamp, gas regulator, and welding wire spool. This image illustrates the comprehensive package provided for various welding applications.
Sikkerhedsforanstaltninger
Always prioritize safety when operating welding equipment. Failure to follow safety guidelines can result in serious injury or death. Refer to relevant safety standards and regulations in your region.
- Bær passende personlige værnemidler (PPE), herunder svejsehjelm, handsker, beskyttelsestøj og sikkerhedssko.
- Sørg for tilstrækkelig ventilation for at undgå indånding af svejserøg.
- Beskyt tilskuere mod lysbuer og gnister.
- Never weld near flammable materials.
- Ensure proper grounding of the welding machine.
- Afbryd strømmen, før du udfører vedligeholdelse eller udskifter forbrugsvarer.
Opsætning
1. Udpakning og inspektion
Tag forsigtigt svejsemaskinen og alt tilbehør ud af emballagen. Undersøg for eventuelle forsendelsesskader. Rapporter eventuelle skader til din leverandør med det samme.
2. Strømtilslutning
The ESAB EMP 210 operates on both 120V and 230V AC power. The machine automatically detects the input voltage. Ensure the power source is properly rated for the welder's requirements.
- 120V drift: Use a dedicated 20A circuit.
- 230V drift: Use a dedicated 30A circuit.
3. Gas Connection (MIG/TIG)
For MIG and TIG welding, connect the appropriate shielding gas cylinder (e.g., Argon, C25) to the regulator provided. Attach the gas hose from the regulator to the gas inlet on the rear of the welder.
4. Welding Lead Connections
Tilslut jorden clamp to the appropriate terminal on the welder and secure it to the workpiece. Connect the MIG gun, TIG torch, or electrode holder to their respective terminals as required for the chosen welding process.

Figur 2: En top-down view of the ESAB EMP 210 welder, highlighting its compact design and integrated handle for portability. This perspective shows the overall form factor of the unit, which is designed for easy transport and setup.
Betjeningsvejledning
The ESAB EMP 210 offers MIG, Stick (MMA), and TIG (Lift TIG) welding capabilities. Select the desired process using the control panel.
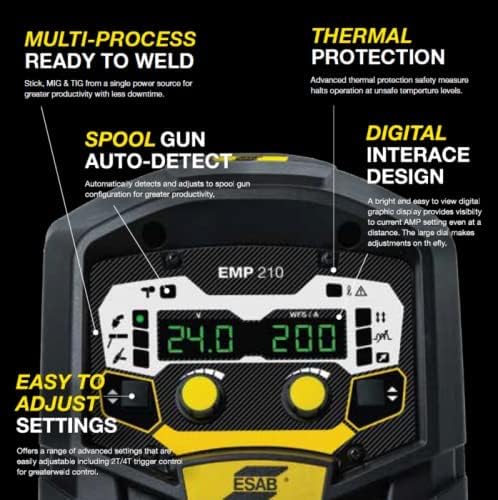
Figur 3: Detaljeret view of the ESAB EMP 210's digital control panel. This image shows the clear display for voltage og amperage, along with the intuitive adjustment knobs and process selection buttons, emphasizing the "Digital Interface Design" and "Easy to Adjust Settings" features.
1. Kontrolpanel overview
The digital interface allows for precise control over welding parameters. Use the large dial and buttons to navigate menus and adjust settings such as amperage, bindtage og trådfremføringshastighed.
2. MIG Welding (GMAW)
- Install the appropriate welding wire spool and feed it through the MIG gun.
- Select MIG mode on the control panel.
- Juster voltage and wire feed speed according to the material thickness and wire type.
- Ensure gas flow is set correctly (typically 15-25 CFH for solid wire).
3. Stick Welding (MMA/SMAW)
- Tilslut elektrodeholderen og jordforbindelsenamp.
- Select Stick mode.
- Sæt den passende elektrode i holderen.
- Tilpasse amperage based on electrode type and diameter.
4. TIG Welding (GTAW - Lift TIG)
- Tilslut TIG-brænderen og jordforbindelsenamp.
- Vælg TIG-tilstand.
- Ensure pure argon shielding gas is connected and flowing.
- Tilpasse amperage for the material and tungsten electrode size.
- Initiate arc using the Lift TIG method.

Figur 4: An individual performing welding operations with the ESAB EMP 210 Multi-Process Welder. The welder is visible in the background, and the operator is focused on the workpiece, demonstrating the machine in an active work environment.
Opretholdelse
Regular maintenance ensures the longevity and optimal performance of your ESAB EMP 210 welder.
- Daglig: Clean the MIG gun nozzle, contact tip, and diffuser. Check ground clamp og kabelforbindelser.
- Ugentligt/Månedligt: Inspect all cables for damage. Clean the wire feed mechanism. Check gas hose for leaks.
- Periodisk: Use compressed air to blow dust and debris from inside the machine (ensure power is disconnected). Inspect cooling fan for obstructions.
- Replace worn consumables (contact tips, nozzles, electrodes, tungsten) as needed.
Fejlfinding
Refer to the following table for common issues and their potential solutions. If a problem persists, contact ESAB customer support.
| Problem | Mulig årsag | Løsning |
|---|---|---|
| Ingen bue | No power, poor ground connection, incorrect settings, faulty torch/electrode holder. | Check power supply, ensure solid ground, verify settings, inspect connections. |
| Dårlig svejsekvalitet | Incorrect settings, contaminated material, improper technique, worn consumables. | Juster parametre, rengør emnet, genindførview technique, replace consumables. |
| Wire Feeding Issues (MIG) | Incorrect tension, clogged liner, wrong contact tip, tangled wire. | Adjust drive roll tension, clean/replace liner, use correct contact tip, untangle wire. |
| Overheating (Thermal Protection) | Exceeding duty cycle, poor ventilation. | Allow machine to cool, ensure adequate airflow around the unit. |
Specifikationer
| Feature | Detalje |
|---|---|
| Mærke | ESAB |
| Modelnummer | 0324-0075 (EMP 210) |
| Input bindtage | 120V / 230V DC (Auto-sensing) |
| Svejseprocesser | MIG (GMAW), Stick (MMA/SMAW), TIG (GTAW - Lift TIG) |
| Maks. Udgangsstrøm | 200A |
| Varens vægt | 43 pund |
| Produktdimensioner | 23 x 18.5 x 18 tommer |
| Dato først tilgængelig | 28. oktober 2021 |
Garanti og support
Garantioplysninger
For detailed warranty terms and conditions, please refer to the official ESAB warranty statement included with your product or visit the official ESAB webGarantidækningen omfatter typisk defekter i materialer og udførelse i en bestemt periode fra købsdatoen.
Kundesupport
If you encounter any issues or have questions regarding your ESAB EMP 210 welder, please contact ESAB customer support. You can find contact information on the official ESAB webhjemmeside eller gennem din autoriserede forhandler.
ESAB-officielle Webwebsted: www.esab.com


