1. Introduktion
Thank you for choosing the Yansoo Dual Dashcam A88A. This manual provides detailed instructions for the proper installation, operation, and maintenance of your new dashcam. Please read this manual thoroughly before use to ensure optimal performance and safety.
2. Pakkens indhold
Tjek venligst pakken for følgende varer:
- Forreste kamera
- Bagkamera
- Bil oplader
- Sugemontering
- Strømkabel
- Brugermanual
- Rengøringsklud

Image: Yansoo Dual Dashcam A88A package contents.
3. Produktet er slutview
The Yansoo Dual Dashcam A88A features a 3-inch IPS screen, a 1080P front camera with a 170° wide-angle lens, and a 150° waterproof rear camera. It is designed to capture clear video footage både foran og bag på dit køretøj.

Image: Yansoo Dual Dashcam A88A front and rear cameras with display.
Nøglefunktioner:
- 3-tommer IPS-skærm: Giver en klar view of recordings and settings.
- 1080P Full HD-optagelse: Captures high-resolution video at 30fps.
- Dobbelt kamerasystem: 170° front camera and 150° rear camera for comprehensive coverage.
- Super nattesyn: F1.8 large aperture, 4 IR LEDs, WDR, and HDR technology for enhanced low-light recording.
- G-sensor: Registrerer automatisk kollisioner og låser videooptagelsertage.
- Loop-optagelse: Continuously records, overwriting older files when the memory card is full (locked videos are protected).
- Parkeringsmonitor: Activates recording upon impact when parked (requires hardwire kit for 24/7 monitoring).
- Bevægelsesdetektion: Records when motion is detected in front of the camera.
4. Opsætning og installation
Before installation, ensure you have a Class 10 or above 32GB Micro SD card (not included). Format the card in the camera menu before first use.
4.1. Montering af frontkamera
- Attach the suction mount to the dashcam.
- Rengør det ønskede område på din forrude.
- Press the suction cup firmly against the windshield and twist the knob to secure it.
- Connect the power cable from the dashcam to your car's cigarette lighter interface.
- Route the power cable neatly along the windshield edge and A-pillar to avoid obstructing your view.

Image: Front dashcam mounted on windshield with cable routing.
4.2. Montering af bakkamera
There are two primary methods for installing the rear camera:
Method 1: Mount on the Rear Windshield
This method involves mounting the rear camera on the inside of your vehicle's rear windshield. The cable can be routed along the headliner and side panels.
Method 2: Install near the License Plate
For external mounting, the rear camera can be installed near your license plate. This typically involves drilling small holes for mounting and cable routing. The red wire from the rear camera cable should be connected to the positive pole of your car's reverse light if you desire the reverse guide line feature. If your car has a reverse system or you do not need the guide line, this red wire connection is optional.
Video: Detailed guide on how to install the rear camera, including routing the cable and connecting the reverse light wire.

Billede: Bakkamera view og funktioner.
5. Betjeningsvejledning
Once powered on, the dashcam will automatically start recording. Press the 'OK' button to stop recording.
5.1. Skift af tilstand
Long-press the 'M' button to switch between Video Recording, Photo, and Playback modes.
5.2. Loop-optagelse
The dashcam supports continuous loop recording in 1, 3, or 5-minute segments. When the memory card is full, the oldest unlocked videos will be automatically overwritten. Videos locked by the G-Sensor are protected from being overwritten.
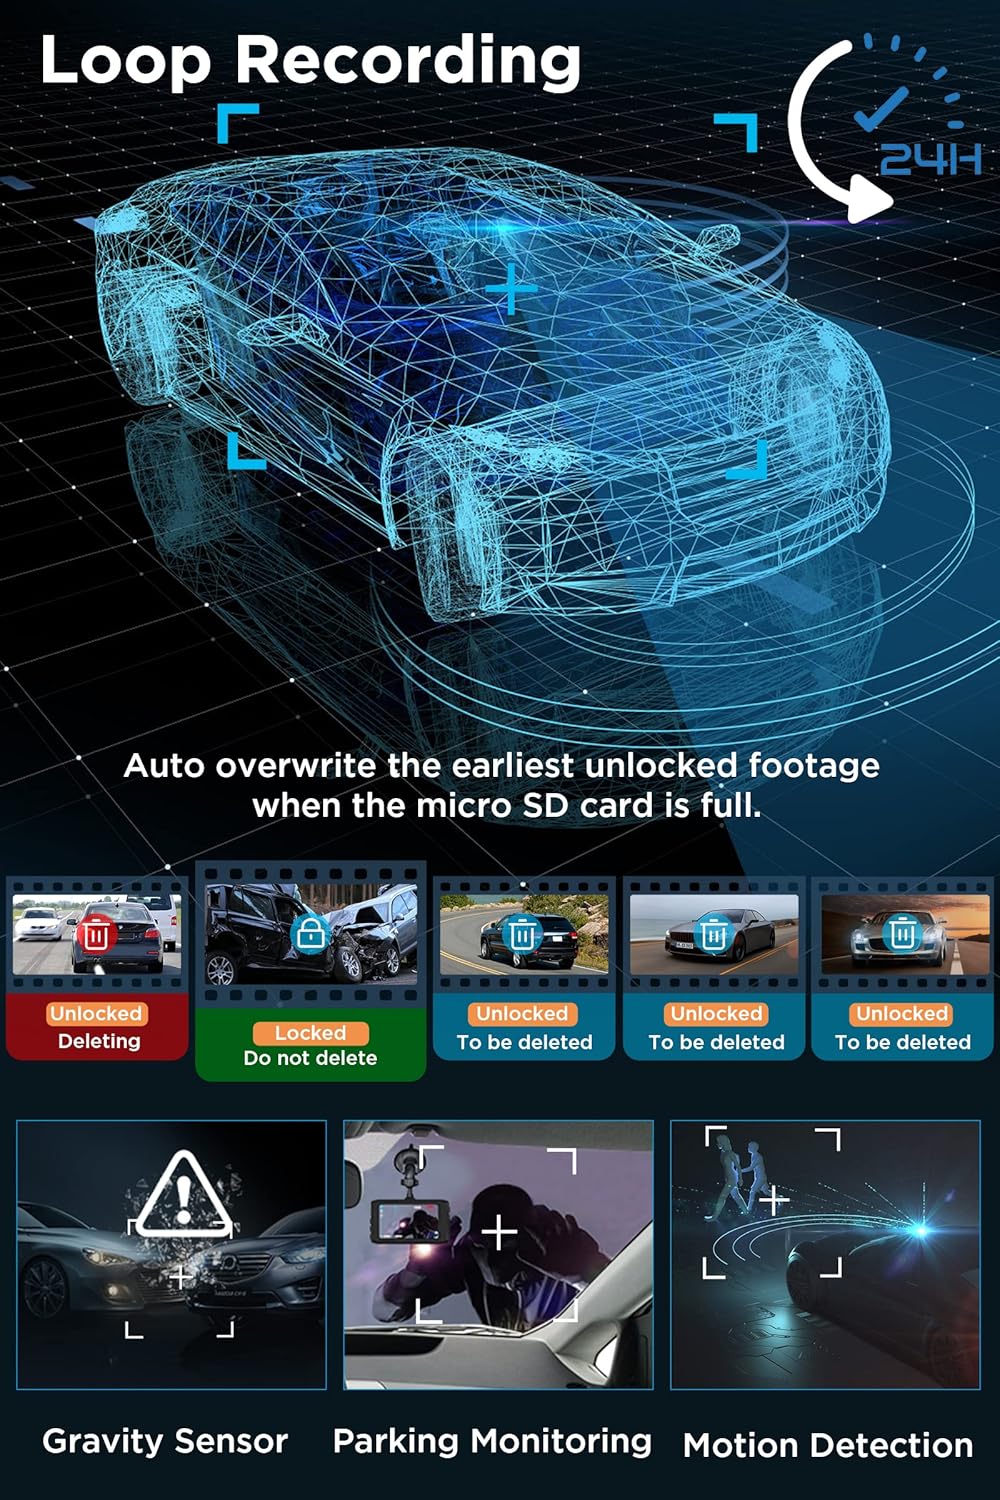
Image: Loop Recording and other key features.
5.3. G-Sensor (Emergency Recording)
The built-in G-Sensor detects sudden impacts or collisions. When an impact reaches the set G-Sensor level, the dashcam will automatically record a 31-second video, lock it, and save it to prevent overwriting.
5.4. Parkeringsmonitor
When enabled, the parking monitor feature will automatically turn on the dashcam and record a 31-second video if an impact is detected while your car is parked. For 24/7 parking monitoring, a separate hardwire kit is required.
5.5. Bevægelsesdetektion
When motion detection is enabled, the dashcam will start recording automatically if it detects movement in front of the camera. It is recommended to set Motion Detection to OFF during normal driving to avoid unnecessary recordings.
5.6. Nattesyn
The dashcam utilizes an F1.8 large aperture, 4 IR LEDs, and WDR (Wide Dynamic Range) + HDR (High Dynamic Range) technology to enhance low-light sensitivity, ensuring clear and vivid recordings during nighttime driving.

Image: Enhanced Night Vision features.
5.7. Afspilning
Det kan du view recorded videos directly on the dashcam's 3-inch IPS screen or by connecting the memory card to a computer.
6. Indstillingsmenu
Press the 'M' button (short press) to enter the setup function. Navigate through the menu using the up/down buttons and confirm selections with the 'OK' button.
Anbefalede indstillinger:
- Gravity Sensor Level: Lav
- Loop-optagelse: 3 minutter
- Bevægelsesdetektion: OFF (for normal driving)
- Parkeringsmonitor: ON
- Automatisk sluk: SLUKKET
7. Vedligeholdelse
To ensure reliable performance, regularly format your Micro SD card (at least once a month). Use the provided cleaning cloth to keep the camera lenses and screen clear.
8. Fejlfinding
- Enheden fryser eller fejler: Use a needle to insert into the small reset hole labeled 'R' on the device to restart it.
- Bakkamera viser ikke: Check all cable connections for the rear camera. Ensure the cable is not damaged.
- Recording Stops Unexpectedly: Ensure the Micro SD card is Class 10 or higher and has been formatted. The card may be full if loop recording is off or too many locked files eksisterer.
- Dårligt nattesyn: Ensure the camera lens is clean. Check that WDR/HDR settings are enabled.
9. Specifikationer
| Produktdimensioner | 3.74 x 0.59 x 1.97 tommer |
| Varens vægt | 2.54 ounce |
| Varemodelnummer | A88A Dash Cam |
| Forbindelsesteknologi | USB |
| Særlige funktioner | Built-In Microphone, 1080P FHD, G-Sensor, Parking Monitor, Loop Recording, 170° Wide Angle, WDR, DVR Dashboard Camera, Motion Detection, 3 Inches IPS Screen |
| Videooptagelsesopløsning | 1080p |
| Monteringstype | Forrudemontering |
| Felt Af View | 170 grader |
| Farve | Sort |
10. Garanti og support
Yansoo offers lifetime after-sales support and a 1-year warranty for the Dual Dashcam A88A. For technical assistance or any questions regarding your dashcam, please contact our customer service team via Amazon or the after-sales email provided in the manual.

Image: Yansoo customer support.


