1. Produktet er slutview
This manual provides instructions for the Garland Shaft Seal Kit, model 080000037. This kit is a genuine OEM (Original Equipment Manufacturer) replacement part designed for specific Garland and US Range commercial kitchen equipment. It ensures proper sealing and functionality of the equipment's shaft components.
The kit typically includes various seals, O-rings, and potentially a lubricant, all essential for maintaining the integrity and performance of the machinery.
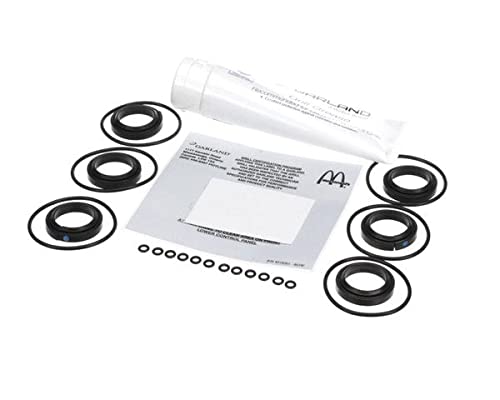
Figure 1: Contents of the Garland Shaft Seal Kit 080000037. The image displays multiple black shaft seals, various small black O-rings, a white tube of lubricant, and a small instruction sheet.
Sættets indhold:
- Shaft Seals (various sizes/types as required for the specific application)
- O-Rings (assorted sizes)
- Lubricant (for installation)
- Instruction Sheet (general guidelines)
2. Sikkerhedsoplysninger
Always prioritize safety when working with commercial kitchen equipment. Failure to follow safety precautions can result in injury or damage to equipment.
- Afbryd strømmen: Before beginning any installation or maintenance, ensure the equipment is completely disconnected from its power source.
- Brug beskyttelsesudstyr: Brug passende personlige værnemidler (PPE) såsom handsker og øjenværn.
- Se udstyrsmanualen: Refer to the specific equipment's service manual for detailed disassembly and reassembly procedures.
- Professionel installation: If you are not experienced with equipment repair, it is recommended to have a qualified technician perform the installation.
- Håndter delene forsigtigt: Seals and O-rings can be delicate. Avoid nicks, cuts, or contamination during handling and installation.
3. Installationsvejledning
These are general guidelines. Always refer to the specific service manual for your Garland or US Range equipment for precise, model-specific instructions.
- Forberedelse:
- Ensure the equipment is powered off and disconnected from all utilities.
- Allow the equipment to cool down if it has been in operation.
- Clear the work area and gather necessary tools (e.g., screwdrivers, wrenches, seal removal tools).
- Access the Shaft:
- Carefully disassemble the equipment components to gain access to the shaft requiring the seal replacement. Document the disassembly process, possibly with photos, to aid reassembly.
- Remove Old Seals:
- Gently remove the old shaft seals and O-rings. Inspect the shaft and surrounding areas for any damage, corrosion, or debris. Clean the area thoroughly.
- Installer nye pakninger:
- Apply a thin, even coat of the provided lubricant to the new seals and O-rings. This aids in installation and prevents damage.
- Carefully position and install the new seals onto the shaft, ensuring they are seated correctly and not twisted or pinched.
- Install any accompanying O-rings in their designated grooves.
- Genmontering:
- Reassemble the equipment components in reverse order of disassembly. Ensure all fasteners are tightened to the manufacturer's specifications.
4. Kontrol efter installation
After installation, perform the following checks before returning the equipment to full operation:
- Visuel inspektion: Ensure all components are correctly reassembled and there are no visible gaps or misalignments.
- Tænd: Reconnect power and carefully observe the equipment during initial operation.
- Lækagetjek: Monitor for any signs of leaks around the newly installed seals.
- Funktionstest: Operate the equipment through its normal cycles to confirm proper function and absence of unusual noises or vibrations.
5. Vedligeholdelse
Proper maintenance extends the life of your equipment and its components, including shaft seals.
- Regelmæssig inspektion: Periodically inspect seals for signs of wear, cracking, hardening, or leakage.
- Renhed: Keep the area around seals clean and free from debris or corrosive substances.
- Undgå barske kemikalier: Do not use harsh cleaning agents that could degrade seal materials.
- Rettidig udskiftning: Replace seals at the first sign of failure or as recommended by the equipment manufacturer's maintenance schedule.
6. Fejlfinding
If you encounter issues after installing the shaft seal kit, consider the following:
| Problem | Mulig årsag | Løsning |
|---|---|---|
| Leakage around new seal | Improper installation, damaged seal during installation, incorrect seal type, shaft surface damage. | Re-inspect installation, replace seal if damaged, verify correct part number, inspect shaft for imperfections. |
| Usædvanlig støj/vibration | Seal binding, improper component alignment, incorrect lubricant. | Check seal seating, verify component alignment, ensure correct lubricant was used. |
| For tidlig slitage af tætninger | Excessive heat, abrasive contaminants, improper shaft finish, chemical incompatibility. | Address operating conditions, ensure proper cleaning, inspect shaft, verify seal material compatibility. |
If troubleshooting steps do not resolve the issue, contact Garland customer support or a qualified service technician.
7. Specifikationer
- Modelnummer: 080000037
- Del type: Akseltætningssæt
- Kompatibilitet: All Garland 3W Models (refer to specific equipment manual for verification)
- Materiale: Viton (Blue Dot) for specific seals, other materials as required for O-rings.
- Produktdimensioner: 9 x 6 x 5 tommer (emballage)
- Varens vægt: 1 Pound (packaging)
- Fabrikant: Garland
- ASIN: B09JB8C7SM
8. Garanti og support
As a genuine OEM part, the Garland Shaft Seal Kit 080000037 is typically covered by the manufacturer's standard warranty for replacement parts. Using genuine OEM parts helps maintain the warranty of your Garland equipment.
For specific warranty details, technical support, or to locate authorized service centers, please refer to the official Garland website or contact their customer service department. You can often find contact information in your equipment's main user manual or on the manufacturer's official webwebsted.
Garland Official Webwebsted: www.garland-group.com


