1. Introduktion
This manual provides detailed instructions for the installation, operation, and maintenance of your ESLYYDS Double Din Car Stereo. This advanced multimedia system offers a wide range of features including Apple CarPlay, Android Auto, Bluetooth connectivity, a high-definition touchscreen, and support for a backup camera, enhancing your in-car entertainment and navigation experience.

Figure 1.1: ESLYYDS Double Din Car Stereo Overview
2. Pakkens indhold
Kontroller venligst, at alle nedenstående varer er inkluderet i din pakke:
- ESLYYDS Double Din Car Stereo Unit
- Monteringsbeslag sæt
- Camera Wire A
- Camera Wire B
- Steering Wheel Control Unit
- Ledningsnet A
- Ledningsnet B
- Bag-view Kamera
- Fjernbetjening
- Brugervejledning (dette dokument)

Figure 2.1: Stereo Dimensions and Included Accessories
3. Produktfunktioner
The ESLYYDS Double Din Car Stereo is equipped with a variety of features designed for convenience and enhanced driving experience:
- Apple CarPlay og Android Auto-kompatibilitet: Seamlessly integrate your smartphone for navigation, music, calls, and messages using voice control.
- 7-inch HD Capacitive Touch Screen: A responsive and accurate display supporting 1080P video playback.
- Bluetooth 5.2: For stable and clear hands-free calling and audio streaming.
- Phone Mirror Link: Display your smartphone's screen directly on the stereo.
- Dobbelt USB-grænseflade: One port for media playback and another with 2.1A fast charging capability.
- Bag View Kamera input: Supports the included 12 HD LED light, night vision, 170° viewing angle waterproof backup camera for safer reversing.
- Ratbetjening (SWC): Compatible with existing steering wheel controls for convenient operation.
- AM/FM Audio Receiver: Access to radio stations with user-friendly digital control.
- AUX IN Connectivity: Til eksterne lydenheder.
- 7 Color LED Buttons: Customizable button illumination.
3.1 Apple CarPlay og Android Auto
Connect your smartphone via USB to access navigation, phone contacts, email, notifications, and music directly on the stereo display. This feature utilizes voice control technology for safe operation while driving.
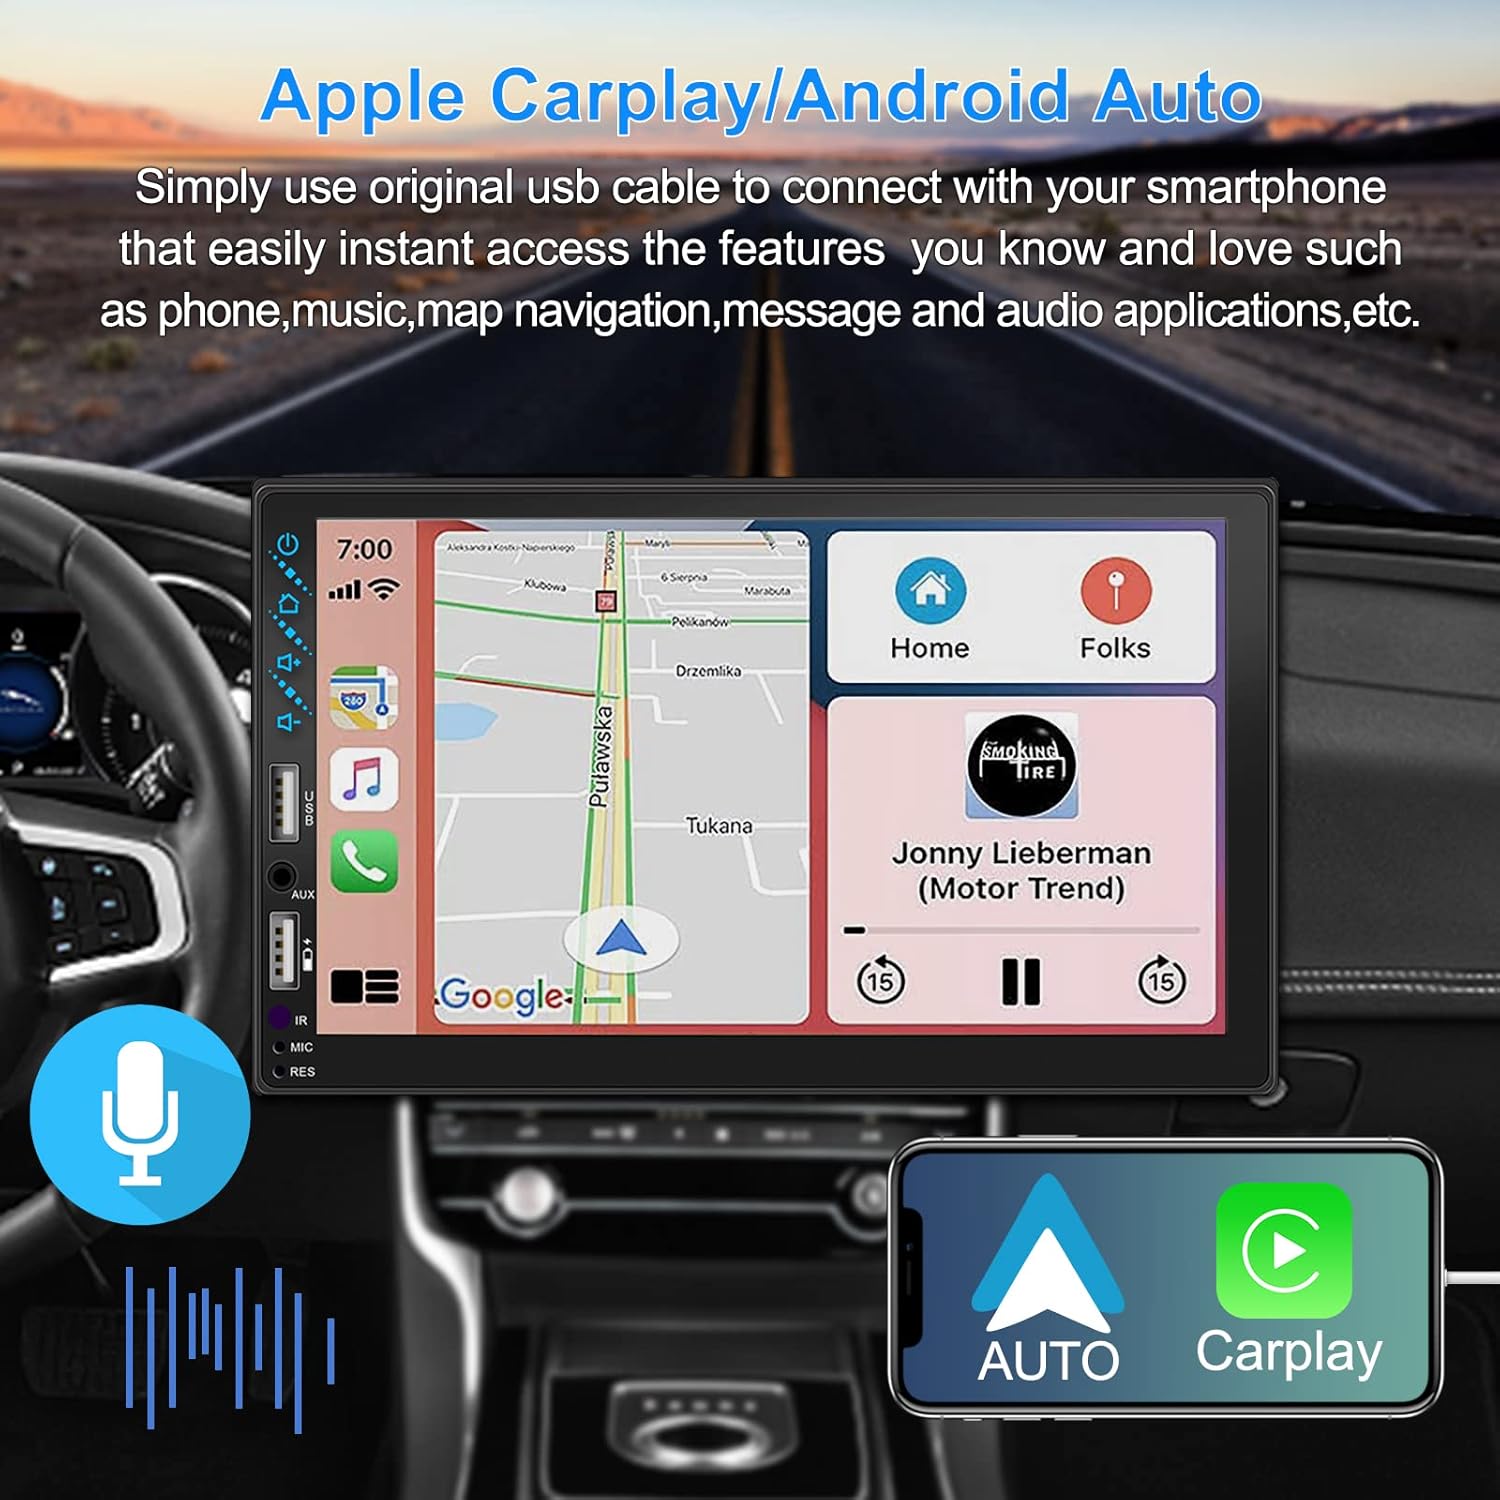
Figure 3.1: Apple CarPlay and Android Auto Interface
3.2 Stemmekontrol
Utilize voice commands to control various functions such as making calls, playing music, and navigating, allowing you to keep your hands on the wheel and eyes on the road.

Figure 3.2: Voice Control Functionality
3.3 Telefonspejlforbindelse
The Mirror Link function allows you to display your smartphone's screen directly onto the stereo's touchscreen. This supports Android devices (version 10.1 and below) and iPhone devices (version 14.5 and below, including iPhone 12, 11, XR, and 8 series and below) with resolutions up to 1920x1080 pixels.
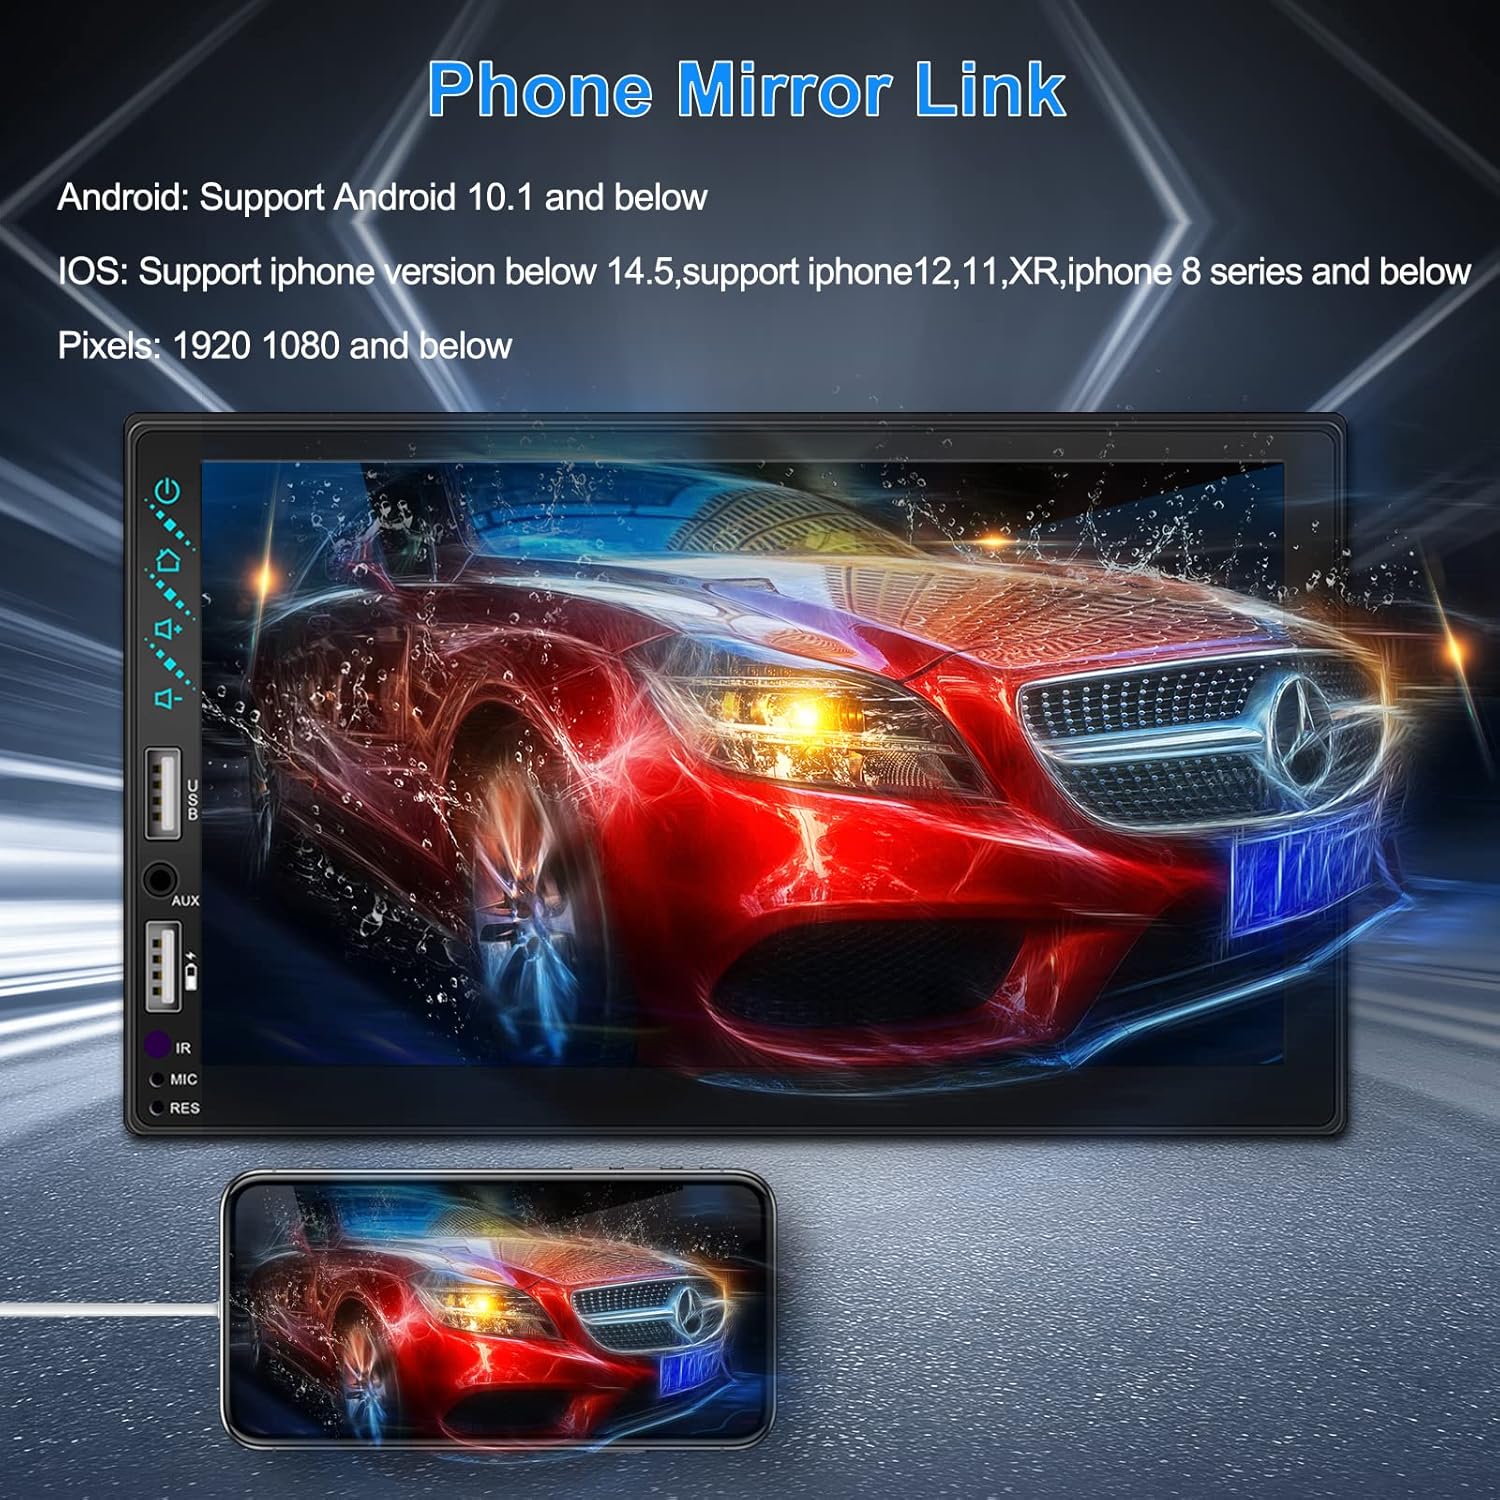
Figure 3.3: Phone Mirror Link
3.4 bag View Kamera
The included waterproof backup camera features 12 HD LED lights for night vision and a 170° viewing angle. When you shift into reverse, the system automatically displays the camera feed on the screen, providing optimal visibility in various weather conditions.
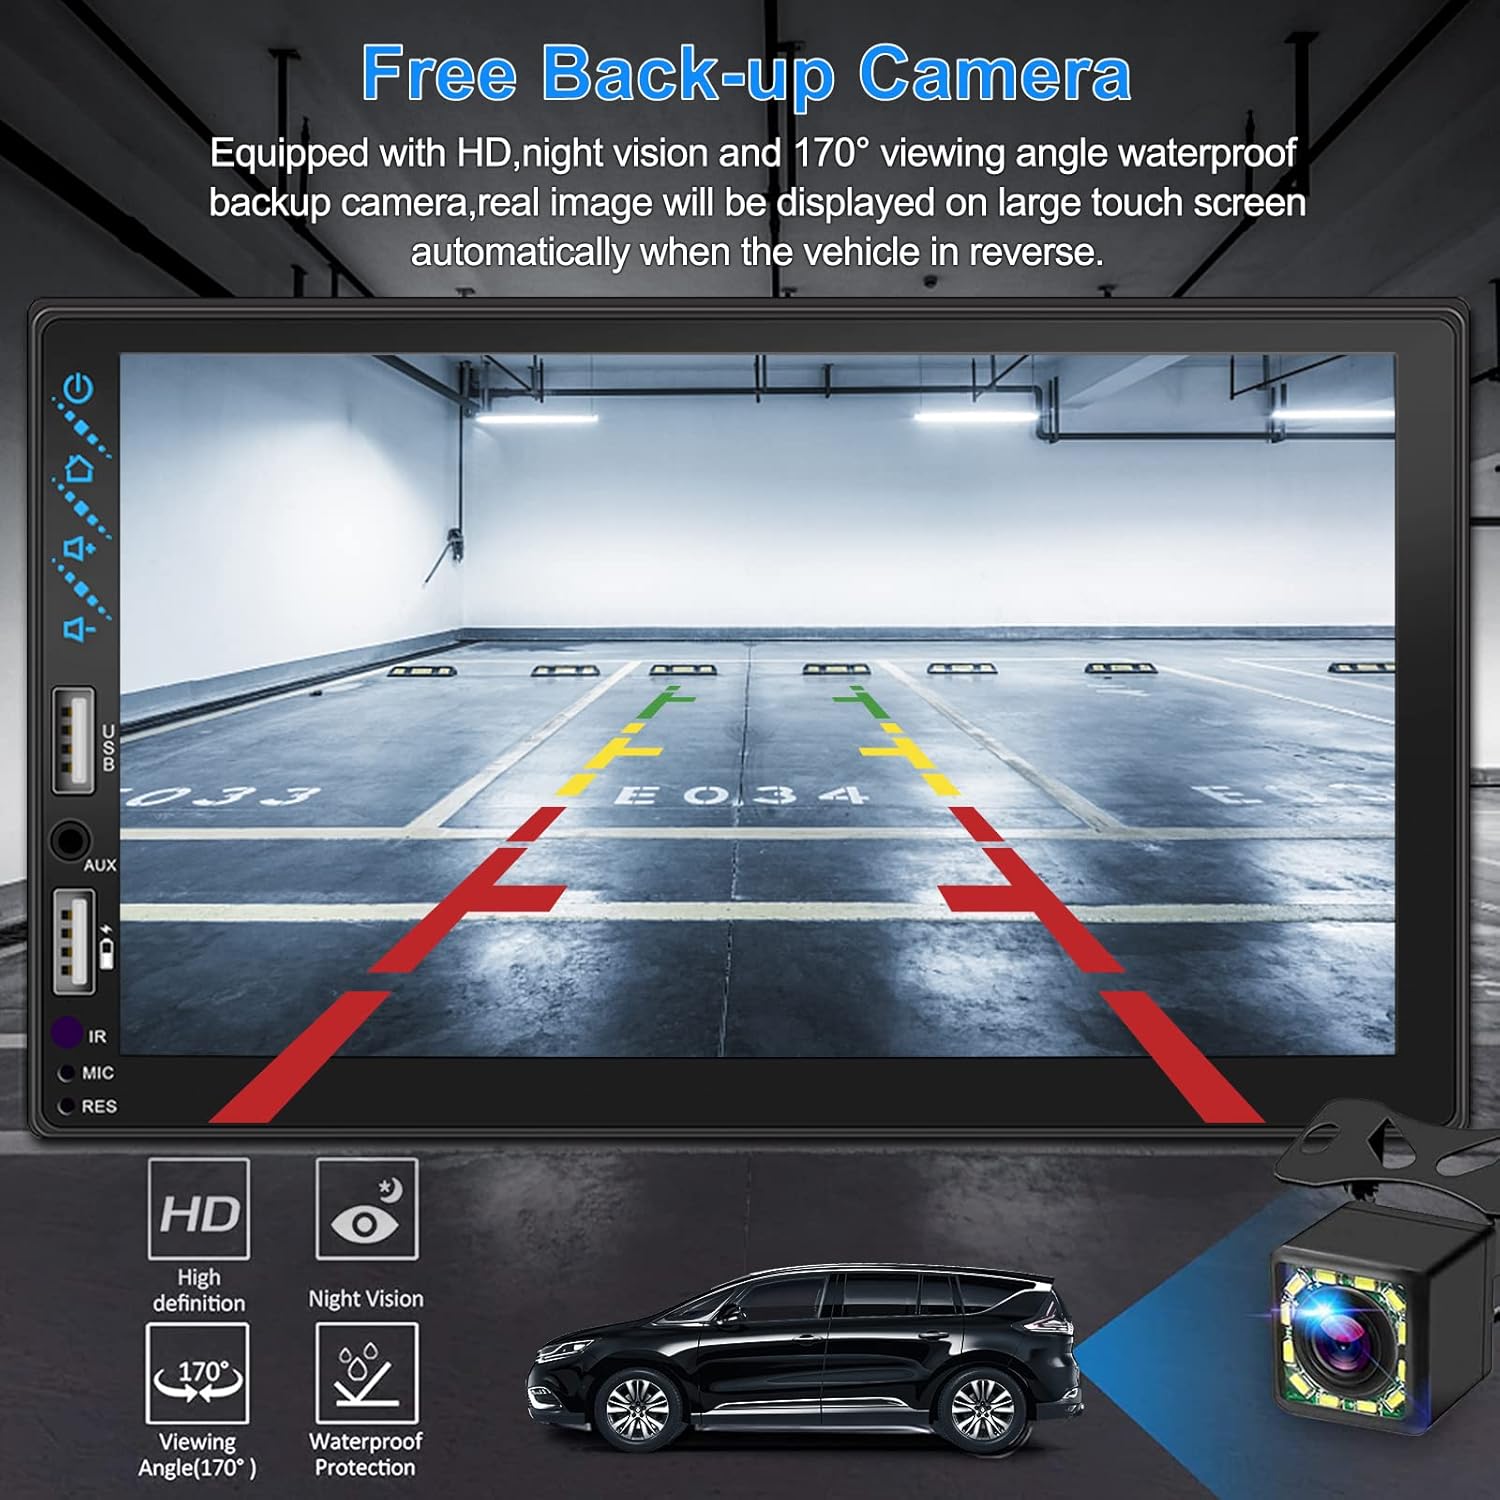
Figur 3.4: Bagside View Kameradisplay
4. Installationsvejledning
Proper installation is crucial for optimal performance. It is recommended to have the unit installed by a professional if you are unfamiliar with car audio wiring.
4.1 Dimensioner
The stereo unit has a standard double din size. Refer to Figure 2.1 for detailed dimensions.
- Bredde: 178mm (7 inches)
- Højde: 102 mm (4 tommer)
- Dybde: 60 mm (2.6 tommer)
4.2 Ledningsdiagram
Carefully follow the wiring diagram below to connect the stereo to your vehicle's electrical system. Ensure all connections are secure to prevent malfunctions.
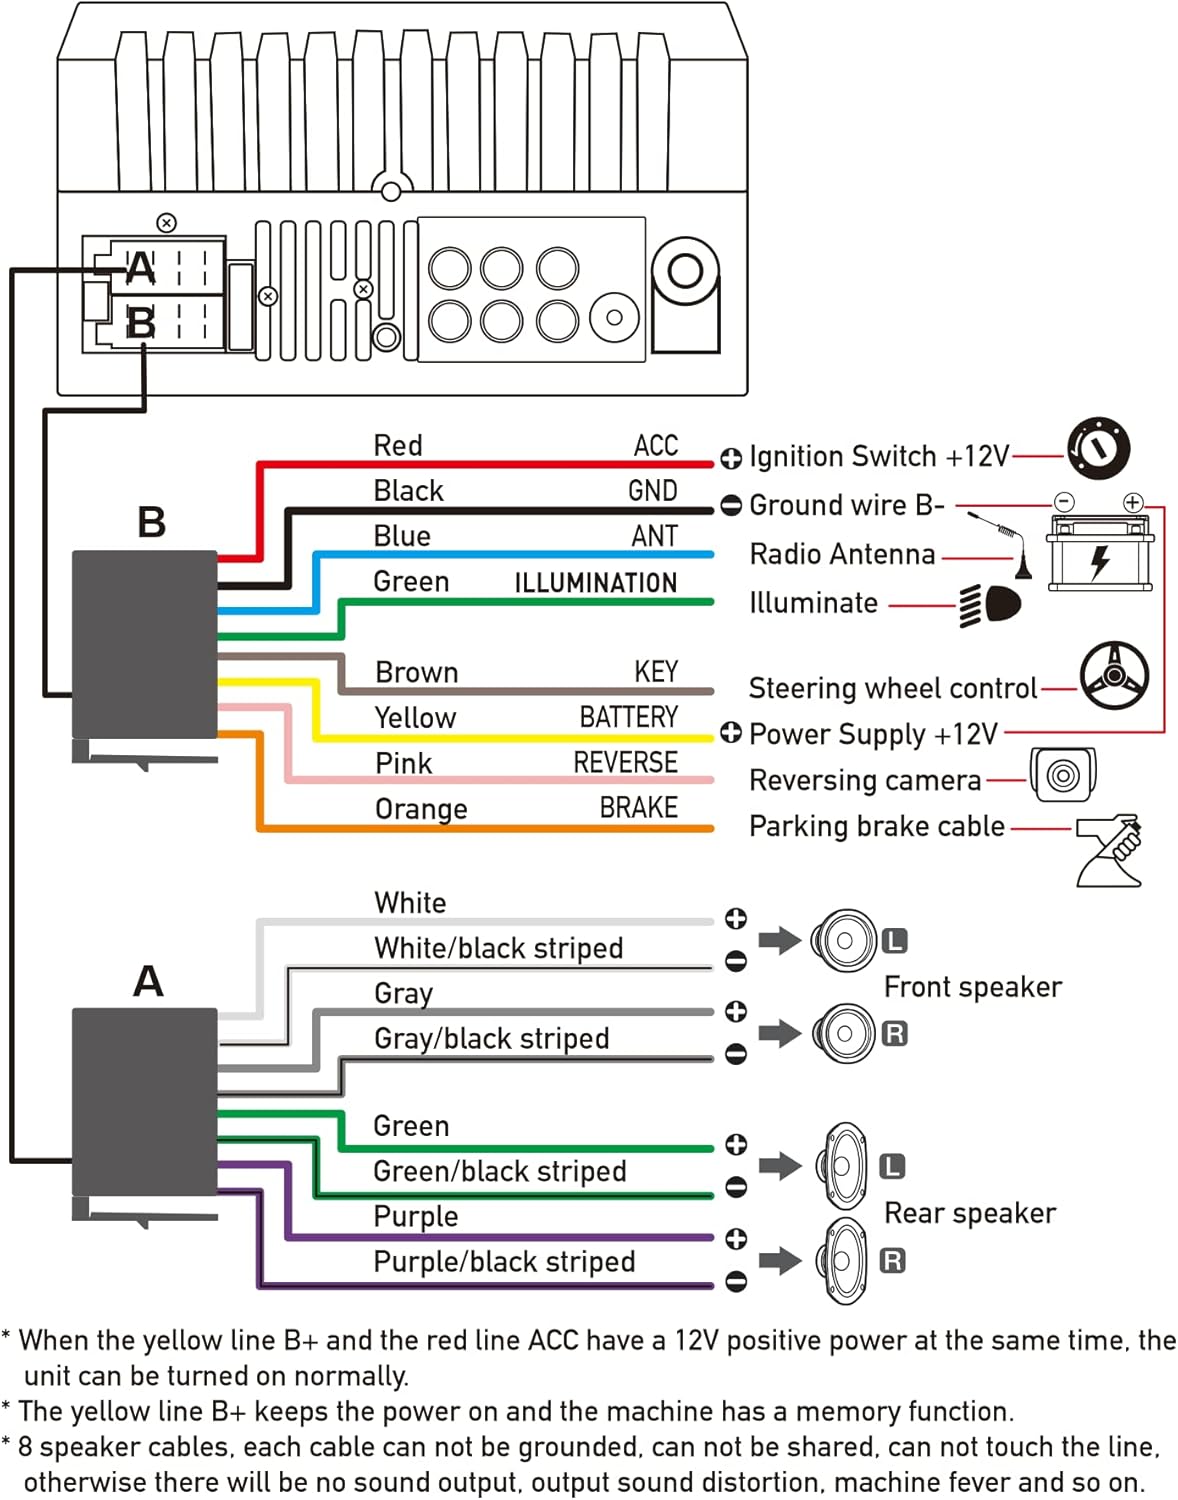
Figur 4.1: Hovedledningsdiagram
- Red (ACC): Connect to Ignition Switch +12V.
- Sort (GND): Connect to Ground wire B-.
- Blue (ANT): Connect to Radio Antenna (if applicable).
- Green (ILLUMINATION): Connect to Illuminate wire.
- Brown (KEY): Connect to Steering wheel control.
- Yellow (BATTERY): Connect to Power Supply +12V.
- Pink (REVERSE): Connect to Reversing camera input.
- Orange (BRAKE): Connect to Parking brake cable.
Speaker Connections (8 speakers supported):
- White / White/black striped: Venstre forreste højttaler
- Gray / Gray/black striped: Højre forreste højttaler
- Green / Green/black striped: Venstre baghøjttaler
- Purple / Purple/black striped: Højre baghøjttaler
Vigtige bemærkninger:
- The unit requires both the Yellow (BATTERY) and Red (ACC) wires to have a 12V positive power supply simultaneously for normal operation.
- The Yellow (BATTERY) wire keeps the power on and maintains memory functions.
- For speaker connections, each cable must not be grounded or shared with other cables. Incorrect wiring can lead to no sound output, sound distortion, or damage to the machine.
5. Betjeningsvejledning
5.1 Grundlæggende betjening
- Tænd/sluk: Tryk på tænd/sluk-knappen på frontpanelet eller fjernbetjeningen.
- Lydstyrkekontrol: Use the volume buttons on the front panel, steering wheel controls, or remote control.
- Kildevalg: Tap the 'Source' or 'Mode' icon on the touchscreen to switch between Radio, Bluetooth, USB, AUX, CarPlay, and Android Auto.
5.2 Apple CarPlay / Android Auto Usage
- Connect your compatible iPhone or Android smartphone to the stereo's USB port using a certified USB cable.
- The stereo will automatically detect the connection and prompt you to launch CarPlay or Android Auto.
- Følg instruktionerne på skærmen for at fuldføre opsætningen.
- Once connected, you can access supported apps like Maps, Phone, Messages, and Music directly from the stereo's touchscreen or via voice commands.
5.3 Bluetooth -parring
- Tænd for Bluetooth på din smartphone.
- On the stereo, navigate to the Bluetooth menu.
- Søg efter available devices on your smartphone. The stereo's Bluetooth name will typically be 'ESLYYDS' or similar.
- Select the stereo from your smartphone's list and confirm the pairing code if prompted.
- Når den er parret, kan du foretage/modtage opkald og streame lyd trådløst.
5.4 Phone Mirror Link Usage
- Connect your smartphone to the stereo's USB port.
- Select the 'Mirror Link' option on the stereo's screen.
- Follow the specific instructions displayed on the stereo for your phone's operating system (Android or iOS) to enable screen mirroring. This may involve enabling USB debugging for Android or trusting the device for iOS.
5.5 Radiodrift
- Select the 'Radio' source.
- Use the 'Scan' function to automatically search and save stations, or manually tune using the frequency controls.
- Gem dine yndlingsstationer under forudindstillede knapper for hurtig adgang.
5.6 USB-afspilning
- Indsæt et USB-drev, der indeholder lyd eller video files into the designated USB playback port.
- The stereo will automatically switch to USB mode or prompt you to select it.
- Browse and play your media files using the touchscreen controls.
6. Vedligeholdelse
For at sikre din bilstereos levetid og optimale ydeevne skal du følge disse vedligeholdelsesretningslinjer:
- Rensning: Use a soft, dry cloth to clean the screen and exterior. For stubborn smudges on the screen, use a screen cleaner specifically designed for electronic displays. Avoid abrasive cleaners or solvents.
- Temperatur: Undgå at udsætte enheden for ekstreme temperaturer, både varme og kolde, i længere perioder.
- Fugtighed: Hold enheden tør. Udsæt den ikke for vand eller for høj luftfugtighed.
- Firmwareopdateringer: Tjek producentens webbesøg webstedet regelmæssigt for at se, om der er tilgængelige firmwareopdateringer for at forbedre ydeevnen og tilføje nye funktioner.
7. Fejlfinding
If you encounter issues with your ESLYYDS car stereo, please refer to the following common problems and solutions. If the problem persists, contact customer support.
| Problem | Mulig årsag | Løsning |
|---|---|---|
| Ingen strøm | Forkert ledningsføring; Sprunget sikring; Problem med bilens batteri. | Check power (Yellow and Red) and ground (Black) wire connections. Inspect vehicle fuses. Ensure vehicle battery is charged. |
| Ingen lyd | Speaker wires incorrectly connected; Volume too low; Mute function active. | Verify all speaker wire connections (ensure no shorts or grounds). Increase volume. Check if mute is enabled. |
| Bluetooth forbinder ikke | Bluetooth not enabled on phone/stereo; Incorrect pairing process. | Ensure Bluetooth is active on both devices. Delete previous pairings and re-attempt pairing process. |
| CarPlay/Android Auto starter ikke | Faulty USB cable; Phone not compatible; Software issue. | Use a high-quality, certified USB cable. Ensure your phone's OS version is compatible. Restart both phone and stereo. |
| Bakkamera viser ikke | Camera wire disconnected; Reverse trigger wire not connected. | Check the camera's video input and power connections. Ensure the Pink (REVERSE) wire is correctly connected to the vehicle's reverse light trigger. |
| USB not reading media | Ikke understøttet file format; Corrupted USB drive; USB port issue. | Sørg for medier files are in supported formats (e.g., MP3, MP4, MKV). Try a different USB drive. |
8. Specifikationer
| Feature | Specifikation |
|---|---|
| Produktdimensioner | 7 x 2.6 x 3.94 tommer |
| Varens vægt | 2.33 pund |
| Modelnummer | L3 |
| Skærmstørrelse | 7 tommer (18 cm) |
| Display Type | HD Capacitive Touchscreen |
| Forbindelsesteknologi | Carplay, Android Auto, Mirror-Link, Bluetooth 5.2, USB, AUX |
| Controller type | Google Assistant, iOS, Android |
| Særlige funktioner | Touchscreen, RDS, Steering Wheel Control (SWC), Fast Charging USB (2.1A) |
| Kompatible enheder | Smartphone |
| Connector Type | USB |
| Lydudgangstilstand | Omgive |
| Surround Sound Kanalkonfiguration | 5.1 |
| Understøttelse af videokodning | MKV |
| Farve | Sort |
| Dato først tilgængelig | 25. september 2021 |
9. Garanti og support
ESLYYDS is committed to providing excellent customer service and technical support. For any inquiries or assistance, please contact our professional technical team.
- Penge-tilbage-garanti: 30-day period from purchase.
- Udskiftningsgaranti: 12-month period for product replacement.
- Teknisk support: Life-time technical support is provided.
Please refer to your purchase documentation for specific contact details or visit the official ESLYYDS webwebsted for supportoplysninger.


