Indledning
Thank you for choosing the Active Era Inflatable Stand Up Paddle Board. This manual provides essential information for the safe and effective use, setup, and maintenance of your new paddle board. Please read it thoroughly before first use and keep it for future reference.
Sikkerhedsoplysninger
- Always wear a personal flotation device (PFD) when using the paddle board.
- Do not use the board in adverse weather conditions, strong currents, or near boat traffic.
- Ensure the leash is securely attached to your ankle and the board to prevent separation.
- Never exceed the maximum weight capacity of 130 kg (286.6 lbs).
- Always check the board for damage before each use.
- Børn bør kun bruge brættet under streng opsyn af voksne.
- Inflate the board to the recommended pressure of 15 PSI. Do not overinflate.
Pakkens indhold
Your Active Era Stand Up Paddle Board package includes the following items:
- Oppustelig Stand Up Paddle Board
- Adjustable Fiberglass Paddle (convertible to kayak paddle)
- Removable Kayak Seat
- Fodstøtte
- High-Pressure Hand Pump with Pressure Gauge
- Removable Center Fin (Smart-Lock Technology)
- Ankelsnor
- Repair Kit (2 PVC patches, 1 valve replacement)
- Waterproof Dry Bag
- Removable Camera Mount
- Rejserygsæk

Image: All components of the Active Era Stand Up Paddle Board set, including the board, paddle, pump, backpack, kayak seat, fin, leash, dry bag, and repair kit.
Opsætningsinstruktioner
1. Udpakning og udfoldning
Remove the paddle board and all accessories from the travel backpack. Unroll the board on a clean, flat surface, free from sharp objects.
2. Inflation
- Locate the high-pressure valve at the tail of the board. Ensure the valve pin is in the UP position (closed) by pressing it once.
- Attach the hose of the included hand pump to the valve by inserting it and twisting clockwise until secure.
- Begin pumping. The pressure gauge will start to register once the board becomes firm. Continue pumping until the recommended pressure of 15 PSI (1.0 BAR) is reached. Do not exceed 15 PSI.
- Once inflated, quickly detach the pump hose by twisting counter-clockwise. The valve will automatically seal.

Image: A person using the high-pressure hand pump to inflate the paddle board on a rocky shore.
3. Fastgørelse af finnen
- Slide the removable center fin into the fin box located on the underside of the board at the tail.
- Secure the fin by pushing down the locking clip until it clicks into place. Ensure it is firmly seated to prevent wobbling during use.
4. Samling af padlen
The paddle can be assembled in two configurations: a single-blade SUP paddle or a double-blade kayak paddle.
SUP Paddle Configuration:
- Connect the three sections of the paddle, ensuring the blade is at one end and the handle at the other.
- Adjust the paddle length using the quick-release clamp. For optimal SUP paddling, the paddle handle should reach your wrist when your arm is extended overhead. The adjustable range is 165cm to 208cm (65" to 82").
Kayak Paddle Configuration:
- Remove the handle section from the SUP paddle.
- Attach the second paddle blade (included) to the open end of the paddle shaft. This creates a double-bladed kayak paddle.

Image: The versatile 4-part paddle, showing its components for both single-blade SUP and double-blade kayak configurations.
5. Attaching the Kayak Seat and Footrest (Optional)
- Locate the D-rings on the board's deck.
- Clip the straps of the kayak seat to the corresponding D-rings. Adjust the strap length for a comfortable seating position.
- Attach the footrest to the D-rings in front of the seat, adjusting its position for optimal comfort and leverage.

Image: The removable kayak seat securely attached to the D-rings on the paddle board, ready for use.
6. Attaching the Camera Mount (Optional)
The board features a dedicated camera mount point at the front. Attach your compatible action camera or accessory to this mount to capture your adventures.
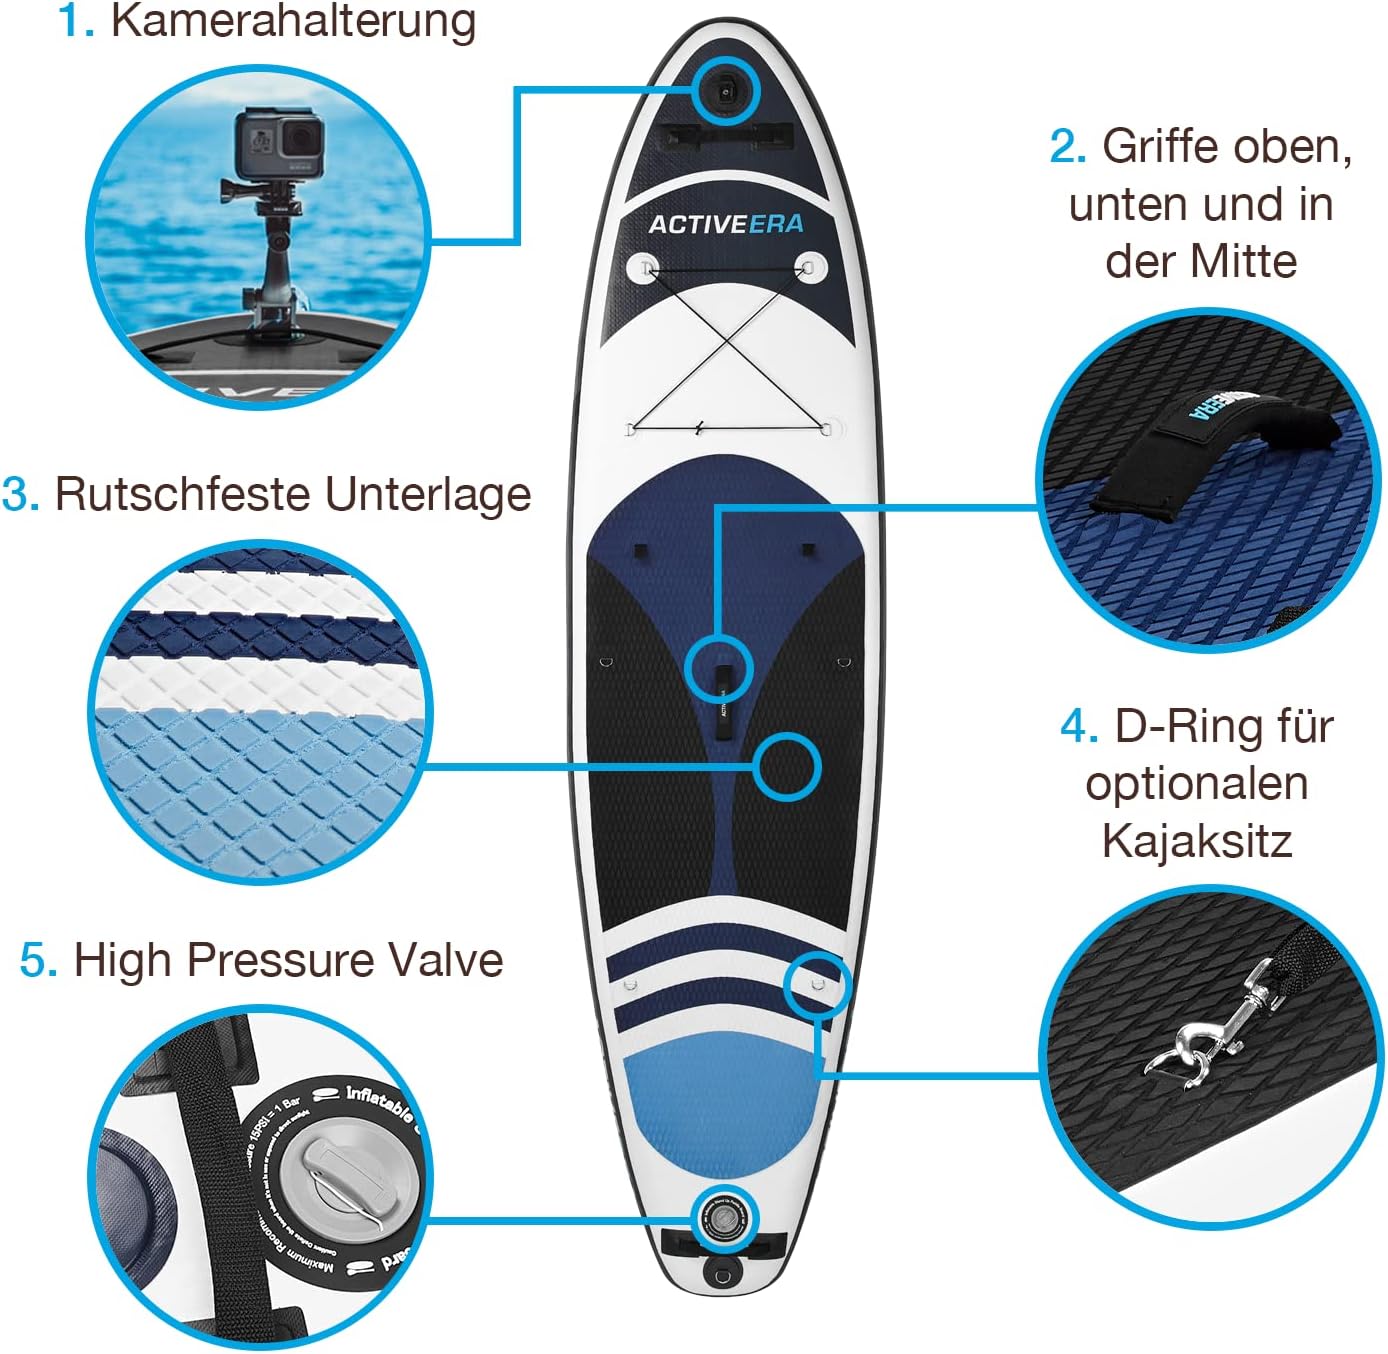
Image: An overhead diagram of the paddle board highlighting key features, including the camera mount at the nose, handles, non-slip deck pad, D-rings, and high-pressure valve.
Betjeningsvejledning
1. Attaching the Ankle Leash
Before entering the water, attach the coiled ankle leash to the D-ring at the tail of the board and secure the cuff around your ankle. This prevents the board from drifting away if you fall off.
2. Stand Up Paddling (SUP)
- Start by kneeling on the center of the board, just behind the carry handle.
- Once comfortable, place your paddle horizontally across the board and use your hands to push up into a standing position.
- Position your feet shoulder-width apart, parallel to each other, and centered over the board's stringer (the imaginary line running down the middle).
- Keep your knees slightly bent and your core engaged for stability.
- Use the paddle to propel yourself forward, keeping the blade submerged and pulling it alongside the board.

Image: A person actively stand-up paddling on the Active Era board in calm water, demonstrating proper stance and paddle technique.
3. Kajaktilstand
With the kayak seat and double-bladed paddle, you can easily convert your SUP into a comfortable kayak.
- Ensure the kayak seat and footrest are securely attached as per the setup instructions.
- Sit comfortably in the seat, placing your feet on the footrest for support.
- Use the double-bladed paddle to propel yourself, alternating strokes on either side of the board, similar to a traditional kayak.

Image: A person seated on the paddle board, utilizing the kayak seat and double-bladed paddle for a kayaking experience.
4. Alsidig brug
The Active Era SUP is designed for various water activities, including:
- Stand Up Paddling
- Kajaksejlads
- Solbadning
- Yoga & Pilates

Image: A woman performing a yoga pose on the paddle board, demonstrating its stability and suitability for water-based fitness activities.
Opretholdelse
1. Rensning
After each use, especially in saltwater, rinse the board thoroughly with fresh water. Use a mild soap and soft brush if necessary to remove dirt or grime. Ensure the board is completely dry before storage to prevent mold or mildew.
2. Deflation og opbevaring
- Ensure the board is clean and dry.
- Press the valve pin IN to the DOWN position to release air. You can use the pump's deflate function for faster air removal.
- Once deflated, start rolling the board tightly from the nose (front) towards the tail, pushing out any remaining air.
- Secure the rolled board with the included strap.
- Place the deflated board and all accessories into the travel backpack for compact storage and transport.

Image: A person standing on a beach, carrying the deflated Active Era paddle board in its compact travel backpack, demonstrating its portability.
Store the board in a cool, dry place, away from direct sunlight and extreme temperatures. Avoid storing it in a tightly folded state for extended periods to prevent creasing.
3. Repair Kit Usage
Your board comes with a repair kit containing PVC patches and a valve replacement. For minor punctures:
- Locate the puncture. Clean and dry the area thoroughly.
- Klip et stykke lidt større end hullet, og sørg for afrundede hjørner.
- Apply PVC glue (not included) evenly to the patch and the damaged area.
- Press the patch firmly onto the puncture, smoothing out any air bubbles.
- Allow at least 24 hours for the glue to cure before reinflating.

Image: The orange container for the repair kit, which includes PVC patches and a valve replacement for minor repairs.
Fejlfinding
| Problem | Mulig årsag | Løsning |
|---|---|---|
| Board loses air quickly. | Valve not properly sealed; Puncture in board. | Ensure valve pin is in UP position and cap is tight. Check for punctures using soapy water and repair with kit. |
| Pressure gauge not registering. | Board not yet firm enough; Pump hose not securely attached. | Continue pumping until board becomes firm. Re-attach pump hose securely to valve. |
| Difficulty attaching fin. | Fin box or fin obstructed; Fin not aligned correctly. | Ensure fin box is clear of debris. Align fin correctly and apply firm, even pressure. |
| Paddle feels unstable or loose. | Sections not fully connected; Clamp ikke strammet. | Ensure all paddle sections are fully inserted and the quick-release clamp er forsvarligt tilspændt. |
Specifikationer
| Feature | Detalje |
|---|---|
| Modelnummer | WS-01BU |
| Dimensioner (oppustet) | 320 x 78 x 15 cm (126 x 31 x 6 tommer) |
| Board Vægt | 8.5 kg (18.7 lbs) |
| Maks. Vægt kapacitet | 130 kg (286.6 lbs) |
| Anbefalet tryk | 15 PSI (1.0 BAR) |
| Materiale | Polyvinyl Chloride (PVC) with Drop-Stitch Technology |
| Paddle Length (Adjustable) | 165 cm - 208 cm (65" - 82") |
| Færdighedsniveau | Nybegynder |

Image: A visual representation of the paddle board's dimensions (320cm length, 78cm width, 15cm thickness) and recommended rider weight range (45kg-100kg), along with paddle length adjustment.

Image: A cutaway diagram illustrating the multi-layer construction of the paddle board, including the PVC inner layer, lightweight base layer, high-density core, anti-flex internal stability band, external protection stability band, and reinforced PVC outer layer, highlighting its durability.
Garanti og support
For warranty information, product support, or to purchase replacement parts, please visit the official Active Era webwebstedet eller kontakt deres kundeservice direkte. Gem din købsbevis til garantikrav.
Official Active Era Store: Active Era Amazon Store


