Indledning
This manual provides comprehensive instructions for the installation, operation, and maintenance of your Hifonics ZG-3200.1D Zeus Gamma Monoblock Class D Amplifier. Please read this manual thoroughly before attempting installation or operation to ensure proper function and safety. This amplifier is designed to deliver powerful and clear audio for your car's subwoofer system.
Opsætning
Udpakning og inspektion
Fjern forsigtigt amplifier and all accessories from the packaging. Inspect all components for any signs of damage. If any damage is found, contact your dealer immediately.

Figure 1: Hifonics ZG-3200.1D Zeus Gamma Monoblock Amplifier with included accessories.
Montering
Select a mounting location that is dry, well-ventilated, and secure. Ensure sufficient airflow around the amplifier for proper heat dissipation. The amplifier is designed for surface mounting. Use appropriate hardware to secure the unit firmly to a stable surface, avoiding areas exposed to direct sunlight or excessive vibration.
Ledningsforbindelser
Proper wiring is crucial for optimal performance and safety. Refer to the diagrams below for correct connections.
- Strømindgang (+12V): Connect to the positive terminal of your car battery using a heavy-gauge power cable (4-gauge recommended). Install an inline fuse or circuit breaker within 18 inches of the battery.
- Jord (GND): Connect to a clean, unpainted metal surface of the vehicle's chassis. Ensure a solid, low-resistance connection.
- Fjernbetjening (REM): Connect to the remote turn-on lead from your head unit or other signal source. This turns the amptænd og sluk for lyden med dit lydsystem.
- RCA-indgange: Connect the RCA cables from your head unit's subwoofer output to the amplifier's RCA input jacks. These nickel-plated inputs ensure efficient signal transfer and corrosion resistance.
- Højttaler output: Connect your subwoofer speaker wires to the amplifier's speaker output terminals. Ensure correct polarity (+ to + and - to -).

Figure 2: Power and Speaker Output Terminals. Ensure secure connections for optimal performance.
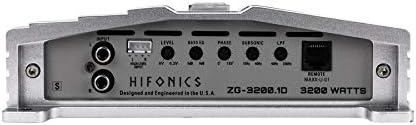
Figure 3: RCA Inputs and Control Panel. Adjust settings for desired audio output.
Indledende indstillinger
Before initial power-up, ensure all connections are secure. Set the following controls to their initial positions:
- Level (Gain): Start at minimum (0.2V). This matches the output voltage of your head unit to the amplifers input.
- LPF (lavpasfilter): Set to approximately 80Hz. This allows only low frequencies to pass to the subwoofer.
- Subsonisk filter: Set to approximately 25Hz. This filters out extremely low frequencies that can damage the subwoofer.
- Bas EQ: Set to 0dB (flat). Adjust later if more bass boost is desired.
- Fase: Set to 0 degrees. Adjust later if the bass sounds out of phase.
For detailed gain setting instructions, refer to the "How To Set the Gain On your Car Subwoofer Amplifier" video below.
Video 1: Instructions on how to properly set the gain on your car subwoofer amplifier for optimal sound quality and to prevent damage.
Drift
Grundlæggende betjening
Når den er korrekt installeret og konfigureret, amplifier will power on automatically with your head unit. The power indicator light on the amplifier will illuminate. Play your audio source and gradually increase the volume on your head unit. Adjust the amplifier's gain control to achieve the desired volume level without distortion.
Justering af lydindstillinger
The Hifonics ZG-3200.1D features variable electronic crossovers (12dB per octave) and bass equalization for precise sound tuning. Experiment with the LPF, Subsonic, and Bass EQ controls to tailor the subwoofer's output to your listening preferences and vehicle acoustics. Adjust the phase control if the bass sounds weak or out of sync with other speakers.
Video 2: Overståetview of Hifonics Brutus Gamma Amplifiers, showcasing features and sound quality relevant to the Gamma series.
Opretholdelse
The Hifonics ZG-3200.1D amplifier requires minimal maintenance. Keep the unit clean and free from dust and debris. Use a soft, dry cloth for cleaning. Do not use harsh chemicals or abrasive cleaners. Ensure that the cooling fins are not obstructed to maintain optimal operating temperature.
Fejlfinding
| Problem | Mulig årsag | Løsning |
|---|---|---|
| Ingen strøm | Blown fuse, loose power/ground connection, no remote turn-on signal. | Check and replace fuse. Secure all power and ground connections. Verify remote turn-on wire is connected and receiving 12V. |
| Ingen lyd | RCA cables disconnected, speaker wires loose, amplifier in protect mode, gain too low. | Check RCA and speaker connections. If protect light is on, refer to overheating section. Increase gain gradually. |
| Forvrænget lyd | Gain set too high, improper crossover settings, damaged speaker/subwoofer. | Lower gain. Adjust LPF/HPF settings. Inspect speakers for damage. |
| AmpOverophedning af væske | Insufficient ventilation, impedance too low, prolonged high-volume use. | Sørg for korrekt luftgennemstrømning omkring ampKontroller højttalerimpedansen. Reducer lydstyrken eller lad ampvarmebeholder for at køle ned. |
Specifikationer
- Model: ZG-3200.1D
- Class/Topology: Klasse D
- Samlet antal kanaler: 1 (Monoblok)
- Output Power @ 1 Ohm: 1 x 3200 watt
- Output Power @ 2 Ohms: 1 x 1600 watt
- Output Power @ 4 Ohms: 1 x 800 watt
- Crossover: Variable Electronic 12dB Per Octave
- Lav støj Preamplifier kredsløb: Ja
- RCA-indgange: Nickel Plated, High Temperature Impact Resistant
- Højt niveau input: Ja
- Varens vægt: 10 pund
- Pakkedimensioner: 9 x 8 x 7 tommer
Garanti og support
For warranty information and technical support, please visit the official Hifonics website or contact your authorized Hifonics dealer. Keep your purchase receipt as proof of purchase for any warranty claims.
Hifonics Official Store: Besøg butik


