Indledning
This instruction manual provides detailed guidance for the installation, operation, and maintenance of your Fluidmaster 400A-019 Brass Shank Toilet Fill Valve. Please read all instructions carefully before beginning installation to ensure proper function and longevity of the product.
Produkt overview
The Fluidmaster 400A-019 is a universal toilet fill valve designed to replace old or noisy fill valves and ballcocks. It features a durable brass shank and adjustable height for compatibility with most toilet tanks. The design allows for easy adjustment of the tank water level.

Figure 1: Fluidmaster 400A-019 Brass Shank Toilet Fill Valve in its packaging.
Komponenter:

Figure 2: Key components of the Fluidmaster 400A Fill Valve with Brass Shank.
- Fill Valve Assembly: The main unit that controls water flow into the tank.
- Brass Shank: Durable metal connection for the water supply line.
- Shank Washer: Ensures a watertight seal at the tank bottom.
- Låsemøtrik: Secures the fill valve to the toilet tank.
- Refill Tube: Directs water into the overflow pipe to refill the toilet bowl.
- Refill Clip: Attaches the refill tube to the overflow pipe.
- Water Level Adjusting Screw: Allows for precise adjustment of the tank water level.
Opsætning og installation
Nødvendige værktøjer:
- Justerbar tang eller skruenøgle
- Bucket or towel for water collection
Trin-for-trin installation:
- Sluk for vandforsyningen: Locate the water supply valve on the wall near the base of the toilet. Turn it clockwise until the water flow stops completely.
- Drain the Toilet Tank: Flush the toilet to empty most of the water from the tank. Use a sponge or towel to remove any remaining water.
- Afbryd forsyningsledningen: Use pliers or a wrench to loosen the nut connecting the water supply line to the bottom of the old fill valve. Place a bucket underneath to catch any residual water.
- Fjern den gamle påfyldningsventil: Unscrew the locknut from the underside of the toilet tank that secures the old fill valve. Carefully lift the old fill valve out of the tank.
- Adjust New Fill Valve Height: The Fluidmaster 400A-019 is height adjustable (9" to 14"). Hold the new fill valve next to the old one or inside the tank to determine the appropriate height. Twist the lower section of the valve to extend or retract it until the top of the fill valve cap is approximately 3 inches above the top of the overflow pipe. This ensures proper backflow prevention.
- Installer ny påfyldningsventil: Insert the new Fluidmaster fill valve into the hole at the bottom of the toilet tank. Ensure the pre-installed shank washer is properly seated. From underneath the tank, hand-tighten the locknut onto the brass shank. Do not overtighten.
- Connect Water Supply Line: Reconnect the water supply line to the brass shank of the new fill valve. Hand-tighten first, then use pliers or a wrench for a final snug turn. Be careful not to overtighten, especially if using a plastic connector. A metal connector is recommended for the brass shank.
- Tilslut genopfyldningsrør: Attach the refill tube to the small port on the top of the fill valve. Secure the other end of the refill tube to the overflow pipe using the provided refill clip. Ensure the tube is positioned to direct water into the overflow pipe. You may need to trim the refill tube to the appropriate length.
- Tænd for vandforsyning: Slowly turn the water supply valve counter-clockwise to restore water flow to the toilet tank. Check for any leaks around the connections.
- Juster vandstanden: Allow the tank to fill. The water level should be about 1/4 inch below the top of the overflow pipe. If adjustment is needed, turn the water level adjusting screw on the top of the fill valve (marked "TANK WATER +/-") to raise or lower the float cup until the desired water level is achieved.
Installationsvideoer:
Video 1: Detailed guide on replacing a toilet fill valve, including steps for water shut-off, old valve removal, and new valve installation. (Source: Michigan Treetop Media)
Video 2: Overståetview of the Fluidmaster fill valve and its installation process. (Source: PLAN - LEARN - BUILD)
Betjeningsvejledning
The Fluidmaster 400A-019 fill valve operates automatically to refill your toilet tank after each flush. The water level is controlled by the float cup and can be adjusted to optimize water usage.
Justering af vandstand:
- To adjust the water level, locate the water level adjusting screw on the top of the fill valve.
- Turn the screw clockwise to lower the water level in the tank, reducing water usage per flush.
- Turn the screw counter-clockwise to raise the water level in the tank, increasing water volume per flush.
- Ensure the water level remains approximately 1/4 inch below the top of the overflow pipe to prevent continuous running and ensure proper backflow prevention.
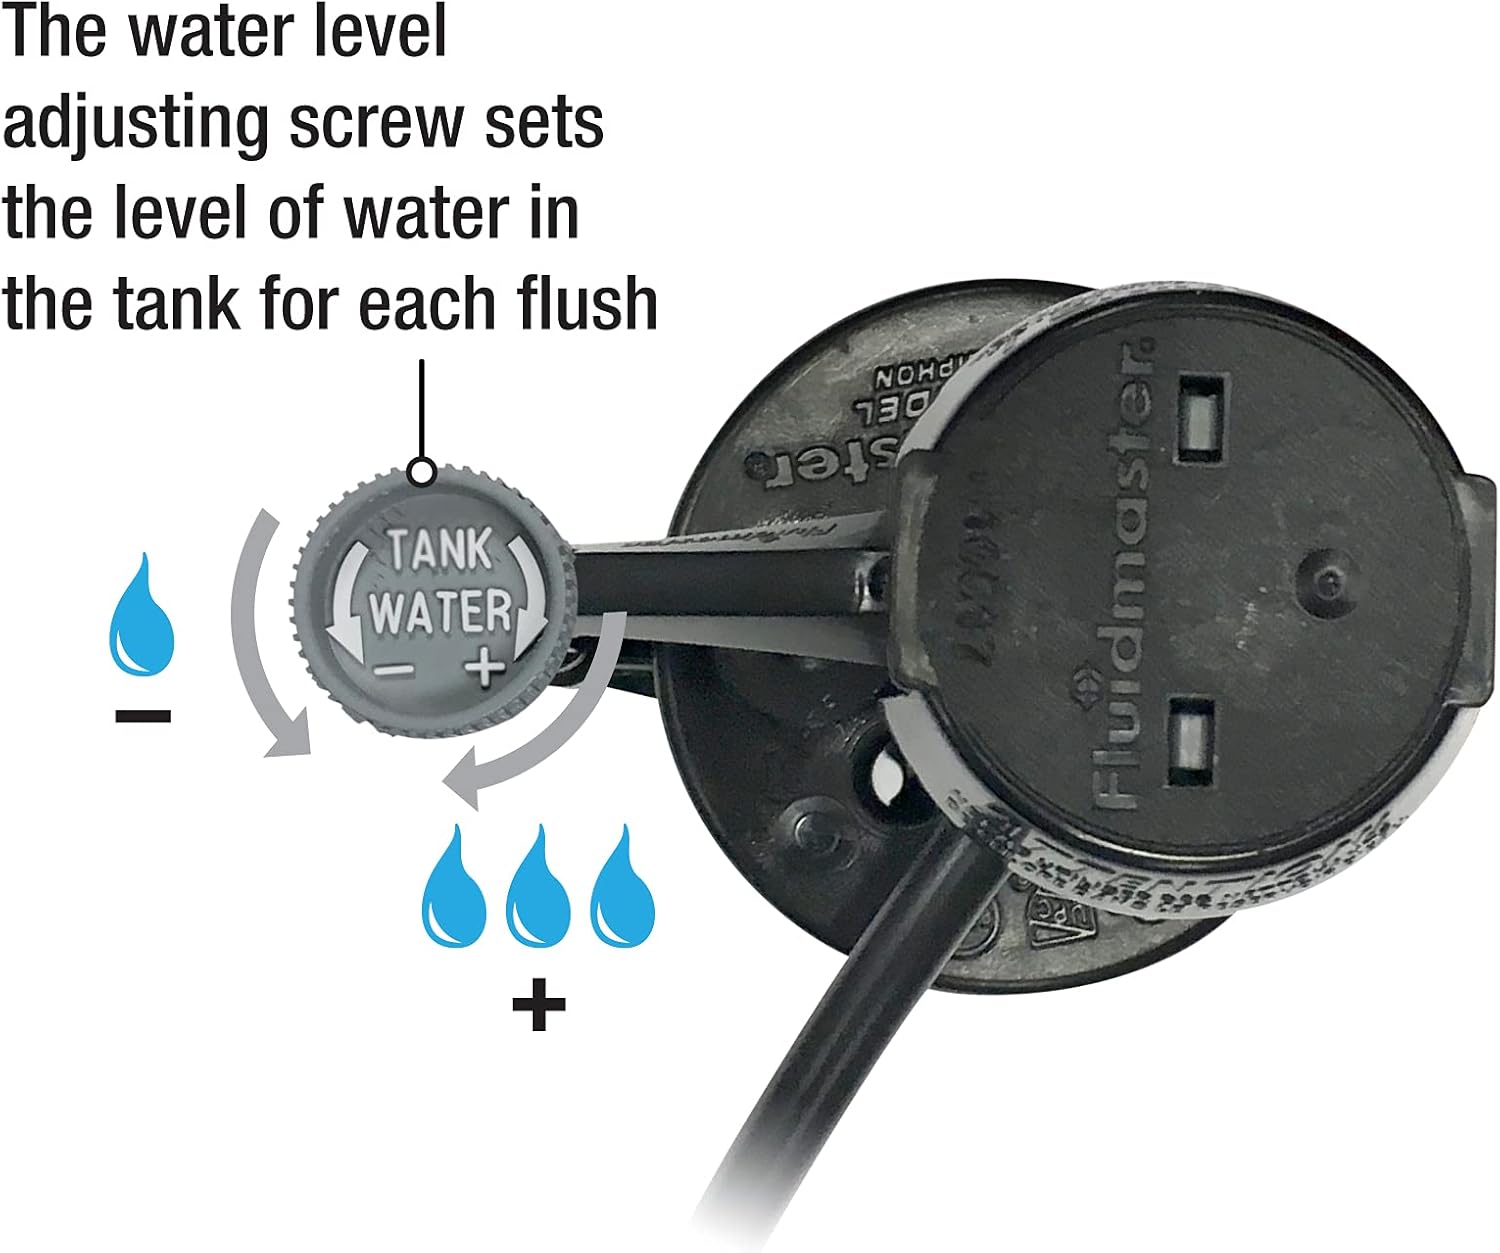
Figure 3: Water level adjustment dial on the Fluidmaster 400A fill valve.
Opretholdelse
Regular maintenance can extend the life of your fill valve and prevent common toilet issues.
- Inspicer årligt: Periodically check the fill valve for signs of wear, such as cracks, leaks, or mineral buildup.
- Rengør efter behov: If the fill valve's performance degrades, turn off the water supply and gently clean any mineral deposits from the valve components, especially the float cup and the water level adjusting screw.
- Tjek forbindelser: Ensure all connections, particularly the supply line to the brass shank, remain snug to prevent leaks.
Fejlfinding
| Problem | Mulig årsag | Løsning |
|---|---|---|
| Toilettet kører kontinuerligt | Water level too high; float cup stuck; worn flapper. | Adjust water level using the adjusting screw. Ensure float cup moves freely. Inspect and replace flapper if necessary. |
| Toilet fills slowly | Low water pressure; clogged fill valve. | Check water supply valve is fully open. Clean any debris from the fill valve inlet filter. |
| Leaking at base of fill valve | Loose locknut; damaged shank washer. | Tighten locknut (hand-tight plus 1/4 turn with wrench). Replace shank washer if damaged. |
Specifikationer
- Model: 400A-019
- Materiale: Messing, Plast
- Højdejustering: 9" til 14"
- Indløbsforbindelsesstørrelse: 2 tommer
- Indløbsforbindelsestype: Gevind
- Inkluderede komponenter: Fill valve, refill tube, clip, locknut
- Certificeringer: ASME, CSA, IAPMO, NSF, UPC, FM, WaterSense
Garanti og support
The Fluidmaster 400A-019 Brass Shank Toilet Fill Valve comes with a 7 års begrænset garanti. For warranty claims or technical support, please refer to the contact information provided on the product packaging or visit the official Fluidmaster webwebsted.
Returpolitik: This product is eligible for a 30-day refund/replacement policy when purchased from Amazon.


