1. Introduktion
Tak for købetasing the Udreamer Turntable Vinyl Record Player Model UD001. This manual provides essential information for the proper setup, operation, and maintenance of your new record player. Please read these instructions carefully before use to ensure optimal performance and longevity of the product. Keep this manual for future reference.

Image 1.1: Udreamer Turntable Vinyl Record Player Model UD001. This image shows the turntable with its clear dust cover open, revealing the black platter, tonearm, and cartridge.
2. Sikkerhedsinstruktioner
- Strømkilde: Brug kun den angivne strømadapter. Sørg for, at lydstyrkentage matcher din lokale strømforsyning.
- Vand og fugt: Udsæt ikke enheden for regn, fugt eller væsker. Placer ikke genstande fyldt med væsker, såsom vaser, på enheden.
- Varme: Placer ikke enheden i nærheden af varmekilder såsom radiatorer, varmeapparater, komfurer eller andre apparater (herunder ampløftere), der producerer varme.
- Ventilation: Sørg for tilstrækkelig ventilation. Bloker ikke ventilationsåbninger.
- Rensning: Tag stikket ud af stikkontakten før rengøring. Brug kun en blød, tør klud.
- Service: Forsøg ikke selv at servicere dette produkt. Overlad al service til kvalificeret servicepersonale.
- Placering: Placer enheden på en stabil, plan overflade for at forhindre skader som følge af fald.
3. Pakkens indhold
Kontroller venligst, at alle nedenstående varer er inkluderet i din pakke:
- Udreamer Turntable Unit
- Støvdæksel
- Platter
- Filtmåtte
- Modvægt
- 45 omdr./min. Adapter
- Strømadapter
- USB kabel
- Brugervejledning (dette dokument)
4. Produktet er slutview
Familiarize yourself with the various parts and controls of your Udreamer Turntable.

Image 4.1: Key features of the Udreamer Turntable. This image highlights the turntable's capabilities such as Vinyl to Computer conversion, Bluetooth output, iron platter, built-in phono equalizer, needle pressure adjustment, speed alignment, and moving magnet cartridge.

Billede 4.2: Detaljeret view of the turntable's components. This image shows the solid iron platter for stability and the moving magnet cartridge, which provides accurate audio reproduction and has a longer lifespan.

Image 4.3: Internal and external components of the turntable system. This diagram illustrates the belt-driven mechanism, arm lifter, record mat, foot pads for vibration isolation, and the 45 RPM adapter.
4.1 Forside og top View
- Støvdæksel: Beskytter plade og tonearm mod støv.
- Fad: The surface on which records are placed.
- Spindel: Holder pladen på plads på fadet.
- Felt Mat: Provides cushioning for records and reduces static.
- Tonearm: Holder patronen og pennen.
- Cartridge with Stylus: Læser pladens riller.
- Modvægt: Balancerer tonearmen og justerer sporingskraften.
- Cueing håndtag: Raises and lowers the tonearm gently.
- Tonearmstøtte: Sikrer tonearmen, når den ikke er i brug.
- Hastighedsvælger: Switches between 33 1/3 and 45 RPM.
- Pitch kontrol: Adjusts playback speed fine-tuning.
4.2 Bagpanel
- LINE/BT OUT/PHONO Switch: Selects output mode (Line Out, Bluetooth Out, Phono Out).
- RCA-udgangsstik (V/H): Connects to external active speakers or an amplivligere.
- USB-PC Port: Connects to a computer for vinyl-to-digital conversion.
- DC IN-stik: Tilslutter strømadapteren.
- Tænd / sluk-kontakt: Tænder eller slukker for enheden.
5. Opsætning
5.1 Udpakning og placering
- Carefully remove the turntable from its packaging. Retain packaging for future transport.
- Placer pladespilleren på en stabil, plan overflade, væk fra direkte sollys, varmekilder og for meget støv eller vibrationer.
5.2 Montering af plade og bånd
- Placer tallerkenen på den midterste spindel.
- Carefully lift the felt mat to expose the drive belt underneath the platter.
- Locate the motor pulley (a small brass cylinder) on the top left of the turntable chassis.
- Using the provided ribbon or your fingers, gently stretch the drive belt and hook it around the motor pulley. Ensure the belt is flat and not twisted.
- Place the felt mat back on the platter.
5.3 Counterweight Adjustment
Proper counterweight adjustment is crucial for optimal sound quality and to prevent damage to your records and stylus.

Image 5.1: Counterweight and Pitch Adjustment. This image illustrates how to accurately adjust the tonearm pressure using the counterweight and fine-tune the playback speed with the pitch control.
- Gently remove the stylus protector.
- Place the counterweight onto the rear of the tonearm. Rotate it clockwise until it is fully threaded.
- Release the tonearm from its rest. Move the cueing lever to the down position.
- Carefully rotate the counterweight until the tonearm is perfectly balanced horizontally, floating freely without touching the surface or rising too high.
- Once balanced, hold the counterweight steady with one hand and rotate the numbered ring on the front of the counterweight until '0' aligns with the line on the tonearm.
- Rotate the entire counterweight (including the numbered ring) counter-clockwise to the recommended tracking force. For the pre-installed magnetic cartridge, a typical tracking force is between 2.5 to 3.5 grams. Refer to your cartridge's specific recommendations if available.
- Return the tonearm to its rest and engage the tonearm clamp.
5.4 Montering af støvdæksel
Insert the hinges of the dust cover into the hinge receptacles at the rear of the turntable chassis.
5.5 Strømtilslutning
Connect the power adapter to the DC IN jack on the rear of the turntable, then plug the adapter into a wall outlet.
6. Betjeningsvejledning
6.1 Grundlæggende afspilning af optagelser
- Placer en plade på pladen. Hvis du afspiller en 45 RPM single, skal du først placere 45 RPM-adapteren på spindlen.
- Vælg den passende hastighed (33 1/3 eller 45 o/min) ved hjælp af hastighedsvælgeren.
- Ensure the LINE/BT OUT/PHONO switch is set to 'LINE OUT' or 'PHONO' if connecting to external speakers, or 'BT OUT' for Bluetooth.
- Turn on the turntable using the Power ON/OFF switch.
- Release the tonearm from its rest.
- Løft tonearmen ved hjælp af cue-håndtaget.
- Placer tonearmen manuelt over den ønskede startrille på pladen.
- Gently lower the tonearm using the cueing lever. The stylus will make contact with the record, and playback will begin.
- At the end of the record, the auto-stop function will stop the platter rotation. Lift the tonearm, return it to its rest, and turn off the turntable.
6.2 Pitch Adjustment
Use the Pitch Control knob (refer to Image 5.1) to fine-tune the playback speed. Rotate the knob to increase or decrease the speed slightly.
6.3 Bluetooth Output
The turntable can wirelessly stream audio to Bluetooth-enabled devices such as headphones, speakers, or soundbars.

Image 6.1: Bluetooth Output functionality. This image demonstrates the turntable's ability to wirelessly connect to various Bluetooth receivers like earphones, soundbars, and external speakers.
- Ensure the LINE/BT OUT/PHONO switch on the rear is set to 'BT OUT'.
- Turn on your Bluetooth receiving device (e.g., speaker, headphones) and set it to pairing mode.
- Turn on the turntable. The Bluetooth indicator light on the turntable will flash, indicating it is searching for a device.
- Once paired, the Bluetooth indicator light will become solid. Audio from the turntable will now play through your Bluetooth device.
- Hvis parringen mislykkes, skal du slukke begge enheder og prøve igen.
6.4 Vinyl to Computer Recording (USB-PC)
You can convert your vinyl records into digital audio files using the USB-PC output.

Image 6.2: Vinyl to Computer conversion setup. This image shows the turntable connected to a laptop via a USB cable, illustrating the process of converting vinyl audio to MP3 format for computer playback.
- Connect the USB cable from the turntable's USB-PC port to an available USB port on your computer.
- Ensure the LINE/BT OUT/PHONO switch is set to 'LINE OUT' or 'PHONO'.
- Install and open audio recording software on your computer (e.g., Audacity, a free open-source software).
- In your recording software's preferences, select the turntable as the audio input device (it may appear as 'USB Audio CODEC' or similar).
- Start recording in the software, then begin playing your record on the turntable (refer to Section 6.1).
- Once the record finishes, stop recording in the software and save your digital audio file.
6.5 Connecting External Speakers (RCA)
The turntable features RCA output jacks for connecting to external active speakers or an amplivligere.
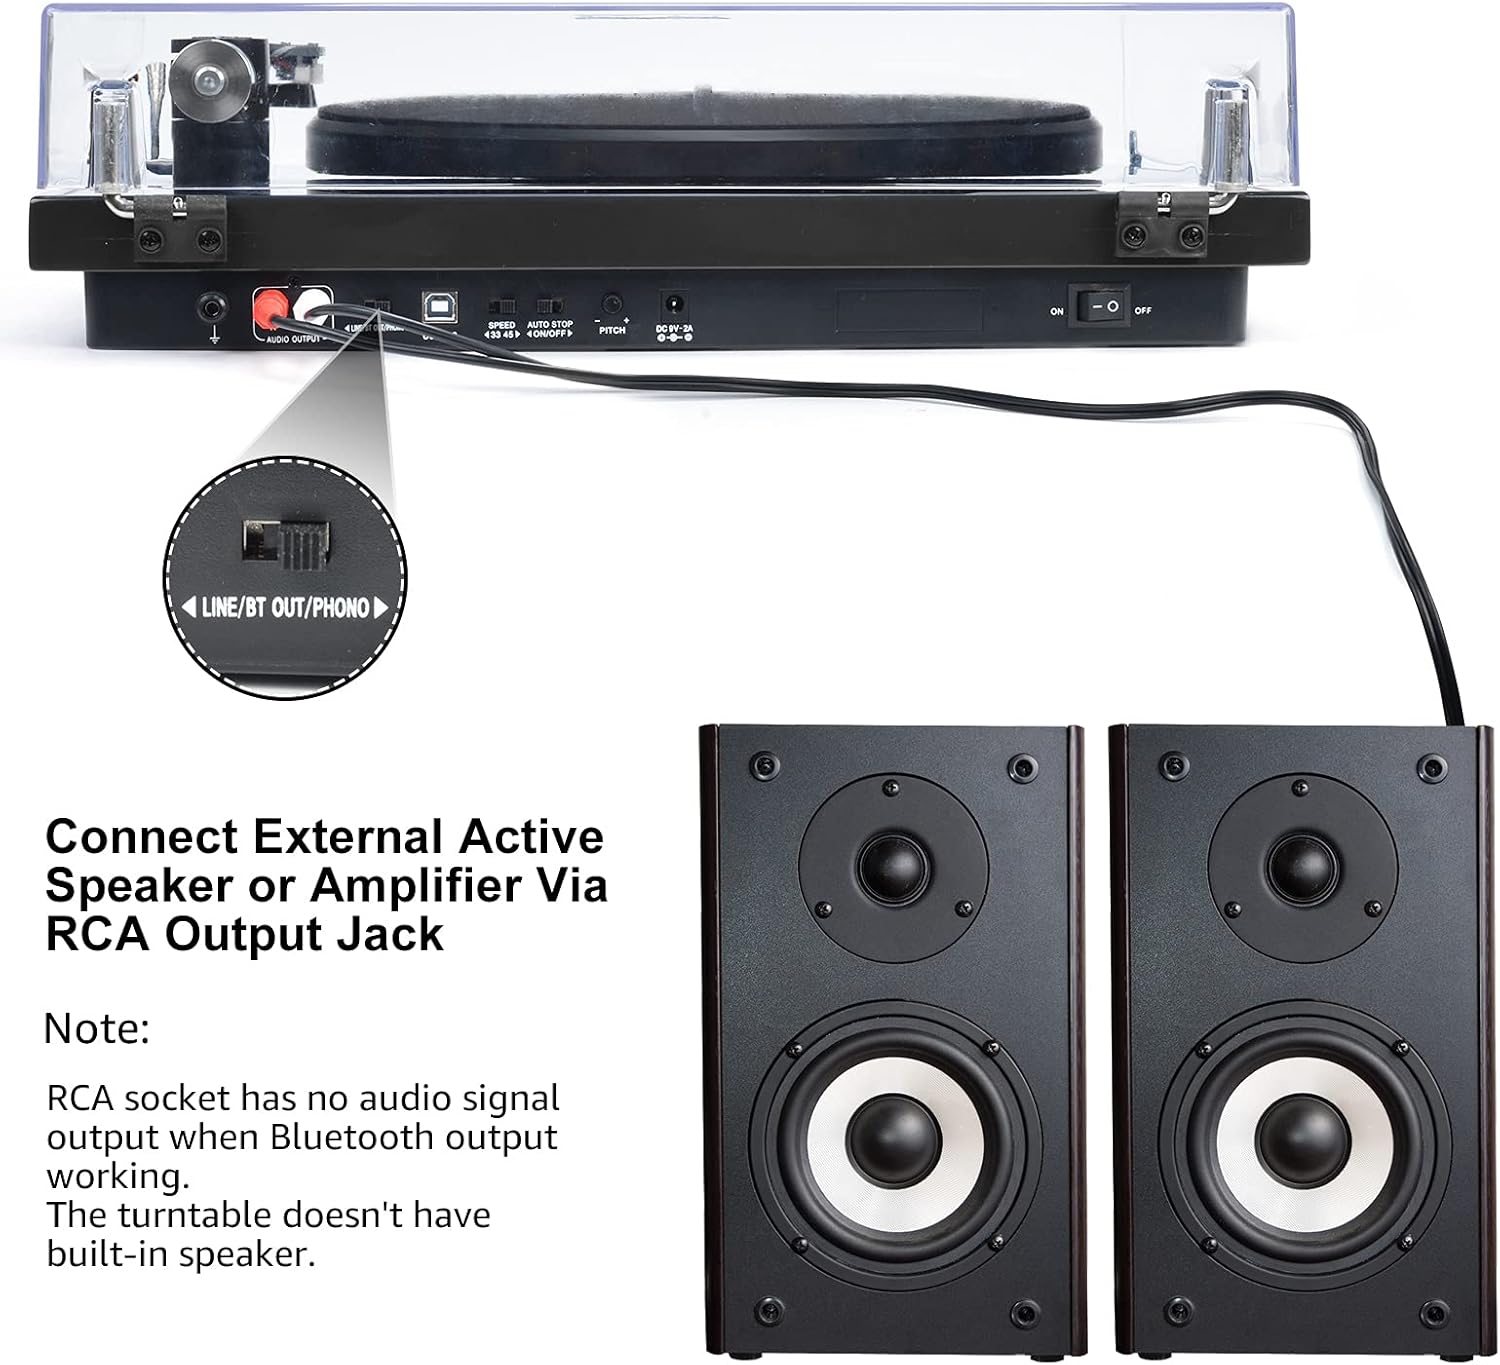
Image 6.3: Connecting to external speakers. This image shows the rear panel of the turntable with the RCA output jacks connected to a pair of external active speakers, indicating how to route audio for amplified playback.
- Ensure the LINE/BT OUT/PHONO switch on the rear is set to 'LINE OUT' if connecting to active speakers (speakers with their own amplifier) eller en amplifier's 'LINE IN' input. Set to 'PHONO' if connecting to an amplifier with a dedicated 'PHONO' input.
- Connect the RCA cables (red for right channel, white for left channel) from the turntable's RCA output jacks to the corresponding input jacks on your active speakers or amplivligere.
- Turn on your external audio system and adjust the volume.
Note: The Udreamer Turntable Model UD001 does not have built-in speakers. An external audio system (active speakers, amplifier, or Bluetooth device) is required for sound output.
7. Vedligeholdelse
7.1 Rengøring
- Turntable Unit: Wipe the exterior with a soft, dry, lint-free cloth. Do not use harsh chemicals or abrasive cleaners.
- Støvdæksel: Clean with a soft cloth and a mild, non-abrasive cleaner. Avoid scratching the surface.
- Stylus: Use a soft stylus brush, brushing gently from back to front (in the direction of play) to remove dust and debris. Never use your fingers.
7.2 Udskiftning af pen
The stylus (needle) is a consumable part and will wear out over time, typically after 300-500 hours of playback. A worn stylus can damage your records and degrade sound quality. Replace the stylus when you notice a decrease in sound quality or visible wear.
- Gently grasp the front of the cartridge body.
- Pull the old stylus assembly downwards and forwards to detach it from the cartridge body.
- Align the new stylus assembly with the cartridge body and push it upwards and backwards until it clicks into place.
- Re-adjust the tracking force if necessary after replacing the stylus.
8. Fejlfinding
If you encounter issues with your turntable, refer to the following common problems and solutions:
| Problem | Mulig årsag | Løsning |
|---|---|---|
| Ingen strøm | Strømadapter ikke tilsluttet; Strømafbryder slukket | Ensure power adapter is securely plugged in; Turn power switch ON |
| Ingen lyd | Incorrect output mode selected; External speakers not connected/powered; Bluetooth not paired | Set LINE/BT OUT/PHONO switch correctly; Connect/power on external speakers; Pair Bluetooth device |
| Lyd forvrænget eller springende | Stylus dirty or worn; Tracking force incorrect; Turntable not level; Record dirty or damaged | Clean or replace stylus; Adjust counterweight; Place turntable on a level surface; Clean record |
| Tallerkenen drejer ikke | Drive belt dislodged or broken; Auto-stop engaged | Re-install or replace drive belt; Ensure tonearm is over the record to disengage auto-stop |
| Bluetooth-parring mislykkes | Device too far; Device not in pairing mode; Interference | Move devices closer; Ensure receiving device is in pairing mode; Restart both devices |
9. Specifikationer
| Feature | Specifikation |
|---|---|
| Produktdimensioner | 12.8 x 9.8 x 4.7 tommer |
| Varens vægt | 5.79 pund |
| Varemodelnummer | UD001 |
| Mærke | Udreamer |
| Speciel funktion | Indbygget Bluetooth-modtager |
| Materiale | Plast |
| Stil | Vintage |
| Kompatible enheder | Hovedtelefon, højttaler |
| Motortype | AC motor |
| Signalformat | Digital |
| Strømkilde | Elektrisk med ledning |
| Signal-støjforhold | 60 dB |
10. Garanti og support
Udreamer products are designed and manufactured to the highest quality standards. For warranty information or technical support, please refer to the contact details provided with your purchase or visit the official Udreamer website. Please have your model number (UD001) and purchase information ready when contacting support.


