1. Introduktion
This manual provides essential information for the safe operation, assembly, maintenance, and troubleshooting of your BILT HARD 13-inch Floor Drill Press. Please read and understand all instructions before operating the machine to ensure personal safety and optimal performance.
The BILT HARD 13-inch Floor Drill Press is designed for drilling through various materials such as metal, wood, and plastics. It features a 16-speed adjustment, a 1 HP motor, and a 5/8-inch keyed chuck.
2. Sikkerhedsinstruktioner
Generel sikkerhed
- Brug altid passende personlige værnemidler (PPE), herunder sikkerhedsbriller, høreværn og handsker.
- Sørg for, at arbejdsområdet er rent, godt oplyst og fri for forhindringer.
- Hold børn og uautoriseret personale væk fra maskinen under drift.
- Sikkert clamp all workpieces to the drill press table before drilling.
- Never wear loose clothing, jewelry, or long hair that could become entangled in moving parts.
- Disconnect power before making adjustments, changing accessories, or performing maintenance.
Elektrisk sikkerhed
- Ensure the power supply matches the specifications of the drill press (120 Volts).
- Do not operate the drill press in damp eller våde forhold.
- Avoid using extension cords unless absolutely necessary, and ensure they are rated for the tool's power requirements.
- Regularly inspect the power cord for damage. Do not use if damaged.
3. Pakkens indhold
Bekræft, at alle nedenstående varer er til stede i pakken:
- BILT HARD 13-inch Floor Drill Press unit
- 5/8-inch Keyed Chuck and Chuck Key
- Sekskantnøgler
- Monteringsværktøj
- Drill Vise (if included with specific model variant)

Image 1: BILT HARD 13-inch Floor Drill Press with included drill vise. The main unit is blue and black, featuring a motor housing, column, worktable, and base. A separate blue drill vise is shown next to it.
4. Opsætning og montering
Follow these steps to assemble your drill press. It is recommended to have assistance due to the weight of the unit (approximately 76 lbs).
- Udpakning: Fjern forsigtigt alle komponenter fra emballagen. Undersøg for eventuelle forsendelsesskader.
- Base and Column Assembly: Secure the column to the base using the provided hardware. Ensure all bolts are tightened securely. The base has pre-drilled holes for mounting to a workbench or stand.
- Hovedsamling: Mount the head assembly (motor and spindle housing) onto the top of the column. Tighten the securing bolts.
- Worktable Assembly: Attach the worktable support arm to the column and then secure the worktable to the support arm. Adjust the height and position as needed.
- Montering af borepatron: Clean the tapered spindle and the inside of the chuck. Place the chuck onto the spindle and firmly tap it into place with a rubber mallet or block of wood to ensure a secure fit.
- Installation af håndtag: Attach the feed handles to the spindle quill.
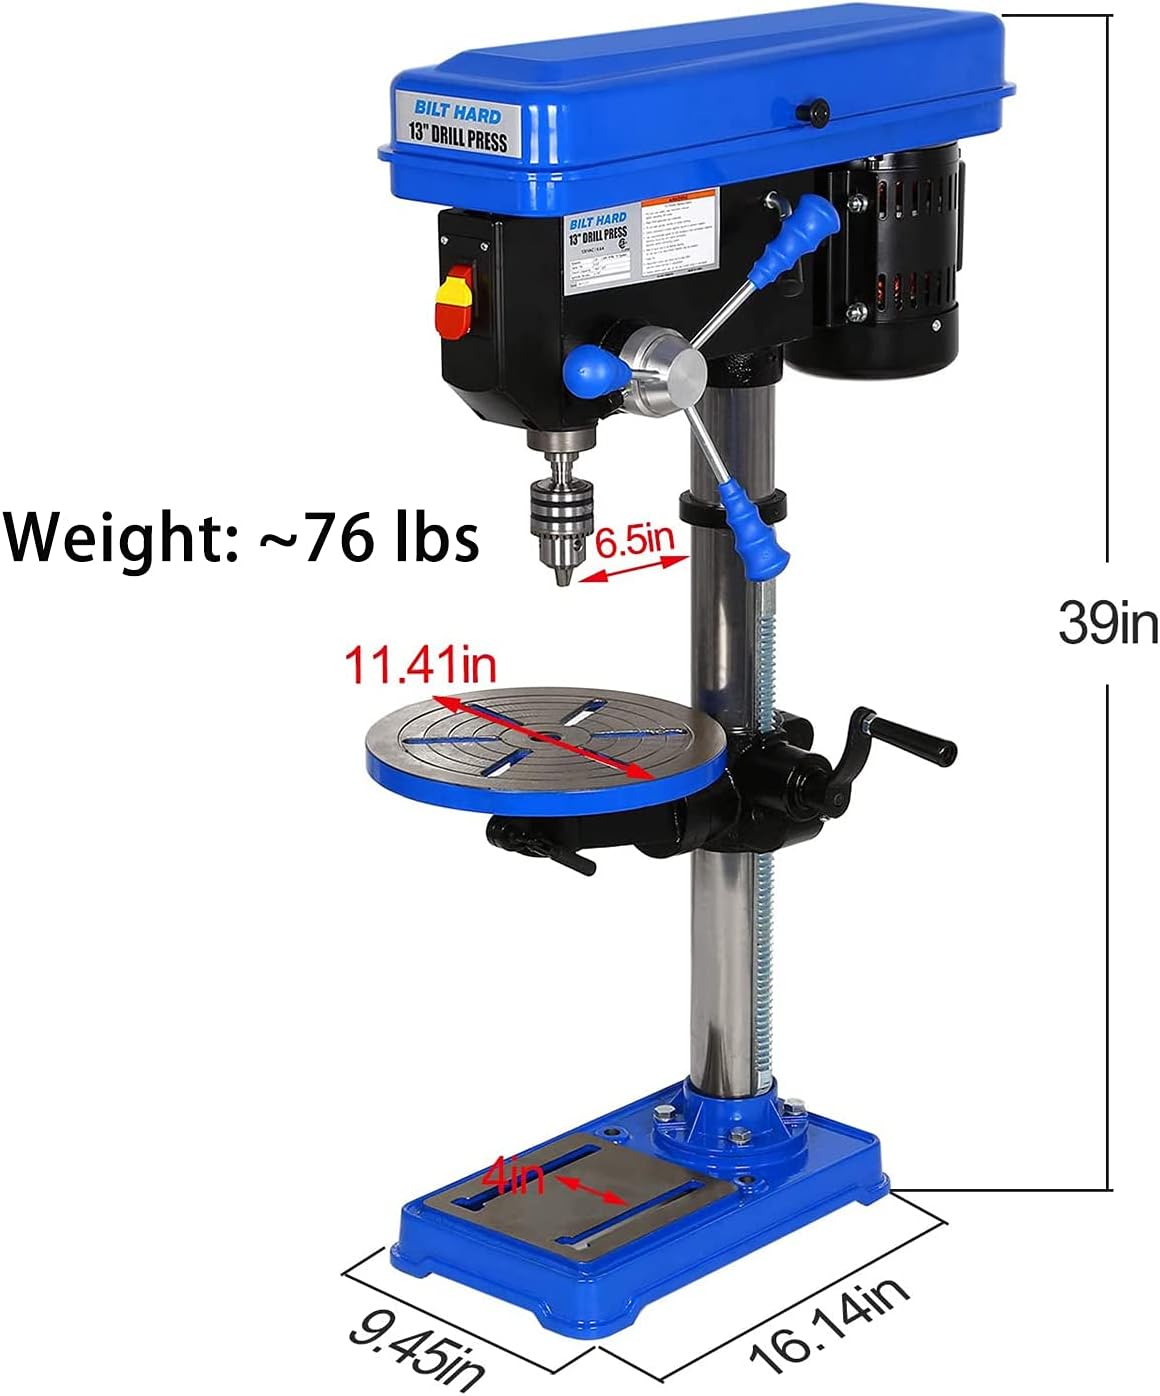
Image 2: Diagram showing the dimensions of the BILT HARD 13-inch Floor Drill Press. Key measurements include a total height of 39 inches, a base of approximately 9.45 x 16.14 inches, and a worktable diameter of 11.41 inches. The approximate weight is 76 lbs.
5. Betjeningsvejledning
5.1. Speed Adjustment (16 Speeds)
The drill press offers 16 operating speeds ranging from 220 to 3600 RPM. To adjust the speed:
- Afbryd boremaskinen fra strømkilden.
- Open the top cover of the head assembly.
- Refer to the belt speed settings chart located inside the cover.
- Loosen the motor lock nuts and adjust the belt tension lever to release tension.
- Move the drive belt to the desired pulley combination for the required speed.
- Re-tension the belt and tighten the motor lock nuts.
- Luk topdækslet.

Billede 3: View of the open top cover of the drill press head, showing the belt and pulley system for 16-speed adjustment. A diagram inside the cover illustrates different belt configurations for various RPMs.
5.2. Worktable Adjustment
The worktable can be adjusted for height and angle:
- Højdejustering: Loosen the worktable locking handle. Use the crank handle to raise or lower the table to the desired height. Tighten the locking handle securely.
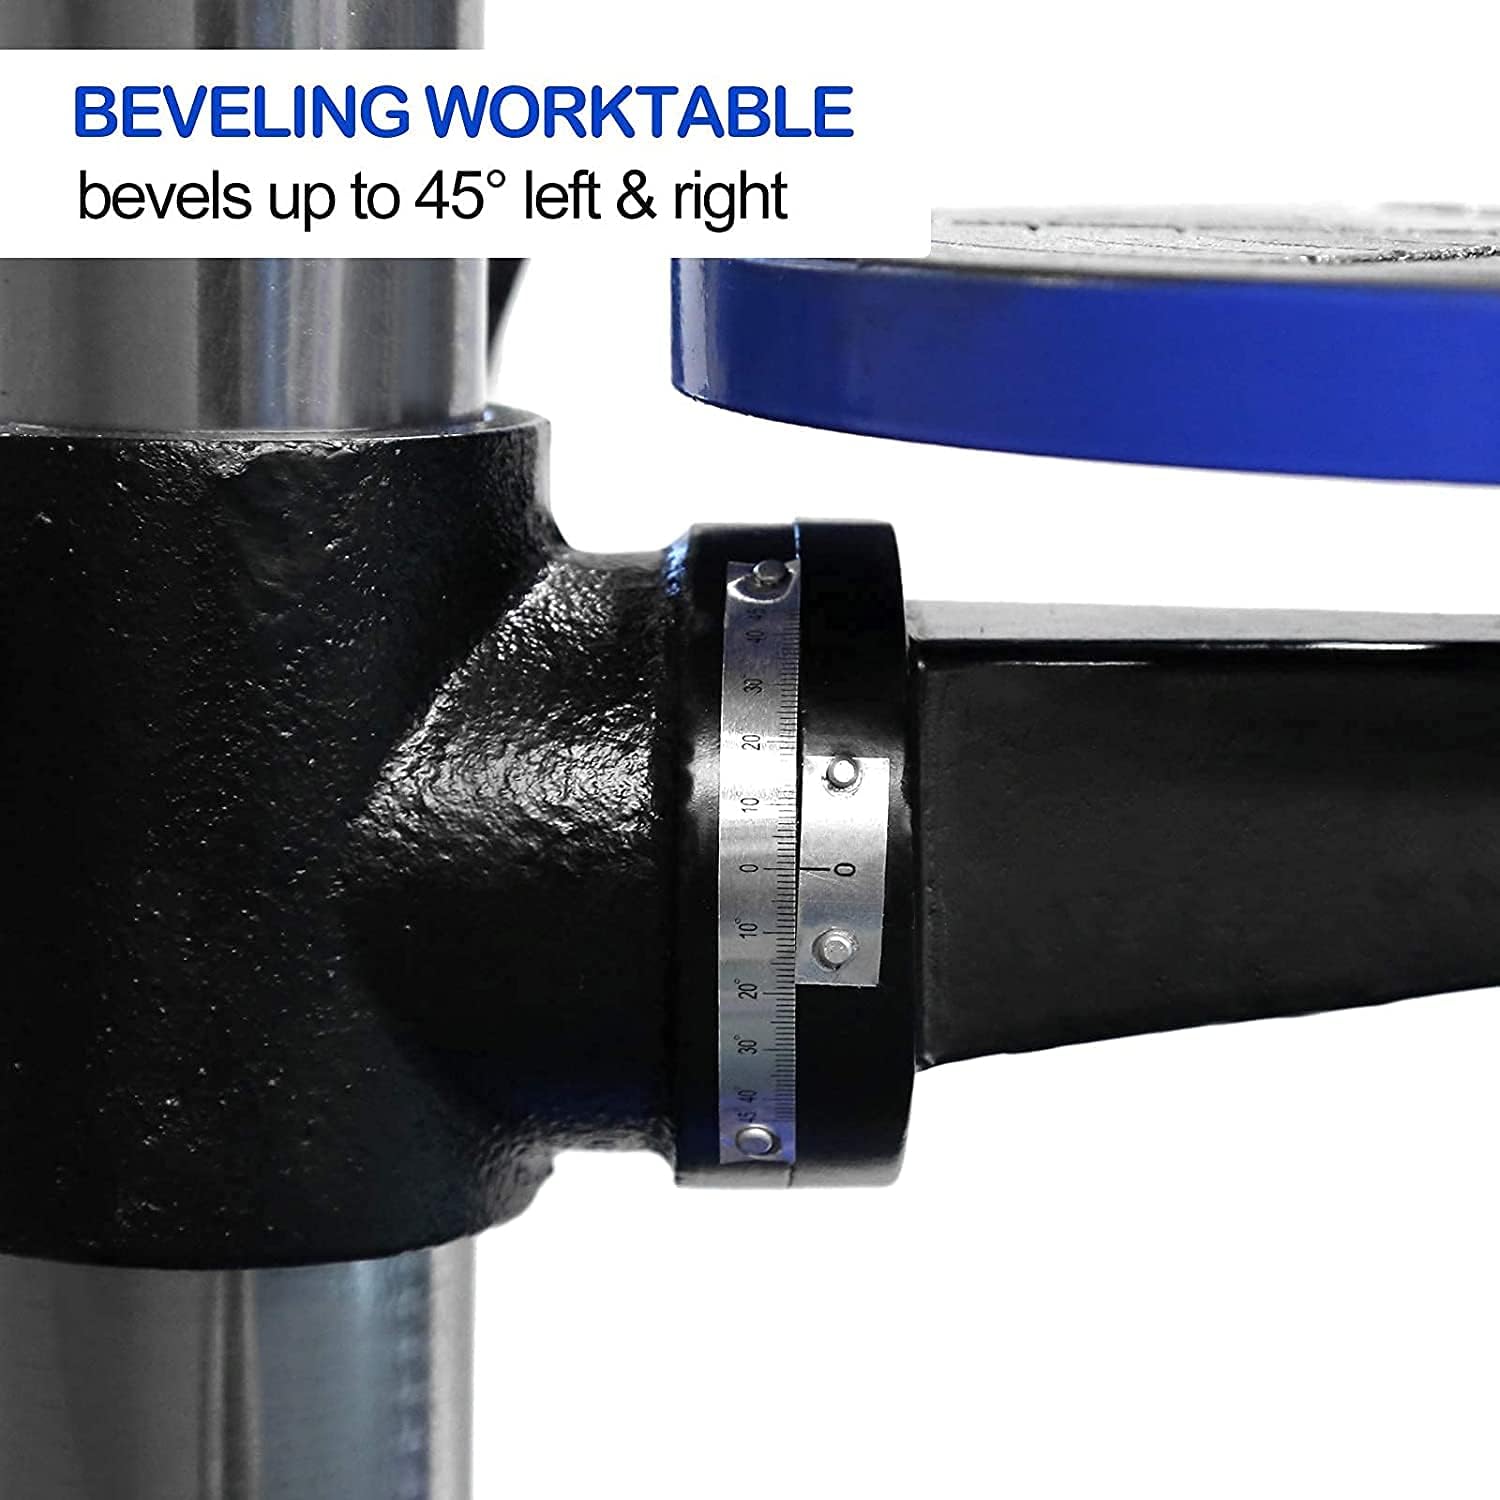
- Bevel Adjustment: The worktable can bevel up to 45 degrees left and right for angled drilling. Loosen the bevel locking bolts beneath the table. Adjust the table to the desired angle using the angle scale, then tighten the bolts.

Image 4: Close-up of the drill press worktable support, showing the mechanism for bevel adjustment. An angle scale indicates the degree of tilt, up to 45 degrees left or right.
5.3. Chuck and Drill Bit Installation
To install a drill bit:
- Ensure the drill press is unplugged.
- Insert the drill bit into the chuck jaws. Ensure the bit is centered and fully seated.
- Use the chuck key to tighten the chuck jaws around the drill bit. Tighten all three holes for maximum grip.
- Remove the chuck key immediately after tightening to prevent it from becoming a projectile during operation.
Billede 5: Nærbillede view of the 5/8-inch keyed chuck on the BILT HARD drill press, showing the jaws ready to accept a drill bit. The chuck is located at the bottom of the spindle.
5.4. Setting Drilling Depth
The adjustable depth stop allows for precise and repeatable drilling depths:
- Lower the drill bit until it touches the workpiece.
- Adjust the depth stop collar to the desired depth.
- Tighten the depth stop lock nut. The drill will stop feeding once this depth is reached.

Image 6: Close-up of the drill press head, highlighting the depth stop mechanism and the feed handles. The image also indicates the 3-1/8 inch spindle travel.
5.5. General Drilling Procedure
- Select the appropriate drill bit and speed for your material.
- Sikkert clamp the workpiece to the drill press table or use the included drill vise.
- Adjust the worktable height and angle as needed.
- Set the drilling depth stop.
- Turn on the drill press.
- Slowly lower the drill bit into the workpiece using the feed handles, applying steady, even pressure.
- Når den ønskede dybde er nået, trækkes borekronen ud af emnet.
- Turn off the drill press.
6. Vedligeholdelse
Regular maintenance ensures the longevity and safe operation of your drill press.
- Rensning: Keep the machine clean and free of dust and debris. Use compressed air to clear chips from the motor and spindle area.
- Smøring: Periodically apply a light machine oil to the column, quill, and other moving parts to ensure smooth operation.
- Bælteinspektion: Regularly check the drive belt for wear, cracks, or stretching. Replace if necessary.
- Vedligeholdelse af borepatron: Keep the chuck jaws clean and free of rust. Apply a small amount of lubricant to the chuck key mechanism.
- El-inspektion: Inspect the power cord and switch for any signs of damage.
7. Fejlfinding
| Problem | Mulig årsag | Løsning |
|---|---|---|
| Borepressen starter ikke | No power, faulty switch, motor overload | Check power connection, inspect switch, allow motor to cool |
| Overdreven vibration | Loose components, unbalanced drill bit, worn belt | Tighten all fasteners, replace or re-seat drill bit, inspect/replace belt |
| Boret skærer ikke effektivt | Dull drill bit, incorrect speed, insufficient pressure | Replace/sharpen drill bit, adjust speed, apply steady pressure |
| Chuck key flies out during operation | Chuck key left in chuck | Always remove chuck key immediately after tightening. |
8. Specifikationer
| Feature | Specifikation |
|---|---|
| Modelnummer | 5f7eb013-a088-4192-86b4-f814df914a06 |
| Svinge | 13-1/4 tomme |
| Spindelrejse | 3-1/8 tomme |
| Chuck kapacitet | 7/64" to 5/8-inch (B16) |
| Motor | 6.6 Amp, 1 HP Induction Motor |
| Driftshastigheder | 16 hastigheder (220-3600 omdr./min.) |
| Worktable Diameter | 11.41 tommer |
| Worktable Bevel | 45 degrees left and right |
| Strømkilde | Elektrisk med ledning |
| Voltage | 120 volt |
| Wattage | 792 watt |
| Produktdimensioner | 355.6 x 50.8 x 50.8 cm (39 tommer højde) |
| Varens vægt | 38.1 kg (ca. 76 lbs) |
| Materiale | Metal (Steel construction for head, table, base) |
| Certificeringer | CSA-certificeret |
9. Garanti og support
BILT HARD offers a warranty of 90 days from the date of purchase for replacement or refund. For warranty claims, technical assistance, or to order replacement parts, please contact BILT HARD customer support.
Refer to your purchase documentation or the official BILT HARD webwebstedet for de mest aktuelle kontaktoplysninger og detaljerede garantivilkår.


