Indledning
This manual provides detailed instructions for the operation and maintenance of your mooas MC-M3 Digital Mirror LED Alarm Clock. This device features a large LED display, dual alarm functionality, adjustable brightness, temperature and humidity display, and a convenient USB charging port.

Billede: Overview of the mooas MC-M3 Digital Mirror LED Alarm Clock, showcasing its design and available colors (Mint, Dark Gray, White).
Pakkens indhold
- mooas MC-M3 Digital Mirror LED Alarm Clock
- USB Cable (1.2A)
- Brugermanual
Opsætning
Tænd for enheden
The mooas MC-M3 clock can be powered via a USB cable or AAA batteries. For continuous display of the LED, the clock must be connected to a USB power source.
- USB Strøm: Connect the provided USB cable to the DC 5V power terminal on the back of the clock and plug the other end into a USB power adapter (not included) or a powered USB port.
- Batteristrøm: Insert 3 AAA batteries (not included) into the battery compartment on the back of the clock. When operating on battery power, the LED display will only light up for 10 seconds after a button press to conserve energy.
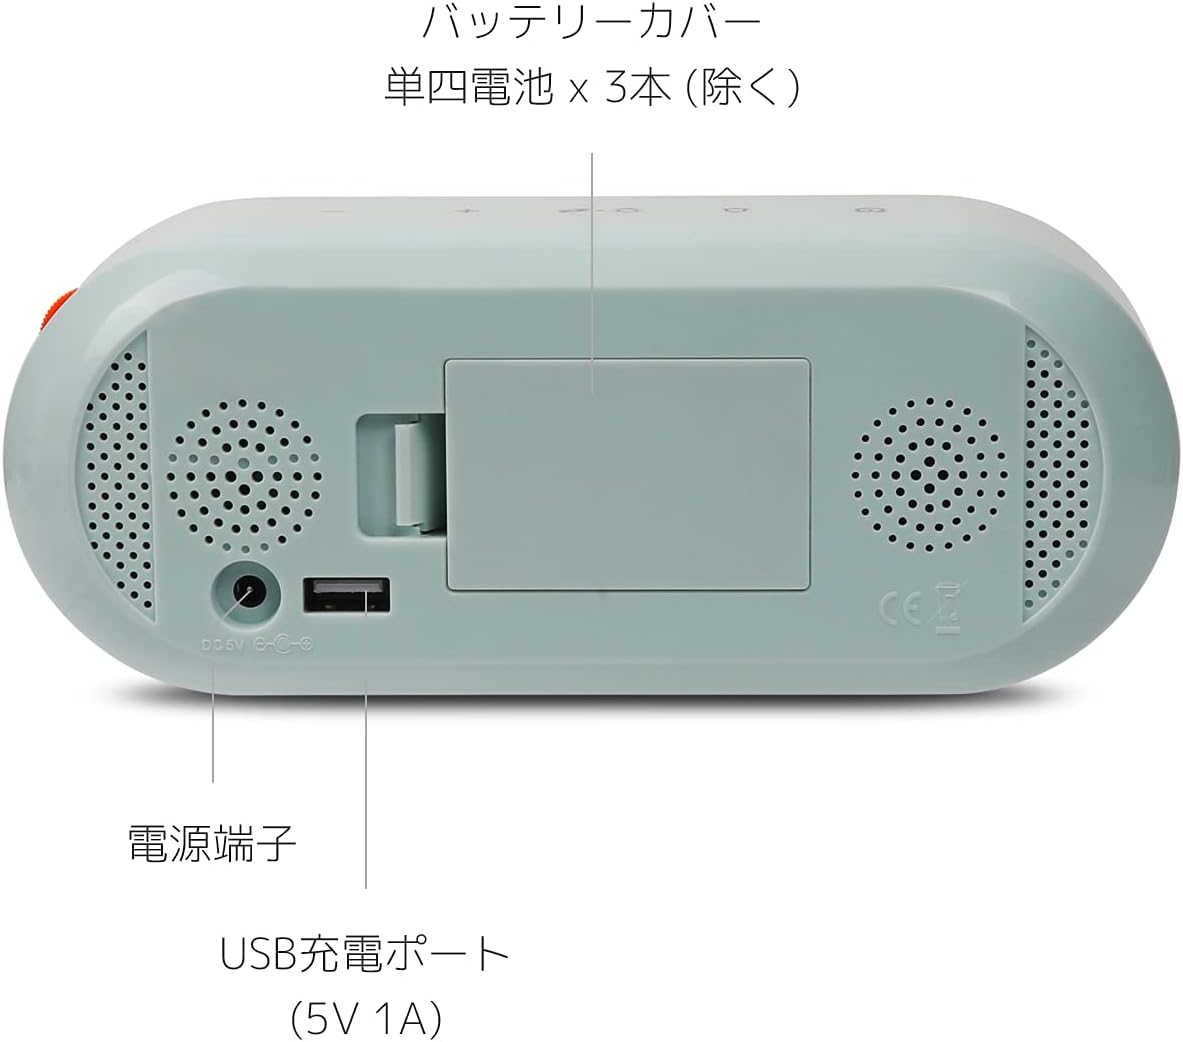
Image: Rear panel of the clock, highlighting the battery cover, power input, and USB charging port.
Betjeningsvejledning
Kontrolknapper overview
The clock features intuitive touch sensor buttons on the top panel and a rolling button on the side for brightness control.

Image: Top panel of the clock with touch sensor buttons clearly visible.
Indstilling af tid og dato
- Tryk og hold på Tid button (clock icon) on the top panel until the time display flashes.
- Brug + og - knapper for at justere timen.
- Tryk på Tid button again to move to minute setting, then use + og - at justere.
- Fortsæt med at trykke på Tid knappen for at gennemgå indstillingerne for år, måned og dag, og juster hver med + og -.
- Tryk på Tid button one last time to confirm and exit time/date setting.
Setting Alarms (Dual Alarms)
- Tryk og hold på Alarm button (bell icon) on the top panel until the alarm time display flashes. The alarm indicator (1 or 2) will also flash.
- Brug + og - knapper for at justere alarmtiden.
- Tryk på Alarm button again to move to minute setting, then use + og - at justere.
- Tryk på Alarm button again to set the second alarm, repeating steps 2 and 3.
- Tryk på Alarm button one last time to confirm and exit alarm setting.
To activate or deactivate an alarm, short press the Alarm button. The corresponding alarm indicator (1 or 2) will appear or disappear on the display.

Billede: Detaljeret view of the display, indicating time, alarm status, humidity, and temperature.
Snooze funktion
Når en alarm lyder, skal du trykke på Snooze button (Zz icon) on the top panel to activate the snooze function. The alarm will temporarily stop and sound again after a set interval. If no buttons are pressed when the alarm rings, it will automatically sound at the same time the next day.
Justering af lysstyrke
Adjust the LED display brightness using the orange rolling button located on the upper right side of the clock. Roll the button up or down to increase or decrease brightness. This allows for fine-tuned adjustment to suit various lighting conditions, including dimming for nighttime use.

Image: The rolling button for detailed brightness control.
12/24 Hour Mode and Temperature Units
To switch between 12-hour and 24-hour time formats, or between Celsius (°C) and Fahrenheit (°F) for temperature display, short press the Mode button (sun/moon icon with Zz) on the top panel. Cycle through the options until your desired format is displayed.
USB-opladningsport
The clock is equipped with a USB charging port on its back, allowing you to charge compatible devices such as smartphones. The maximum output for this port is 5V 1A.

Image: The clock displaying time, temperature, and humidity, with a smartphone charging from its USB port.
Opretholdelse
- Clean the clock's surface with a soft, dry cloth. Avoid abrasive cleaners or solvents.
- Ensure the USB cable and power adapter are in good condition.
- If using batteries, replace them when the display becomes dim or unresponsive (when not connected to USB power).
- Undgå at udsætte uret for ekstreme temperaturer, direkte sollys eller høj luftfugtighed.
Fejlfinding
| Problem | Mulig årsag | Løsning |
|---|---|---|
| Display is off or very dim. | Not connected to USB power, or batteries are low/dead. | Connect the clock to a USB power source for continuous display. If using batteries, replace them. Adjust brightness with the rolling button. |
| Alarmen lyder ikke. | Alarmen er ikke aktiveret eller indstillet forkert. | Ensure the alarm indicator (1 or 2) is visible on the display. Re-check alarm time settings. |
| Tid/dato er forkert. | Time/Date was not set or reset due to power interruption. | Følg instruktionerne under "Indstilling af tid og dato" for at nulstille. |
| USB-opladeporten virker ikke. | Device not properly connected or power source insufficient. | Ensure the clock is connected to a stable USB power source. Check the charging cable of the device you are trying to charge. |
Specifikationer
| Mærke | mooas |
| Modelnummer | MC-M3 |
| Display Type | Digital LED |
| Strømkilde | Corded Electric (USB DC 5V) / 3 x AAA Batteries (not included) |
| USB udgang | 5V 1A (Max) |
| Produktdimensioner | 20.32 cm B x 10.16 cm H (8 cm B x 4 cm H) |
| Varens vægt | 6 ounces (170.1 gram) |
| Materiale | Acrylonitril Butadien Styren (ABS) |
| Særlige funktioner | Dual Alarm, Snooze, Brightness Adjustment, 12/24H Mode, Temperature (°C/°F) & Humidity Display, Mirror Display |

Image: The mooas MC-M3 clock in its three available colors, illustrating its compact size.
Garanti og support
Specific warranty information is not provided in the product details. For support or warranty inquiries, please contact mooas customer service through their official webwebstedet eller forhandleren, hvor produktet blev købt.


