Vigtige sikkerhedsinstruktioner
- Sørg for, at enheden er placeret på en stabil, flad overflade.
- Holdes væk fra vand og miljøer med høj luftfugtighed.
- Må ikke udsættes for direkte sollys eller ekstreme temperaturer.
- Use only the provided USB power cable. Do not attempt to power with batteries.
- Avoid disassembling the device; refer servicing to qualified personnel.
1. Opsætning
1.1 Pakkens indhold
Bekræft at alle varer er til stede i pakken:
- JALL Wooden Digital Alarm Clock (Model WX18039)
- USB-strømkabel (strømadapter medfølger ikke)
- Brugervejledning (dette dokument)
1.2 Tænding af enheden
The JALL Digital Alarm Clock is powered exclusively via USB. It does not support battery operation.
- Connect the small end of the USB power cable to the DC 5V port on the back of the alarm clock.
- Plug the larger end of the USB cable into a standard USB power adapter (e.g., phone charger, computer USB port) or a wall outlet with a USB port.
- Displayet lyser op, hvilket indikerer, at enheden er tændt.

Image: The JALL alarm clock connected to a USB power source, illustrating the 'Powered by USB Only' feature. This clock requires continuous USB power to function.
1.3 Indledende indstillinger for tid og dato
Upon first power-on or after a power interruption, you may need to set the time and date.
- Adgang til indstillinger: Locate the 'SET' button (usually on the back or top). Press and hold it for a few seconds until the display flashes.
- Setting Time Format (12H/24H): While the time is flashing, use the 'UP' or 'DOWN' buttons to switch between 12-hour and 24-hour formats. Press 'SET' to confirm.
- Setting Hour: The hour digit will flash. Use 'UP' or 'DOWN' to adjust the hour. Press 'SET' to confirm.
- Setting Minute: The minute digit will flash. Use 'UP' or 'DOWN' to adjust the minute. Press 'SET' to confirm.
- Setting Year, Month, Day: Follow similar steps to set the current year, month, and day. Press 'SET' after each adjustment.
- Indstilling af temperaturenhed: After setting the date, the temperature unit (℃/℉) may flash. Use 'UP' or 'DOWN' to select your preferred unit. Press 'SET' to exit settings.
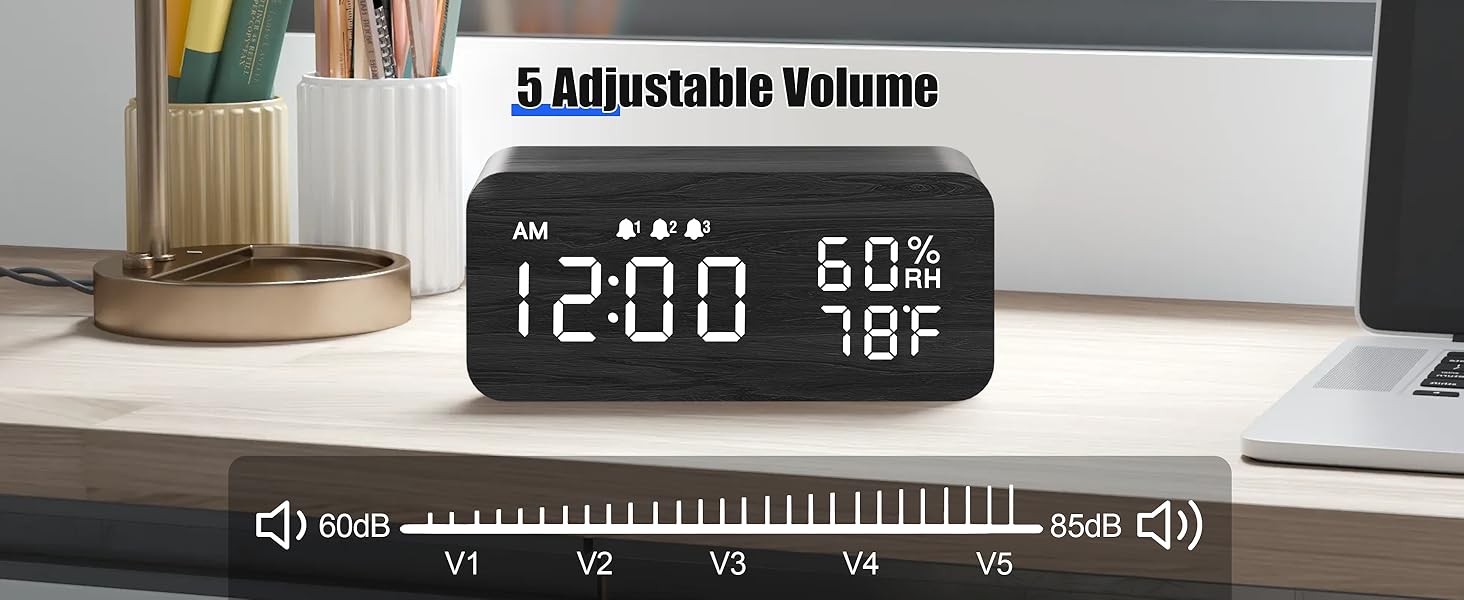
Image: The alarm clock showing both 12-hour (PM 3:00) and 24-hour (15:00) time formats, demonstrating the switchable display option.
2. Betjeningsvejledning
2.1 Justering af displayets lysstyrke
The clock features adjustable brightness levels to suit your environment.
- In normal time display mode, press the 'UP' or 'DOWN' button (or a dedicated brightness button if available) to cycle through the brightness levels.
- There are typically multiple levels, from very dim (L1) to brightest (L6), allowing for comfortable viewdag eller nat.

Image: A visual representation of the alarm clock's six adjustable brightness levels, ranging from dim (L1) to bright (L6), suitable for various lighting conditions.
2.2 Setting Alarms (AL1, AL2, AL3)
The clock supports up to three independent alarms with customizable modes.
- Adgang til alarmindstillinger: Press the 'ALARM' button (or 'SET' button repeatedly until 'AL1' appears).
- Indstilling af alarmtidspunkt: When 'AL1' flashes, press and hold 'SET'. The hour will flash. Use 'UP' or 'DOWN' to adjust, then 'SET' to confirm. Repeat for minutes.
- Setting Alarm Mode: After setting the time, the alarm mode will flash (e.g., 'MON-SUN', 'MON-FRI', 'SAT-SUN'). Use 'UP' or 'DOWN' to select the desired mode. Press 'SET' to confirm.
- Aktivering/deaktivering af alarm: In normal time display, press the 'ALARM' button to cycle through AL1, AL2, AL3. Press 'UP' or 'DOWN' when an alarm is displayed to turn it ON or OFF. An alarm icon will appear on the display when active.
- Repeat steps for AL2 and AL3 as needed.

Image: The alarm clock displaying three distinct alarm settings, each configurable for 'Everyday', 'Weekday', or 'Weekend' operation, allowing for flexible scheduling.
2.3 Snooze -funktion
When an alarm sounds, you can temporarily silence it using the snooze function.
- When the alarm rings, press any button (except the 'OFF' button, if present) to activate snooze.
- Alarmen vil holde pause i cirka 9 minutter og derefter lyde igen.
- To turn off the alarm completely, press the designated 'OFF' button or follow the instructions in the manual for your specific model.

Image: A person reaching to press the top of the JALL alarm clock to activate the 9-minute snooze function, with the time set to 7:00 AM.
2.4 Trådløs opladningsfunktion
The top surface of the alarm clock features a wireless charging pad compatible with most Qi-enabled smartphones.
- Sørg for, at vækkeuret er tændt.
- Place your Qi-enabled smartphone directly onto the center of the charging pad on top of the clock.
- The phone's display should indicate that charging has begun. If not, slightly adjust the phone's position.
- Remove any thick cases or metallic objects from your phone that may interfere with wireless charging.

Image: A smartphone placed on top of the JALL alarm clock, actively displaying a charging icon, demonstrating the wireless charging capability.

Image: An illustration showing the JALL alarm clock's universal compatibility with various smartphone models for wireless charging, including iPhones and Samsung Galaxy devices.
2.5 Justering af alarmlydstyrke
The alarm volume can be adjusted to your preference.
- In normal time display mode, press the 'VOLUME' button (or a combination of 'SET' and 'UP'/'DOWN' if no dedicated button) to enter volume adjustment mode.
- Use the 'UP' or 'DOWN' buttons to increase or decrease the alarm volume.
- Confirm your selection by pressing 'SET' or waiting a few seconds for the setting to save automatically.

Image: The alarm clock displaying a volume bar with five distinct levels (V1 to V5), indicating the range of adjustable alarm sound intensity from 60dB to 85dB.
3. Vedligeholdelse
3.1 Rengøring
- Before cleaning, disconnect the power cable.
- Wipe the surface of the clock with a soft, dry, or slightly damp klæde.
- Brug ikke slibende rengøringsmidler, opløsningsmidler eller kemiske spraymidler, da disse kan beskadige overfladen.
- Sørg for, at der ikke kommer væske ind i enhedens åbninger.
3.2 Opbevaring
- Hvis enheden opbevares i længere tid, skal den afbrydes fra strømmen.
- Opbevares på et køligt, tørt sted, væk fra direkte sollys og ekstreme temperaturer.
4. Fejlfinding
4.1 Almindelige problemer og løsninger
| Spørgsmål | Mulig årsag | Løsning |
|---|---|---|
| Clock not powering on / Display is blank. | Ingen strømforbindelse eller defekt kabel/adapter. | Ensure the USB cable is securely connected to both the clock and a working power source. Try a different USB adapter or port. |
| Skærmen er for svag eller for lys. | Brightness level is set incorrectly. | Adjust the display brightness using the 'UP' or 'DOWN' buttons as described in Section 2.1. |
| Alarmen lyder ikke. | Alarm is not activated, volume is too low, or incorrect alarm mode. | Verify the alarm is turned ON (check for alarm icon). Increase alarm volume (Section 2.5). Ensure the alarm mode (Weekday/Weekend/Everyday) is set correctly for the current day (Section 2.2). |
| Trådløs opladning virker ikke. | Phone not positioned correctly, phone case interference, or phone not Qi-enabled. | Reposition the phone centrally on the charging pad. Remove thick phone cases or metallic objects. Confirm your phone supports Qi wireless charging. Ensure the clock is powered on. |
| Clock losing time. | Internal clock drift or power interruptions. | Reset the time as per Section 1.3. Ensure a stable power supply. If the issue persists, contact customer support. |
5. Specifikationer
| Feature | Detalje |
|---|---|
| Mærke | JALL |
| Modelnummer | WX18039 |
| Display Type | Digital LED |
| Materiale | Træ |
| Strømkilde | Corded Electric (USB DC 5V) |
| Batteridrift | Ikke understøttet |
| Vækkeure | 3 Independent Alarms |
| Særlige funktioner | Wireless Charging, Dimmable Display, Adjustable Volume, Snooze, Temperature Display, Humidity Display |
| Varens vægt | 9.9 ounces (0.62 pund) |
| Pakkedimensioner | 7.24 x 3.46 x 3.23 tommer |
6. Garanti og support
6.1 Produktgaranti
JALL products are manufactured with quality and performance in mind. This product comes with a standard manufacturer's warranty against defects in materials and workmanship under normal use. Please refer to the product packaging or the official JALL webwebstedet for specifikke garantivilkår og varighed.
6.2 Kundesupport
If you encounter any issues or have questions regarding your JALL Wooden Digital Alarm Clock, please contact JALL customer support. For the most up-to-date contact information, visit the official JALL webwebstedet eller se din købsdokumentation.
Note: Please have your model number (WX18039) and purchase details ready when contacting support.


