1. Introduktion
This manual provides detailed instructions for the operation and maintenance of your Jensen CR-100 Portable AM/FM Radio Cassette Player/Recorder. Please read this manual thoroughly before using the unit to ensure proper function and to maximize your listening experience. Keep this manual for future reference.
2. Sikkerhedsoplysninger
- Udsæt ikke enheden for ekstreme temperaturer, fugtighed eller direkte sollys.
- Undgå at tabe enheden eller udsætte den for kraftige stød.
- Forsøg ikke at skille enheden ad eller ændre den. Overlad al service til kvalificeret personale.
- Rengør enheden med en blød, tør klud. Brug ikke slibende rengøringsmidler eller opløsningsmidler.
- Fjern batterierne, hvis enheden ikke skal bruges i længere tid, for at forhindre lækage.
- Bortskaf batterier korrekt i henhold til lokale regler.
3. Pakkens indhold
Kontroller venligst, at følgende varer er inkluderet i din pakke:
- Jensen CR-100 Portable AM/FM Radio Cassette Player/Recorder
- Instruktionsbog
4. Produktet er slutview
Familiarize yourself with the various parts and controls of your Jensen CR-100 unit.

Figur 4.1: Forside View. This image displays the front of the Jensen CR-100, featuring the cassette window, built-in speaker, AM/FM frequency dial, and the telescopic antenna extended upwards. The Jensen logo is visible above the cassette window.

Figure 4.2: Side Controls. Denne view highlights the left side of the unit, showing the volume control dial, microphone input, and the cassette control buttons including REC (Record) and PLAY.

Figure 4.3: Cassette Compartment Open. The image shows the unit with its cassette compartment door open, providing a clear view of the tape playback and recording mechanism inside.

Figure 4.4: Top/Side Ports. This perspective illustrates the top and right side of the unit, displaying the headphone jack, external microphone jack, tuning dial, and the AM/FM band selector switch.
5. Opsætning
5.1 Strømforsyning til enheden
The Jensen CR-100 can be powered by either batteries or an AC adapter (not included).
Installation af batteri
- Find batteridækslet på bagsiden af enheden.
- Skub dækslet åbent.
- Insert two (2) 'AA' (UM3) batteries, observing the correct polarity (+ and -) as indicated inside the compartment.
- Luk batterirummets dæksel forsvarligt.
Note: Batteries are not included. Remove batteries when the unit is not in use for extended periods to prevent leakage and damage.
AC Adapter (Not Included)
To operate the unit using an AC adapter, plug a compatible AC adapter (DC 3V, 300mA, center positive) into the DC IN jack on the unit. Plug the other end of the adapter into a standard AC wall outlet. Using an AC adapter will conserve battery life.
6. Betjeningsvejledning
6.1 AM/FM-radiobetjening
- Slide the function switch to the 'RADIO' position.
- Select the desired band (AM or FM) using the AM/FM selector switch.
- Extend the telescopic antenna for optimal FM reception. For AM reception, rotate the unit for best signal.
- Rotate the 'TUNING' dial to select your desired radio station.
- Adjust the 'VOLUME' control to your preferred listening level.
- To turn off the radio, slide the function switch to the 'OFF' position.
6.2 Kassetteafspilning
- Slide the function switch to the 'TAPE' position.
- Press the 'STOP/EJECT' button to open the cassette compartment door.
- Insert a cassette tape with the exposed tape facing upwards.
- Close the cassette compartment door firmly.
- Press the 'PLAY' button to begin playback.
- Adjust the 'VOLUME' control to your preferred listening level.
- To fast forward, press the 'F.FWD' button. To rewind, press the 'REW' button. Press 'STOP/EJECT' to stop fast forwarding or rewinding.
- To stop playback, press the 'STOP/EJECT' button.
- To listen privately, plug headphones into the headphone jack. The built-in speaker will automatically mute.
6.3 Cassette Recording
The unit allows recording from the built-in microphone or from the AM/FM radio.
Recording from Built-in Microphone
- Insert a blank cassette tape into the compartment as described in Section 6.2.
- Slide the function switch to the 'TAPE' position.
- Press the 'REC' (Record) button. The 'PLAY' button will also engage simultaneously.
- Speak clearly into the built-in microphone located on the unit.
- To stop recording, press the 'STOP/EJECT' button.
Recording from AM/FM Radio
- Insert a blank cassette tape into the compartment.
- Tune to your desired AM or FM radio station as described in Section 6.1.
- Slide the function switch to the 'RADIO' position.
- Press the 'REC' (Record) button. The 'PLAY' button will also engage simultaneously, and the radio broadcast will be recorded onto the tape.
- To stop recording, press the 'STOP/EJECT' button.
7. Vedligeholdelse
7.1 Rengøring af enheden
Tør enhedens yderside af med en blød, let fugtig klud.amp cloth. Do not use harsh chemicals or abrasive cleaners, as they may damage the finish.
7.2 Cleaning the Tape Heads
Periodically clean the tape heads, capstan, and pinch roller to ensure optimal sound quality and prevent tape damage. Use a cotton swab lightly moistened with isopropyl alcohol. Gently wipe the surfaces and allow them to dry completely before inserting a tape.
7.3 Pleje af batterier
Always use fresh batteries of the recommended type. Do not mix old and new batteries or different types of batteries. Remove batteries if the unit is not used for a long period to prevent corrosion.
8. Fejlfinding
| Problem | Mulig årsag | Løsning |
|---|---|---|
| Ingen strøm | Batterierne er døde eller isat forkert; AC-adapteren er ikke tilsluttet eller defekt. | Replace batteries, check polarity; ensure AC adapter is securely connected and functional. |
| Dårlig radiomodtagelse | Antenna not extended; unit position; interference. | Extend telescopic antenna; rotate unit for better AM reception; move away from electronic devices causing interference. |
| Cassette tape not playing/poor sound | Tape heads are dirty; tape is damaged; incorrect function mode. | Clean tape heads (see Section 7.2); try a different tape; ensure function switch is in 'TAPE' position. |
| Optagelse virker ikke | Tape is write-protected; microphone not close enough; incorrect function mode. | Check tape for write-protect tab; speak closer to the microphone; ensure 'REC' button is fully pressed. |
9. Specifikationer
| Feature | Specifikation |
|---|---|
| Mærke | Jensen |
| Modelnummer | CR-100SB |
| Produktmål (L x B x H) | 4.02 x 1.89 x 5.35 tommer |
| Varens vægt | 8.4 ounce |
| Strømkilde | Battery Powered (2 x 'AA' UM3, not included) or AC Adapter (not included) |
| Radiobånd understøttet | AM, FM |
| Særlige funktioner | Lightweight, Portable, Built-in Microphone, Built-in Speaker, Headphone Jack |
| Forbindelsesteknologi | Auxiliary, USB (Note: USB functionality for power only, not data transfer) |
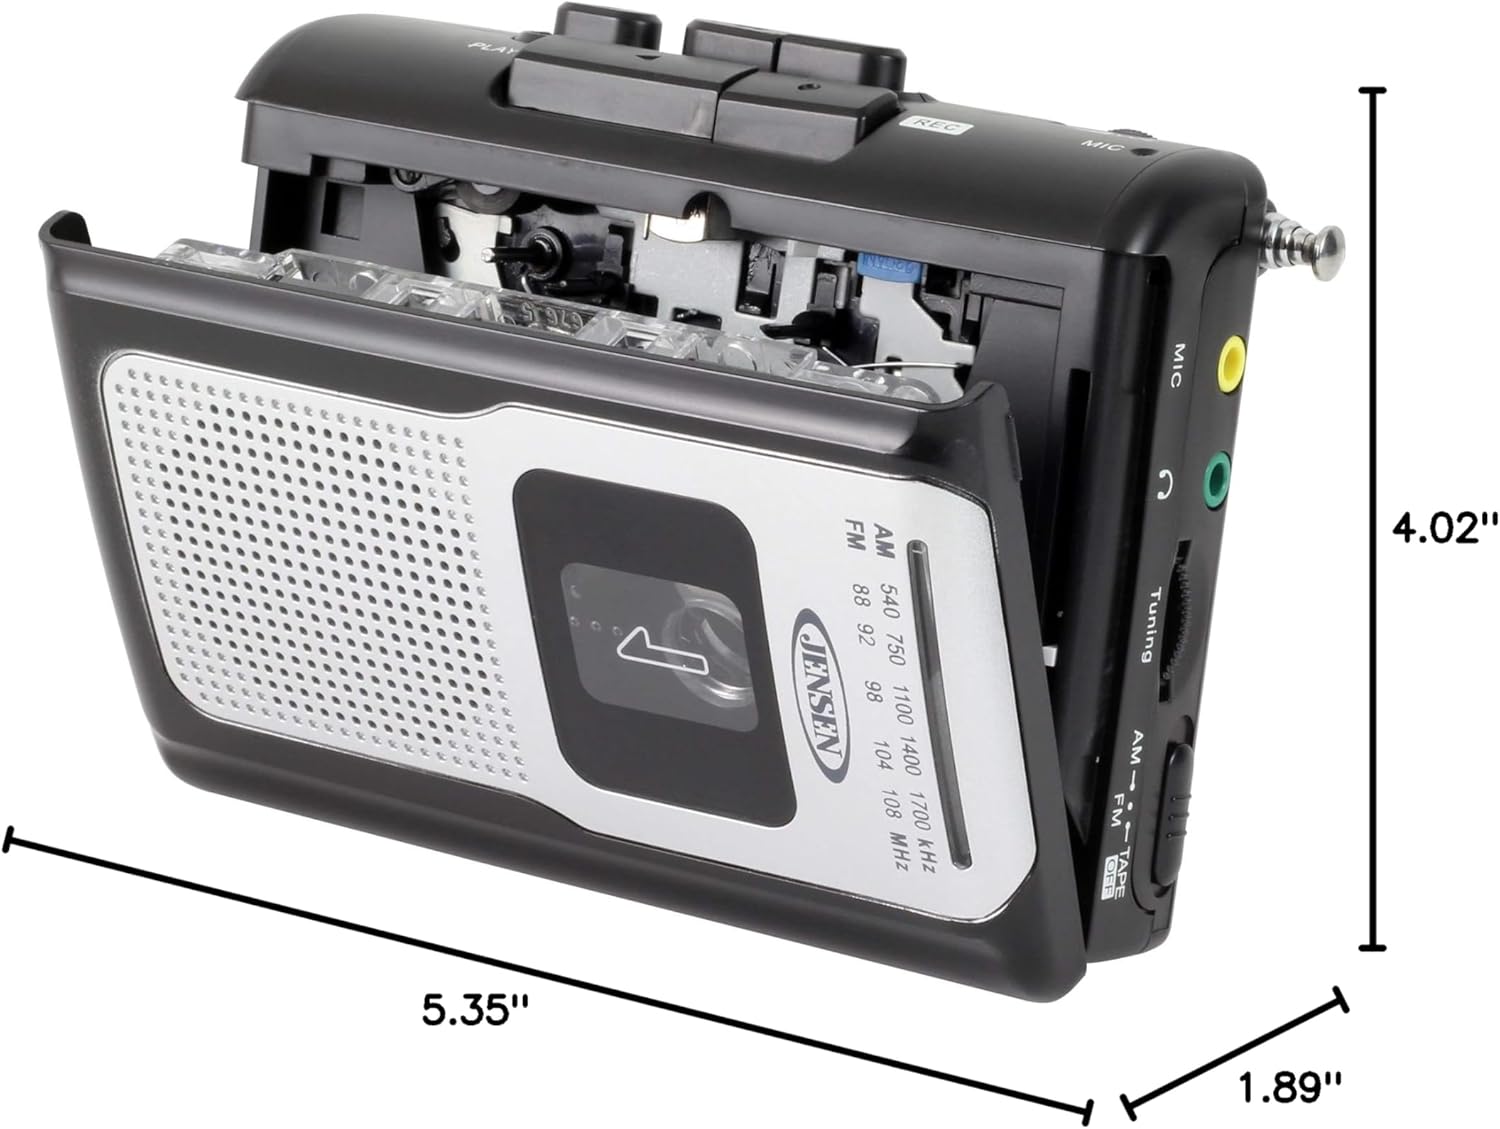
Figur 9.1: Produktmål. This diagram illustrates the physical dimensions of the Jensen CR-100 unit.
10. Garanti og support
Jensen products are designed and manufactured to the highest quality standards. For specific warranty information and customer support, please refer to the warranty card included with your purchase or visit the official Jensen webwebsted. Gem din købsbevis til garantikrav.
For technical assistance or service inquiries, please contact Jensen customer support through their official channels.


