1. Introduktion
The ATS BBPhotoPhone is an amplified speakerphone designed for ease of use, featuring large buttons and photo memory keys. It functions as a standalone telephone or as a dialer for an existing landline. This manual provides instructions for setup, operation, maintenance, and troubleshooting to ensure optimal performance of your device.
2. Produktfunktioner
- 10 Memory Picture Keys: Allows for one or two-touch dialing using custom photos.
- 2-Way High-Level Speakerphone: Integrated speakerphone for hands-free communication.
- Speakerphone Volume Control: Slide control to adjust speakerphone audio level.
- Normal/One Touch Dialing Mode: Toggle switch to select preferred dialing method.
- Ringer Volume Switch: Adjustable ringer volume (Off, Low, High).
- Bright LED Indicators: Visual alerts for incoming calls (ringer LED) and in-use status.
- Phone Jack Powered: Operates without batteries or an AC adapter.
- Hukommelse backup: All programmed memories are retained.
- Nøglefunktioner: Includes Memory key, Redial/Pause key, Speakerphone key, and Music on Hold/Mute.
- Vægmonterbar: Designed for flexible placement.
- Automatic Hang-Up: Unit automatically disconnects on most lines after the other party hangs up.

Figur 2.1: Forside view of the ATS BBPhotoPhone, showcasing the large, customizable photo memory buttons and main control keys.
3. Opsætning
3.1 Tilslutning af telefonen
- Locate a standard telephone wall jack in your home or office.
- Connect one end of the provided telephone line cord to the 'LINE' jack on the back of the BBPhotoPhone.
- Connect the other end of the telephone line cord to the wall jack.
- If connecting another phone to the same line, use the 'PHONE' jack on the BBPhotoPhone to connect the additional telephone.
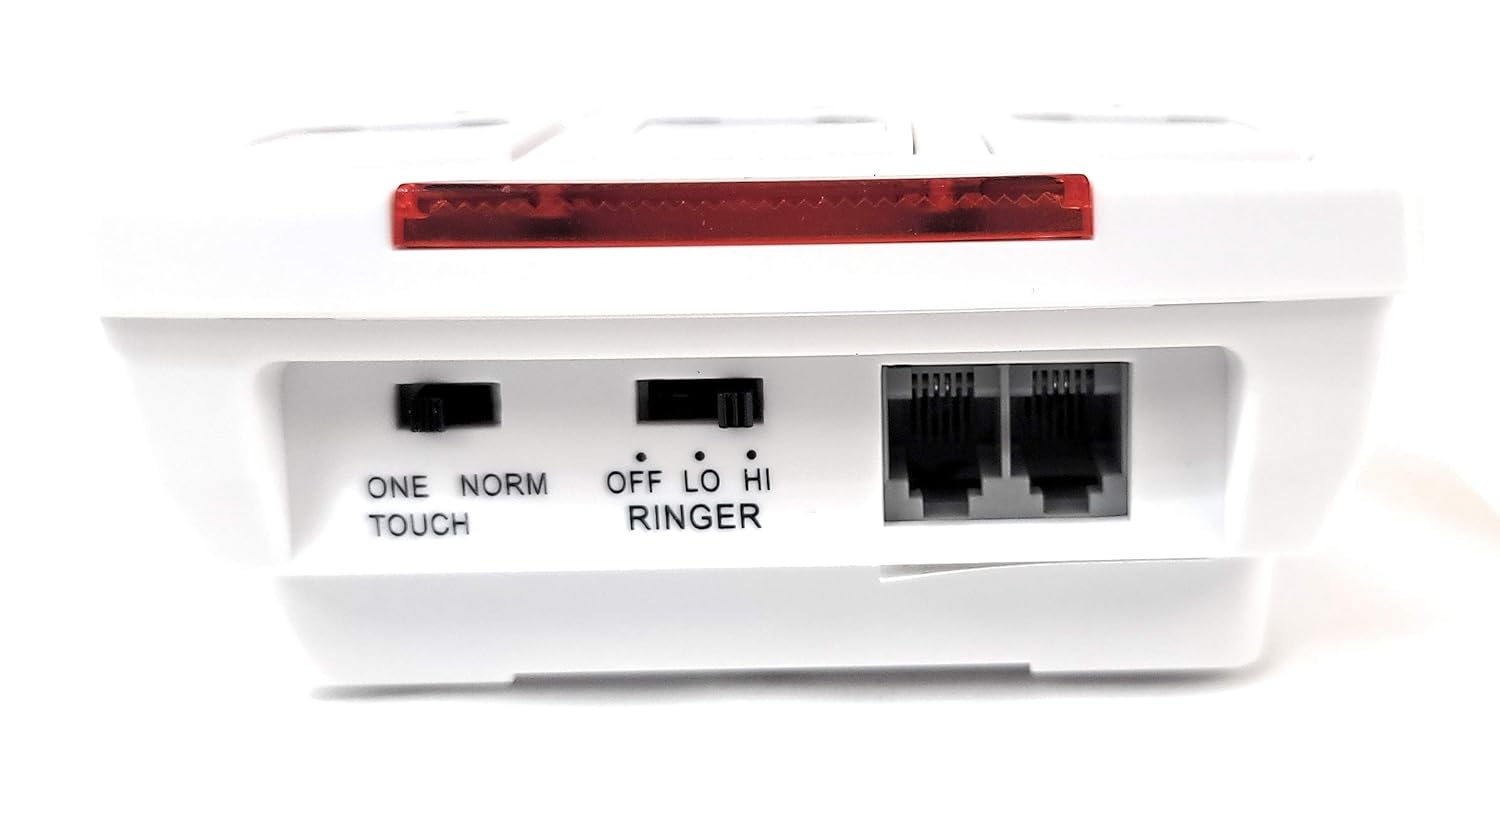
Figur 3.1: Bagside view of the BBPhotoPhone, illustrating the telephone line input ('LINE'), auxiliary phone output ('PHONE'), and the 'ONE TOUCH/NORM' and 'RINGER' switches.
3.2 Inserting Photos into Memory Keys
The 10 memory keys are designed to hold small photos for easy visual identification of contacts. To insert a photo:
- Gently lift the clear plastic cover on each memory button.
- Insert a trimmed photo of the contact into the designated slot.
- Replace the clear plastic cover securely.
3.3 Vægmontering (valgfrit)
The BBPhotoPhone can be wall-mounted for convenience. Use the integrated mounting holes on the back of the unit to secure it to a wall using appropriate screws (not included).

Figur 3.2: Nederst view of the BBPhotoPhone, highlighting the wall mounting slots and speaker grille.
4. Betjeningsvejledning
4.1 Dialing Modes
The BBPhotoPhone offers two dialing modes, selectable via the 'ONE TOUCH/NORM' switch on the back of the unit:
- One Touch Mode: Ideal for users who prefer simplified dialing. Pressing a photo memory key will automatically dial the stored number.
- Normal tilstand: For standard dialing. Pressing a photo memory key will display the number, requiring a subsequent press of the 'SPEAKER' button or lifting a connected handset to dial.
4.2 Programming Memory Keys
To program a phone number into a photo memory key:
- Tryk på HUKOMMELSE button. The 'IN USE' LED may illuminate.
- Dial the phone number you wish to store (up to 16 digits).
- Press the desired photo memory key (0-9) to save the number.
- The number is now stored. Repeat for other memory keys.
4.3 Foretage et opkald
- Using Photo Memory Keys:
- In One Touch Mode: Simply press the desired photo memory key.
- In Normal Mode: Press the desired photo memory key, then press the HØJTTALER button or lift the handset of a connected phone.
- Manual Dialing: Tryk på HØJTTALER button, wait for a dial tone, then dial the number using the numeric keypad.
- Genopkald: Tryk på GENOPKALD/P knappen for at genopkalde det sidst kaldte nummer.
4.4 Brug af højttalertelefonen
To use the speakerphone function:
- Under et opkald skal du trykke på HØJTTALER button. The 'IN USE' LED will illuminate.
- Adjust the speaker volume using the slide control on the side of the unit.

Figur 4.1: Side view of the BBPhotoPhone, indicating the location of the speaker volume slide control.
4.5 Mute and Hold Function
Tryk på HOLD/MUTE button during a call to place the call on hold. Music will play for the caller. Press again to resume the conversation.
4.6 Justering af ringelydstyrke
Use the 'RINGER' switch on the back of the unit to select the desired ringer volume: Off, Low, or High.
5. Vedligeholdelse
To ensure the longevity and proper functioning of your BBPhotoPhone, follow these simple maintenance guidelines:
- Rensning: Wipe the unit with a soft, dry cloth. Avoid using liquid cleaners, aerosols, or harsh chemicals, as these can damage the surface or internal components.
- Miljø: Keep the phone in a dry environment, away from direct sunlight, excessive heat, or moisture.
- Håndtering: Håndter enheden forsigtigt. Undgå at tabe den eller udsætte den for hårde stød.
6. Fejlfinding
If you encounter issues with your BBPhotoPhone, please refer to the following common problems and solutions:
| Problem | Mulig årsag | Løsning |
|---|---|---|
| No dial tone or power. | Telefonlinjen er ikke korrekt tilsluttet. | Ensure the telephone line cord is securely plugged into both the wall jack and the 'LINE' jack on the phone. |
| Cannot hear caller on speakerphone. | Speaker volume is too low or muted. | Adjust the speaker volume slide control to a higher level. Ensure the 'HOLD/MUTE' button is not active. |
| Ringer does not sound. | Ringer switch is set to 'OFF'. | Set the 'RINGER' switch on the back of the unit to 'LOW' or 'HIGH'. |
| Memory keys are not dialing correctly. | Number not programmed or incorrect dialing mode. | Reprogram the memory key (Section 4.2). Verify the 'ONE TOUCH/NORM' switch is set to the desired mode. |
7. Specifikationer
| Feature | Specifikation |
|---|---|
| Mærke | ATS |
| Model | BBPhotoPhone |
| Dimensioner (pakke) | 19.71 x 12.5 x 5.89 cm |
| Varens vægt | 372 g |
| Strømkilde | Phone Jack Powered |
| Display Type | LED |
| Primary Interface | Knapper |
| Materiale | Acrylonitril Butadien Styren (ABS) |
| Monteringstype | Vægmontering |
| Farve | Råhvid |
| Telefontype | ledning |
8. Garanti og support
For warranty information or technical support, please refer to the documentation provided with your purchase or contact Assistive Technology Services directly. Keep your purchase receipt as proof of purchase.


