1. Introduktion
This manual provides essential information for the safe and efficient installation, operation, and maintenance of your Mi-Heat Electric Heating Mat. Please read these instructions carefully before beginning installation and retain them for future reference. This electric heating mat is designed to provide comfortable underfloor heating for various indoor spaces.

Image 1.1: Mi-Heat Electric Heating Mat Kit. This image shows the complete kit including the rolled heating mat, connection cables, empty conduits, and a bottle of primer.
2. Sikkerhedsinstruktioner
WARNING: Electrical installation should only be performed by a qualified electrician in accordance with local regulations and standards.
- Afbryd altid strømmen før installation eller vedligeholdelse.
- Do not cut or shorten the heating cable itself. Only the mesh backing can be cut.
- Ensure the heating mat is not overlapped or installed over itself, as this can lead to overheating.
- Protect the heating cable from mechanical damage during and after installation.
- The heating mat must be controlled by a thermostat with an external floor sensor to prevent overheating and ensure efficient operation.
- Do not install the heating mat under fixed furniture without legs (e.g., kitchen cabinets, bathtubs) where heat dissipation would be restricted.
- Sørg for korrekt jordforbindelse af systemet.
- The mat is suitable for wet rooms, but all electrical connections must be waterproofed and installed according to relevant safety standards.
3. Produktet er slutview og komponenter
The Mi-Heat Electric Heating Mat is a high-quality, self-adhesive underfloor heating solution designed for quick and easy installation. It provides 160 W/m² of heating power for rapid and consistent warmth.
3.1. Nøglefunktioner
- Strømudgang: 160 W/m² for efficient heating.
- Voltage: 230 volt.
- Kabeltype: Twin conductor technology for reduced electromagnetic fields and unilateral connection.
- Mat Thickness: Approximately 4 mm, allowing for minimal floor height increase.
- Conductor Spacing: Approximately 90 mm for even heat distribution.
- Installation: Self-adhesive mesh backing for easy placement.
- Holdbarhed: High-quality, durable heating conductor.
- Alsidighed: Suitable for installation under various floor coverings including tiles, marble, carpet, parquet, laminate, and vinyl. Can be used in wet rooms.
3.2. Pakkens indhold
- Mi-Heat Electric Heating Mat (7.0 m²).
- Connection Cable (3 meters).
- 2 Empty Conduits (for floor sensor and power cable routing).
- Installation Instructions (this manual).

Image 3.1: Key specifications of the Mi-Heat heating mat, including 3m connection cable, Twin technology, self-adhesive fiberglass fabric, 160W/m² power at 230V, and 50cm mat width.

Image 3.2: Diagram illustrating the Twin Technology cable structure, showing the outer insulation, protection conductor, inner insulation, and the Twin heating conductors. This design minimizes electrical radiation.
4. Opsætning og installation
Careful planning and execution are crucial for optimal performance and longevity of your heating mat. Ensure the subfloor is clean, dry, and level before installation.
4.1. Planning the Layout
- Measure the area to be heated. The heating mat should cover approximately 80-90% of the free floor space.
- Avoid installing the mat under permanent fixtures like kitchen units, bathtubs, or heavy furniture that do not have legs, as this can lead to heat build-up and damage.
- Plan the route for the cold lead (connection cable) to the thermostat location.
- Determine the placement of the floor sensor within one of the empty conduits, ideally centered between two heating cables.
4.2. Forberedelse af undergulv
- The subfloor (e.g., screed) must be stable, clean, dry, and free of dust and grease.
- Apply a suitable primer to the subfloor if recommended by the adhesive or leveling compound manufacturer.
4.3. Laying the Heating Mat
- Begin laying the mat from the thermostat connection point.
- Unroll the mat, pressing the self-adhesive backing firmly onto the prepared subfloor.
- To change direction or fit the mat around obstacles, cut only the mesh backing, not the heating cable. You can then turn the mat and continue laying.
- Ensure the heating cables are evenly spaced and do not overlap. The distance between heating conductors is approximately 90 mm.
- Use the provided empty conduits to route the cold lead to the thermostat and to house the floor sensor. The sensor should be placed centrally between two heating cables to accurately measure the floor temperature.

Image 4.1: Illustration of various laying options for the heating mat. This includes repositioning by rotating 180 degrees, angular reinforcement by cutting the mesh and folding 90 degrees, and creating individual shapes. A critical warning indicates that the heating mat must not be shortened.
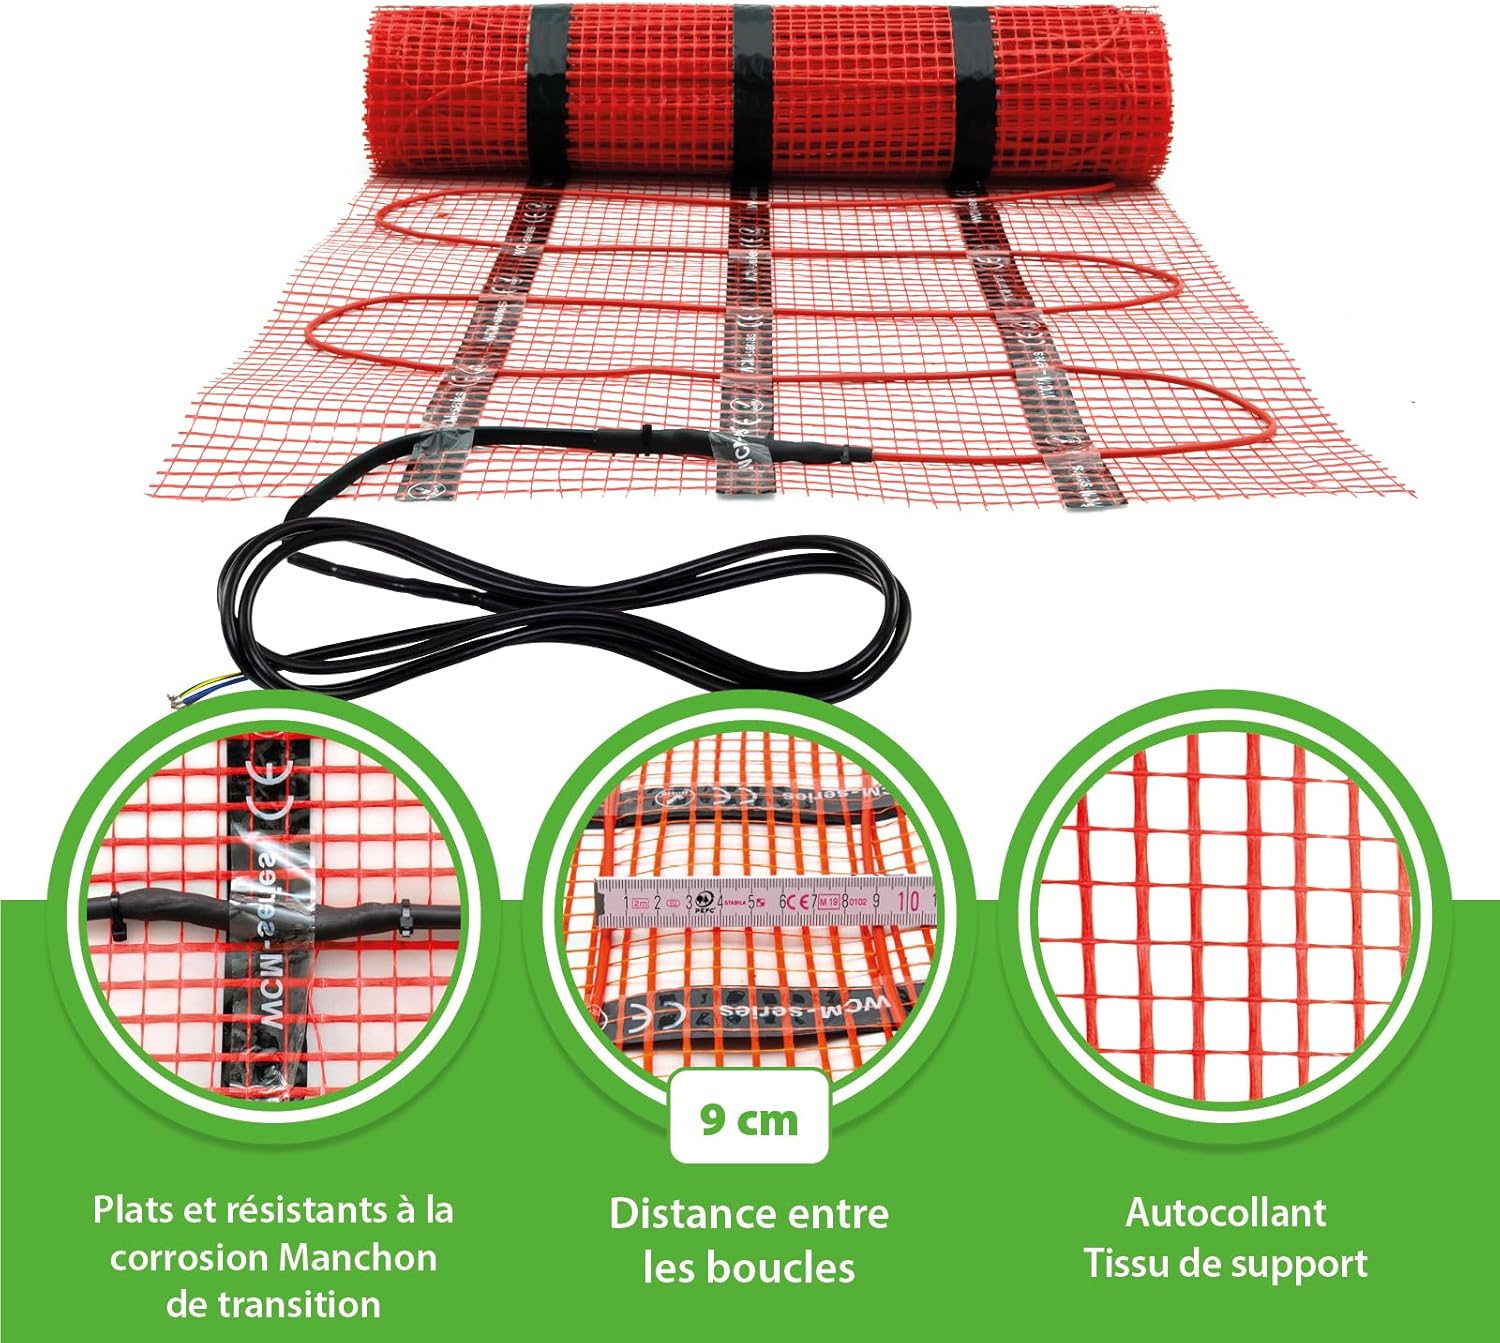
Billede 4.2: Nærbillede view of the heating mat showing the flat and corrosion-resistant transition sleeve, the 9 cm (approx. 90 mm) distance between heating loops, and the self-adhesive support fabric.
4.4. Elektrisk tilslutning
The electrical connection must be carried out by a certified electrician.
- Connect the cold lead of the heating mat to a suitable thermostat.
- Install the floor sensor into one of the empty conduits and place it between two heating cables, ensuring it does not touch the heating cable itself.
- Sørg for, at alle forbindelser er sikre og korrekt isolerede.
- Vigtig: Never connect heating mats in series. If multiple mats are used, they must be connected in parallel to the thermostat, provided the thermostat can handle the total load.

Image 4.3: Simplified wiring diagram showing how to connect two heating mats in parallel to a thermostat. The diagram illustrates connections for Live (L), Neutral (N), and Protective Earth (PE) for both heating mats and the main power supply, along with the thermostat and floor sensor.
4.5. Covering the Heating Mat
Once the mat is laid and tested, it must be covered with a suitable floor covering material.
- For tiles, granite, or ceramic, apply a flexible tile adhesive directly over the heating mat, ensuring full coverage and no air pockets.
- For other floor coverings like parquet, laminate, or vinyl, the mat should first be embedded in a self-leveling compound.
- Allow sufficient drying time for adhesives and leveling compounds before installing the final floor covering or operating the heating system.

Image 4.4: Cross-section diagram illustrating the layers of an underfloor heating installation: the subfloor, the Mi-Heat heating mat, tile adhesive, and the final floor covering (tiles/granite/ceramic).

Billede 4.5: Eks.amples of compatible floor coverings for the Mi-Heat heating mat, including ceramic, marble, granite, natural stone, laminate, parquet, vinyl, carpet, and PVC. The image distinguishes between installation with tile adhesive and installation within a leveling compound.
5. Betjeningsvejledning
The Mi-Heat Electric Heating Mat requires a compatible thermostat with an external floor sensor for operation. The thermostat (not included in this kit) allows you to control the floor temperature and set heating schedules.
- Ensure the floor covering material has fully cured before operating the heating system for the first time. Refer to the adhesive/leveling compound manufacturer's instructions for curing times.
- Consult the instruction manual of your specific thermostat for detailed operating procedures, programming, and temperature settings.
- The external floor sensor ensures that the floor temperature does not exceed the set limit, protecting both the heating mat and the floor covering.
- For optimal energy efficiency, program your thermostat to heat only when needed, or use setback temperatures during unoccupied periods.

Billede 5.1: Eks.ample of a compatible thermostat (not included) that would be used to control the Mi-Heat heating mat.
6. Vedligeholdelse
The Mi-Heat Electric Heating Mat is designed to be maintenance-free once properly installed. However, general care of your floor and heating system is recommended.
- Regularly clean your floor covering according to its manufacturer's recommendations.
- Avoid placing heavy, non-legged furniture directly over heated areas, as this can impede heat dissipation and potentially damage the heating system or floor covering.
- If you notice any issues with the heating performance, refer to the troubleshooting section or contact a qualified electrician.
7. Fejlfinding
If your Mi-Heat Electric Heating Mat is not functioning as expected, consider the following common issues:
| Problem | Mulig årsag | Løsning |
|---|---|---|
| No heat from the mat. |
|
|
| Ujævn opvarmning. |
|
|
| Thermostat error message. |
|
|
For issues not listed here or if troubleshooting steps do not resolve the problem, please contact a qualified electrician or the product manufacturer for assistance.
8. Tekniske specifikationer
| Feature | Specifikation |
|---|---|
| Mærke | Mi-Heat |
| Modelnummer | HM-ECO-160W-7.0 (Reference: 1273-010) |
| Varmeområde | 7.0 m² |
| Strømudgang | 160 W/m² (Total: 1120 W for 7.0 m²) |
| Voltage | 230 Volt AC |
| Ampslette | 1.43 A (for 160 W/m² at 230V) |
| Mat Thickness | Ca. 4 mm |
| Heating Conductor Spacing | Ca. 90 mm |
| Særlige funktioner | Waterproof, Electric, Twin Technology |
| Fabrikant | infrarød-fussboden-de |
9. Garanti og support
For garantioplysninger henvises til de vilkår og betingelser, der blev oplyst på købstidspunktet, eller kontakt din forhandler. Gem din købsbevis i tilfælde af garantikrav.
For technical support or further assistance, please contact the manufacturer, infrarot-fussboden-de, or your authorized dealer.


